Scher-Khan Logicar 2 (Sherkhan Logicar 2) – car alarm system of the budget segment from the Russian one. Despite the fact that the model was discontinued from mass production in 2008, it is in demand among car enthusiasts on the market.
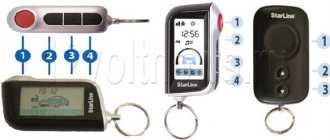
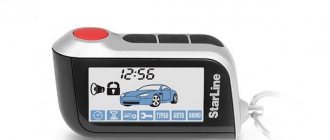
Keychain Scher-Khan Logicar 2
In addition, representatives still provide free consultations on installation, maintenance, and alarm prevention.
Scher-Khan Magicar II is also a budget model, but with a shorter range, only 800 meters.
Both modifications are installed on cars, minivans, and SUVs. Classic connection type: relay, twisted pair, limit switches. Control method: key fob, remotely.
Characteristics of Scher-Khan Logicar 2 and Scher-Khan Magicar 2
| Scher-Khan Logicar 2 | Sher-Khan Magicar 2 | Description |
| Up to 800 meters | Up to 1500 meters | Signal range |
| Yes | Yes | Pulse interception protection |
| Yes | No | Dynamic (changeable) code for disarming |
| Yes | Yes | Two-factor authentication |
| Yes | Yes | Panic Mode |
| Yes | Yes | Remote start/stop capability |
| Yes | Yes | Work on engines with gasoline and diesel power systems |
| Yes | Yes | Programmable automatic start |
| Yes | Yes | Engine start by timer |
| Yes | Yes | Liquid crystal display, four function buttons |
| Yes | Yes | Functional programming from the key fob |
| No | Yes | Sound and vibration confirmation of activation and command execution |
| No | Yes | Control of a second vehicle, provided it is connected |
| Yes | Yes | Engine operating time recording |
| Yes | Yes | Feedback indication |
| Yes | Yes | Power Saving Mode |
User manual
Before starting work, you need to turn on the communication key fob:
- Pull back the cover latch located on the back of the case.
- Press the cover and slide it along the guides to the side.
- Remove the protective film from the contacts. The film may not be available when shipped from the factory.
- Replace the battery. Polarity must be observed during installation.
- Push the cover into place and fasten the latch.
Designations of buttons and symbols on the key fob
The communicator body has 4 buttons located at the end.
Button layout
Icons on the display
During operation, use a short (short) press for 0.5 seconds and a long (long) press for 2 seconds.
The purposes of the buttons are described in the table.
| Button | Press type | Purpose |
| K-I | cor. |
|
| K-I | duration | Panic and anti-robbery modes |
| K-II | cor. |
|
| K-II | duration |
|
| K-III | cor. | Turning on the screen backlight |
| K-III | duration |
|
| K-IV | cor. | Condition test |
| K-IV | duration | Additional channel 1 control |
| K-I+K-II | cor. | Siren control |
| K-I+K-II | duration | Controlling the second vehicle control mode function |
| K-I+K-III | cor. | Remote control of service mode |
| K-I+K-III | duration | Setting up key fob functions |
| K-I+K-IV | cor. | Controlling the operating modes of the shock sensor and additional sensor |
| K-I+K-IV | duration | Entering the first programming menu |
| K-II+K-III | cor. | Additional channel 2 control |
| K-II+K-IV | cor. | Autorun timer management |
| K-II+K-IV | duration | Entering the second programming menu |
| K-III+K-IV | cor. | Key lock control |
| K-III+K-IV | duration |
|
The display is color and has the ability to display the following icons:
- Signal of operation of the transceiver device. In standby mode, indicates the presence of communication between the key fob and the antenna module.
- Return signal level.
- Switching the security mode on and off.
- Passive activation of the security mode.
- A digital field used to display the time, alarm clock, temperature sensor readings and various service information.
- Turbo timer.
- Controlling the operation of door locks from the ignition switch.
- Pressing the brake pedal (based on a signal from the brake light switch).
- Autostart by timer.
- Autostart based on data from the temperature sensor.
- Using information about the voltage level in the on-board network during autostart.
- Running motor.
- Alarm.
- Battery charge status icon. Consists of three segments. Used to indicate battery charge saving mode.
- Indication of open lock and trunk lid.
- The limit switch of one of the doors was triggered, the door was open.
- Launch reservation.
- An alarm is triggered based on data from the shock sensor.
- Hood open indicator.
- Lights up when the siren is turned off.
- Indicates that the shock sensor is deactivated.
- Vibrate alert indicator.
- The mode of operation with a second vehicle is enabled.
Linking key fobs
The Logicar 3 system uses an algorithm for storing key fobs in memory without asking for a digital code:
- Disable security, turn the key in the ignition and press the setting key for 2 seconds.
- Wait for the emergency lights to flash and press the button again within five seconds. The emergency light will flash twice and the diode will light up continuously.
- Press the K-I key on the first remote control. The key fob will be recorded in memory, which is confirmed by a single flash of the “emergency light”.
- Enter the remaining remote controls into memory in the same way. After the memory is full, the emergency light will work twice and the programming mode will automatically exit.
When using a digital CAN bus, you must select the type of signal encoding. For this purpose, a contact module is located on the block, covered with a sliding casing. The module contains three jumpers connecting the pins in pairs. Removing the jumpers allows you to select the bus type using a computer. The connection is made with a cord installed in the miniUSB connector installed next to the contact module.
Function programming
Description of programmable settings of main menu No. 1:
- opening the trunk lock without disabling security (mode 1-1);
- ability to control door locks from the ignition switch (mode 1-2);
- setting the combination of buttons KI and K-II (mode 1-3);
- automatic arming (mode 1-4);
- automatic activation of the security mode upon accidental pressing (mode 1-5);
- turning on the lighting around the car using standard lighting devices (mode 1-6);
- setting the engine operating time in autostart mode (mode 1-7);
- the need to enter a digital code in case of emergency shutdown (mode 1-8);
- disabling security in two stages (mode 1-9);
- setting autorun repeat frequency (mode 1-10);
- limiting the number of restarts (mode 1-11);
- setting up automatic start reservation and activating the turbo timer (mode 1-12);
- selecting a method for ending the backup mode (mode 1-13);
- checking voltage parameters in the on-board network (used to start the engine and charge the battery (mode 1-14);
- starting the engine based on data from the temperature sensor (mode 1-15);
- triggering of an external light alarm during warning activation and autostart (mode 1-16);
- activation of the Slave mode (mode 1-17).
Work with the security complex begins with programming functions, which is performed using the control panel:
- Disable the security mode and, without turning on the ignition, simultaneously press the K-I and K-IV or K-II and K-IV or K-III and K-IV buttons for two seconds. Each combination allows you to enter a separate settings menu. Successful entry into the menu is confirmed by a single short sound and light signal.
- Select by pressing K-IV the number of the function included in the menu. The number of presses corresponds to the function number. With each short press on the K-IV, a siren and emergency signal will sound.
- Wait 3-5 seconds for the system to read the function number and status. The number will be confirmed by short beeps from the siren. The number of signals corresponds to the function number.
- Use the buttons to select the required value. The base value is set by short exposure to KI. The remaining three buttons are used to select additional values according to the setting tables. Depending on the button number, there is sound and light confirmation. The number of signals is equal to the button number. If there is a programming error, the sequence is repeated from the beginning.
- After completing the setup, wait 4 seconds for the system to exit the mode. Confirmation is a long siren signal.
If the setting is incorrect, it is possible to return the settings of menu No. 1 to the factory settings:
- With the ignition off, press K-I and K-IV simultaneously and enter the setup mode.
- Briefly press K-III three times. Each press is accompanied by a sound and a flash of the emergency light.
- Wait about 5 seconds for the settings to reset, which is confirmed by a triple flash and three beeps.
Menu parameters No. 2 and 3 are configured during system installation. Changing the settings yourself is not recommended, as it may cause the security system to operate incorrectly.
The LogiCar 2 and 3 systems have a “Pit Stop” function, which allows you to activate the vehicle’s security with the engine running, but without the key in the ignition. The function is activated through the settings menu.
To enable the mode you must:
- After stopping the car, move the gearbox selector to neutral (for manual transmission) or to “P” mode (for automatic transmission). Raise the parking brake lever and release the pedal.
- Press K-II for 2 seconds to turn on the mode. Immediately after this, the ignition support mode is activated, after which the key fob will sound two beeps. From this moment on, the mode operation timer starts.
- Turn off the ignition and remove the key. The motor will continue to operate in accordance with the programmed program.
- Get out of the car and turn on the security mode. The engine will continue to run, but the starter circuit will be blocked.
In Slave mode, the mode may not be available to control with the standard key (depending on the car model).
Setting up autorun
If you plan to use autostart to warm up the power unit, then you need to make a number of adjustments when installing and programming the system.
When installing the main unit, you must select the transmission type. Under the sliding cover on the block there is a special connector closed by a wire loop. The hinge must be used for a mechanical box. When installing the system on cars with an automatic transmission, the loop opens.
It is forbidden to cut the loop when it is possible to start the car with the speed turned on. Violating the rule may result in an accident and damage to the vehicle.
When the engine is running, the system unit must receive information about the rotation of the crankshaft. For this purpose, the signal from the speed sensor is used.
To program the signal from the tachometer you must:
- Disable security mode and start the engine.
- Press the setting key for two seconds and hold until the emergency lights go off.
- Release the button.
- Press and hold the key again for four seconds. The success of the learning process is confirmed by a single flash of the emergency lights, accompanied by a short sound signal. If there is a programming error, the siren and emergency lights will sound three times.
For autostart to work on a car with a manual transmission, it is necessary to reserve the function:
- After stopping, set the gearbox lever to neutral, engage the handbrake and release the service brake pedal.
- Turn off the ignition and remove the key from the lock. It is possible to set a mode in which you need to press the K-II twice, and only then the key is turned and removed. The third setting option allows you to turn on ignition support after lifting the brake lever, according to data from the limit switch.
- In all options, the owner has 2 minutes before turning on the security mode. During this time, he must open the door, leave the salon and close the door.
- When the last door is closed, the motor will stop. The exception is systems with the “turbo timer” service enabled. In this option, the engine will stop after completing the programmed cycle.
The Logicar 3 system supports autorun by timer, four repeat options are possible:
- every day;
- after 8 hours;
- every 4 hours;
- with an interval of 2 hours.
To set a 24-hour cycle, proceed as follows:
- Set the desired first start time.
- Press the K-II and K-IV buttons to turn on the timer autorun icon.
For the other three modes, simply pressing K-II and K-IV is enough. The first start will occur, depending on the setting, after 8.4 or 2 hours. When autorun is running, you can configure the number of restarts. At the request of the owner, the number of starts is limited to 16, 7 and 5. An unlimited number of repetitions can be set.
Timer starts may be limited by vehicle interior temperature and battery charge level. When the control is turned on, the corresponding indicator on the display turns on.
The system supports triggering by signals from additional devices, which can be GSM modules and advanced temperature sensors.
Equipment and price of Scher-Khan Logicar 2 and Scher-Khan Magicar 2
| Name | Scher-Khan Logicar 2 Price in rubles / availability | Scher-Khan Magicar 2 Price in rubles / availability |
| User manual | Yes | Yes |
| Wire connection diagram (electrical) | Yes | Yes |
| Microprocessor | Yes | Yes |
| LCD communicator | Yes | Yes |
| Replacement key fob without LCD display, without feedback | Yes | Yes |
| Power cables | Yes | Yes |
| Shock and shock protection sensors | Yes | Yes |
| Service book, instructions | Yes | Yes |
| Radio transmitter | Yes | Yes |
| Relay - blocker | Yes | Yes |
| End cap for installation under the hood | Yes (1 piece) | Yes |
| Siren, power cables | Yes | Yes |
| Sticker for fixing the antenna on the windshield | No | Yes |
| Price | From 3200 to 4500 | From 5500 – 6500 |
*price indicated as of 02/18/2019. In many respects, the Scher-Khan Magicar II alarm system is identical to the Scher-Khan Logicar 2 model.
Alarm installation and connection
All diagrams below are provided with installation instructions. Power is supplied to the processor unit through the power connector, or more precisely, through the “red” cord connected to the lock contact “30”. However, the documentation states the following: power for the alarm is supplied from the fuse terminal. But the 30 amp fuse in question is usually present in the starter circuit.
Main unit of the security system
Anyone who thinks that the setup is complete is mistaken. There is an LED installed under the curtain, and it should only light up when the engine is running. If the instructions are not followed, change the alarm setting - set selector “2” to a different position. The “ON” mark corresponds to a high ripple level, the “OFF” mark to a lower one.
Now let's look at how the car alarm is connected to the ignition switch. The Scher Khan Magicar A system has the following feature: it switches the starter circuit as well as the first ignition circuit. If two different circuits are responsible for the ignition process, install an additional relay. The alarm itself will control it by shorting the purple connector cord to ground.
Power connector, connection diagram
The following cables are connected to the ignition switch contacts:
- ACC terminal – white wire;
- Terminal “15/1” – green;
- Terminal “50” – yellow;
- Terminal “30” or fuse connector is red.
The blocking relay is connected between contact “50” and the connection point of the signaling wire. However, you can do without blocking, but the “green” cord must be connected in any case.
The “green” cable is not only an output, but also a low-current input for a car alarm. Connect it even if you do not implement automatic launch.
Low current inputs and outputs
Using the diagram provided by the basic instructions, you can immediately understand which wires the size lamps are connected to. A relay is installed inside the car alarm housing, and its contacts can switch both “positive” and “negative” voltage. This is the positive feature of Scher Khan Magicar A.
Signal input connection options
More precisely, you need to use only one wire, which is selected depending on the polarity. This is true if we talk about car alarms of any model, and not just about the Scher Khan Magicar A or Logicar systems.
For some reason, the basic diagram does not show how exactly the first cord of the 9-pin connector is connected. In fact, if we are talking only about Sherkhan A, “minus polarity” sensors are connected to “cord 1”:
Connection diagram, “wire 1”
As you can see, a car alarm can receive data from several switches, but on the condition that each of them is connected to ground. To connect, use 1N4001 diodes, connecting their anodes to the “black” wire. But the power diodes indicated in the diagram must withstand significant current (2-3 Amperes). If you install only low-current diodes, problems will arise that will manifest themselves during long-term operation.
Let us note an important circumstance. The Scher Khan Magicar A system, the connection of which was discussed here, is an alarm system with automatic engine start
But any car alarm equipped with this option must monitor the state of the handbrake or brake lights. Otherwise, during operation, you can observe the following: a car left “in gear” begins to move on its own. Despite this, the alarm system of this model does not have low-current inputs connected to the handbrake micro button or to the brake pedal limit switch.
Gearbox type selection loopIf autostart is implemented, be sure to cut the gearbox selection loop if you are using an automatic transmission. Otherwise, the car alarm will be able to start the engine even when the gear is engaged.
Advantages and disadvantages of Scher-Khan Logicar 2 and Scher-Khan Magicar 2
| Advantages | |
| Functionality | Basic set of options for protection, network monitoring, pulse signal reading prevention |
| Sound and silent arming | |
| Delayed engine start | |
| Reliability | 126 bit signal encryption, encoding |
| Price | Since these are budget modifications discontinued from mass production, the prices are also affordable |
| Build quality | Build quality is average |
| View | Plastic case made of impact-resistant polymer. Cardboard packaging, shockproof filler |
| False alarm | Acceptable subject to unprofessional interference with the system |
| Flaws | |
| Unstable system operation | Subject to the purchase of non-original products, incorrect configuration on your own |
| Exposure to the negative effects of freezing temperatures | Frequent operation at temperatures from -15° and below |
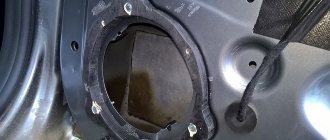
How to install?
Step-by-step installation algorithm:
Mount the main unit inside the instrument panel. The block is attached to a plastic panel body or a metal load-bearing frame. Double-sided tape or plastic ties are used for fixation. There are no standard fastening points with self-tapping screws on the block. It is recommended to place the unit at a distance from the standard electronic components of the car, which may emit radio interference. Install the antenna. The location is usually the windshield of a car. The antenna elements must be located at a distance of at least 5 cm from metal parts of the body. The antenna unit is located vertically, thereby ensuring maximum communication range
The wire is laid under the headliner and along the front pillars, subject to safety precautions. The manufacturer allows the antenna to be placed secretly, under plastic panels
In this case, the signal level may decrease and the range may be reduced. It is not allowed to install the unit under metal panels that will shield the signal. Stick a status indicator diode on the windshield and lay a signal wire. The diode can be located in a hole made on the plastic elements of the instrument panel or the trim of the front pillars. It is possible to fix the diode in the hole with glue or sealant. Install a siren on the engine side of the engine shield. Lay signal wires from the siren connector to the main unit. When installing a non-standard siren, follow the connection instructions. Modern cars can be equipped with signal switches in the trunk and hood locks. In the absence of such devices, free-standing mechanical limit switches are used. Installation is carried out in a hole made on the body or on a separate bracket attached to the body. The limit switch rod should not interfere with loading cargo into the trunk or maintenance of components and assemblies. Place an impact sensor in the cabin. For installation, standard self-tapping screws, plastic ties or double-sided tape can be used. Install an additional sensor that is used to control interior volume. Check the wiring to the main unit and connect them in accordance with the wiring diagram.
Car alarm. Connection diagram
Possible malfunctions and ways to eliminate them
| Malfunction | Elimination |
| The door lock does not close remotely | Weak contact on the end switches |
| Terminal oxidation | |
| Mechanical damage to the chain | |
| Low power supply | |
| Frequent alarms | Unprofessional installation |
| Shock sensor not corrected | |
| Sensor calibration required | |
| Activation/deactivation only at close range | Low power supply (battery) |
| Antenna damaged | |
| Weak contact on the end switches |
Conclusion
The Scher-Khan Magicar 2 car alarm belongs to the budget category, like the Scher-Khan Universe 2. Despite the fact that the Magicar 2 has been discontinued from mass production, the alarm is in demand in car dealerships.
Whether to purchase or not is an individual decision. You need to take into account the class of the car, actual mileage, and operating conditions. It is not advisable to buy a premium version for a budget one and vice versa.
The presented models have a good price-quality ratio, long service life, official support from the manufacturer. In the case of self-installation without experience, incorrect operation and false positives are observed.
Error codes Sherkhan on a keychain in the form of Er
If automatic engine start is not possible, then when you press button 2 of the key fob for 2 seconds (for auto start), the key fob with feedback will emit a triple beep and information about the failed auto start will appear on the display indicating the error code on the key fob (Er05, Er08, etc.) . The siren will emit three short beeps, the hazard warning light will flash three times and, after a three-second pause, the number of flashes will indicate the reason preventing the start.
Scher-Khan Magicar 7 and 9
Er01 Engine running - flashes once Er02 Ignition on - flashes twice Er03 Door open - flashes three times Er04 Hood or trunk open - flashes four times Er05 Start reservation not made for manual transmission - flashes five times Er06 Parking brake off - flashes six times times Er07 Brake pedal pressed - flashes seven times Er08 Failed to start engine - flashes eight times
Scher-Khan Magicar 11 12
Er01 Engine running - flashes once Er02 Ignition on - flashes twice Er03 Door open - flashes three times Er04 Hood or trunk open - flashes four times Er05 Start reservation not made for manual transmission - flashes five times Er06 Parking brake off - flashes six times times Er07 The brake pedal is pressed - it will flash seven times Er08 The tachometer signal value has not been programmed - it will flash eight times
Scher-Khan M10 M20 and Mobicar 1 2 AB
If the automatic start does not work correctly, the following error codes are displayed on the key fob display:
Er01 The engine is running Er02 The ignition is on Er03 The door is open Er04 The hood is open/opened Er05 There is no preparation for autostart for manual transmission Er06 The parking brake or position is not engaged Er07 The brake pedal is pressed Er08 The engine is not running or the system does not receive a signal that the engine is running Er09 The trunk is open Er10 Off or ignition turned off Er11 Start prohibition: there was a power alarm (system reset) Er12 Start prohibition: there was an ignition alarm Er13 Start prohibition: there was a door alarm Er14 Start prohibition: there was an alarm on the hood Er15 Start prohibition: there was an alarm on the trunk Er16 Start prohibition: there was an alarm on the motion sensor Er17 Startup prohibited: there was an alarm on the tilt sensor Er18 Interruption of startup: there was an alarm on the shock sensor Er19 Interruption of startup: there was an alarm on the external sensor
Scher-Khan M30 and Mobicar 3
Er:01 The engine is running Er:02 The ignition is on Er:03 The door is open Er:04 The hood is open/opened Er:05 There is no preparation for remote or automatic start for manual transmission Er:06 The parking brake or “Parking” is not applied Er:07 The pedal is pressed brakes Er:08 The engine is not running or the system does not receive a signal that the engine is running Er:09 The trunk is open Er:10 The ignition is turned off or turned off Er:11 Start prohibition: power alarm (system reset) Er:12 Start prohibition: there was an ignition alarm Er:13 Start prohibited: there was a door alarm Er:14 Start prohibited: there was an alarm on the hood Er:15 Start prohibited: there was an alarm on the trunk Er:16 Start prohibited: there was an alarm on the motion sensor Er:17 Start prohibited: there was an alarm on the tilt sensor Er:18 Startup interrupted: there was an alarm on the shock sensor Er:19 Startup interrupted: there was an alarm on the external sensor Er:43 Preheater did not start
Scher-Khan Magicar 13 and 14
If automatic engine start is not possible, then when you press button 4 of the key fob for 2 seconds (for auto start), the feedback key fob will sound a triple beep, and the display will show the message START ERROR indicating the error code on the key fob that caused the failure to automatically start the engine. The siren will sound three short beeps, the hazard warning light will flash three times and after a three-second pause, the number of flashes will indicate the reason preventing the start.
Er01 Engine running - flashes once Er02 Ignition on - flashes twice Er03 Door open - flashes three times Er04 Hood or trunk open - flashes four times Er05 Start reservation not made for manual transmission - flashes five times Er06 Parking brake off - flashes six times times Er07 The brake pedal is pressed - it will flash seven times Er08 The tachometer signal value has not been programmed or autostart attempts have been exhausted - it will flash eight times or is absent.
Reviews of Scher-Khan Logicar 2
| № | Positive |
| 1. | Gennady (avtozvuk.ua): I’m happy with the purchase of the signaling system, it’s been working for six months now. I installed it at a service station, the guys completed it in a couple of hours. |
| 2. | Alexander Vadimovich (rozetka.ua): you can’t find anything better in your price category. I bought it without hesitation. The secret police may not be multifunctional like others, but this is enough for me. |
| 3. | Ivan (hotline.ru): I installed Sherkhan myself, following the instructions in the instruction manual. It has been working flawlessly for a year, there have been no false alarms. |
| 4. | Kirillovich (avtozvuk.ua): during a scheduled technical inspection, the master recommended a signaling system. I looked and read the brochures and was also interested in the price. As a result, I installed it on the same day. |
| 5. | Peter (ugonavto.net): Shere Khan Logicar 2 signaling is a good budget option for the passenger class. It will not fit minivans and jeeps; there are other models for that. |
| 6. | Konstantin Ivanovich (ugonavto.net): review of Shere Khan Logicar 2 is positive. The second year it works flawlessly. |
| 7. | Negative |
| 8. | Dmitry (avtozvuk.ua): dissatisfied with the quality of workmanship and the work of Sherkhan Logikar 2. |
| 9. | Alexander (ugonavto.net): The last time I bought something Chinese, the quality cannot be trusted. |
| 10. | Vasily (hotline.ru): after the purchase, the key fob constantly works; at night the car alarmed several times. In general, the workmanship is poor, I do not recommend it. |
| 11. | Mikhalych (ugonavto.net): after a year of operation, problems began. The factory warranty has expired, there is no one to file claims against. |
Cryptographic strength Sherkhan
At the moment, systems of the Logicar families (except for series with the suffix i, but not iS!) and Magicar (up to the 13th model) are not considered crypto-resistant, which is confirmed by both theft statistics and tests of independent publications. In the case of a typical installation, if the owner (like most of them) does not bother to read the operating instructions, the resistance of the alarm to hacking is reduced catastrophically, since without the user specifying a PIN code for disabling the alarm, the thief can disable the alarm mode by two presses of the Valet button, which the creators of Scher-Khan persistently place it in the most visible place - in the LED module.
In Slave mode, outdated Scher-Khan systems do not have additional validation, that is, if the code of the standard radio key fob is cracked, they are completely deactivated, without checking the eligibility of access to the car.
A common problem with Scher-Khan systems that does not allow the implementation of full-fledged anti-theft systems on their basis is the extreme primitiveness of the start-up interlock mechanism: the installer has at his disposal only one built-in interlock relay (absent on a number of systems) and an additional low-current output to an external relay. The ability to assemble modular complexes, connect wireless blocking relays, or indirectly block the start via the CAN bus is not available in current Scher-Khan systems.
In addition to the ease of deciphering the code message, which the proprietary Magic Code communication protocol of all generations suffers from, it also has a proprietary flaw that is very familiar to owners of Logicar 1-3 alarms - the central alarm unit often loses synchronization with the key fob, ceasing to perceive commands coming from it.
Video: Control and configuration of Scher-khan magicar
Using the example of the Logicar 1 system, which appears most often in customer requests:
- Disarm the car and turn on the ignition.
- Briefly press the “Valet” button on the LED indicator housing, then hold it until the LED switches to constant lighting mode.
- Press button 1 on each key fob in the kit one by one; the command entry should be confirmed by the blinking of the LED.
- Wait 5 seconds or turn off the ignition.
It must be remembered that in the process of programming key fobs, previously stored ones are erased, so you need to register both the main one (which usually loses synchronization) and the additional one at a time.