Removal and installation of the Chevrolet Niva engine in Moscow
The engine idles unevenly: possible reasons
There are quite a few reasons why the engine idles unevenly. Motorists should be aware of them in order to avoid unnecessary waste by solving the problem themselves and doing the repairs themselves. On the other hand, it will also be possible to avoid more serious problems thanks to timely diagnosis.
Causes of uneven engine idling
Experts divide the main reasons for rough idling into two categories:
A malfunction of the air system (intake) can be considered separately, but it is more appropriate to include it in the list of problems with the fuel system. The fact is that both of them are inextricably linked and affect the stability of the power unit in idle mode and under load.
- Fuel-air system and fuel. A poor fuel-air mixture is often the reason why the engine idles rough. Such a “poor” mixture is that there is too little fuel in it and too much air.
Excess air can be sucked in through damage in the line. For example, rubber fuel hoses of poor quality may initially have or acquire microcracks in their walls over time. Poor fixation of the hose also contributes to air leaks at the joints.
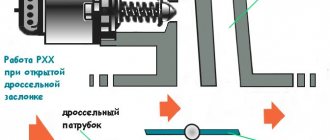
A more serious problem can be considered a problem with the idle air valve (also known as the idle air regulator, the secondary air regulator), which is sometimes called the idle air sensor. Owners of carburetor cars also know this part as the “solenoid valve.”
Excess air can also be sucked in through, for example, broken holes in the throttle valve axis on the carburetor. In this case, the problem may not become noticeable immediately: gasoline consumption will gradually increase, and interruptions in idling will appear.
- Poor quality fuel. Because of it, the idle speed also often “floats”. This phenomenon is especially strong when using so-called eco-gasoline. It contains a certain amount of ethanol. Ideally, this not only makes the exhaust gases less toxic, but also helps clean the fuel system.
However, in practice, drivers either deal with counterfeit fuel, manufactured in violation of technology, or use such fuel incorrectly. The fact is that for normal engine operation of the specified “eco” type gasoline in the tank there should be no more than 40-50 percent.
- The fuel pressure regulator (aka low pressure bypass valve) has failed. Its task is to maintain the required fuel pressure while the engine is running in any mode.
This breakdown is indicated not only by uneven engine operation at idle, but also by interruptions if you sharply press the gas pedal, a drop in power, and a strong increase in fuel consumption.
- The injectors are clogged (the channels are coked). Due to poor operation of the injectors, the fuel mixture is of inadequate quality in composition, which leads to disruptions in the operation of the power unit in different modes and increased fuel consumption.
- Air damper malfunction. This is usually a mechanical interference, which also leads to the formation of a poor-quality fuel-air mixture. As already mentioned, this causes the engine to run unevenly.
- The idle speed on the carburetor is not adjusted. In this case, under load the engine will operate normally, but at idle it will sometimes jerk, and at the same time there may even be a slight popping sound in the muffler. A relatively simple problem that you can deal with yourself by tightening the required adjusting screw.
Electrical problems
First of all, let's start with the ignition system. More precisely, the cause is too large a gap between the electrodes on the spark plugs.
Here the symptoms will be almost the same as with poor idle speed adjustment on the carburetor. The problem can be easily resolved by reducing the gap between the electrodes.
Unstable engine operation without load can also be caused by engine tripping. That is, one of the cylinders is not working.
Before performing operations, it is necessary to raise the car on a lift or jack. However, if manual lifting mechanisms are used, it will be necessary to use stands under the front axle so that the car is level.
To dismantle the oil pan, you will need to use a wrench and a suitable socket diameter to remove the front and rear mudguards, as well as the engine protection.
The next step will require draining the oil from the engine. After the main drain, it is necessary to warm up the car to remove residues from the engine. At the same time, it is important to monitor the temperature of the power unit and, in case of extreme deviations, take measures to turn it off. Unscrewing the sump cover to drain the oil is done with a 17mm head.
Next, to free up space around the crankcase to remove the pan, you will need to unscrew the nut securing the engine mount. It is important not to drop the spacer washers. It is advisable to post them in a visible place.
Using a jack, it is necessary to lift the engine a short distance to release the mounting pads from the brackets.
A pre-prepared block is placed into the resulting gap, after which the jack is moved to the side and the 19 bolts securing the oil pan to the engine body are unscrewed.
After removing the cover, leave the unit open for at least 10 minutes. This time will be enough to completely drain the oil from the working walls of the engine components.
Overhaul of the VAZ 21213 Engine with Your Own Hands
Repair
Lada engine: basic concepts
Many car owners, especially beginners, are not at all willing to repair a VAZ 2107 engine or at least some gasoline engine, for example a VAZ 21213
, is called “ overhaul or overhaul.” We explain this as a normal “life situation”. “Your car is not new. You were driving, it “ate” excess oil and gasoline, the engine
very extended, noisy. Your car was unable to climb a long, steep hill in 4th gear. I needed to move on to the third one, all the traffic participants came after you first gave you the signal and then caught up.
So. then you decided to “save” on buying motor oil. Video and manual for removing and replacing VAZ 2110, 2111, 2112, car cabin filter. Your car is serviced and repaired. The journey is not long, and oil is decreasing very noticeably. You purchased oil available on the market and filled the engine
and forgot. Video guide on removing and replacing the ignition lock on the Audi 100 (Audi 100 c4). how to do auto repair do it yourself. videos and articles. But on the way I had to stop. engine
started to overheat in the evening, wild place.
You have a “classic”, not a VAZ 21213 . There are no handouts. You hit the gas pedal and in 1st gear you finally got away. On the way to the house, the knocking intensified, the oil pressure light began to constantly burn, I had to go to the “suction”, and when entering the garage the car completely stalled. The workshop found that:
- The camshafts are lean and primed, with rough burrs.
- The slots on the oil pump shaft are almost completely cut off, and the entire crankcase and oil pump filter are clogged with shavings and metal dust.
This happened: during forced operation of a hot engine, the engine oil lost its lubricating properties, and intensively rubbing parts merged instead of lubricating, and as a result the engine even “seized.”
Significant funds were spent on repairs Make yourself a steering wheel 2121 The following has been done:
- head replaced cylinder block
, - chain is tight
- insert the new oil pump,
- completely flush the oil when flushing the engine,
- replacing the oil filter,
- I had to change a lot of gaskets
- The ignition timing was reset and new high voltage ignition wires were purchased (the coil wire was supplied by VAZ 21213);
- put new spark plugs;
- Generator relay replaced
- The timing chain is tightened, the tensioner and damper are adjusted.
Should I assume that major repairs have been carried out?
Removing the engine Niva VAZ 21213, 21214, 2131 lada 4×4
Remove the hood and spare tire.
We dismantle the spare wheel supports.
Disconnect the tip of the negative wire from the exhaust manifold.
Drain the oil and coolant from the engine.
We remove the radiator (at the same time, on a VAZ-21213 car we remove the fan casing, and on a VAZ-21214 car we remove the electric fans).
Remove the thermostat with the cooling system hoses.
Disconnect the coolant inlet and outlet hoses from the heater radiator pipes.
Remove the air filter housing (on an injection engine, remove the housing with the mass air flow sensor).
Disconnect the throttle valve drive cable from the throttle assembly and the receiver of the injection engine.
We disconnect the air and throttle valve drives from the carburetor of the VAZ-21213 engine.
We dismantle the generator and starter.
Disconnect the exhaust pipe from the exhaust manifold and gearbox.
Disconnect the brake booster hose from the engine.
We disconnect the air supply and crankcase ventilation hoses from the throttle assembly of the injection engine,...
...as well as the adsorber purge hose.
On the VAZ-21213 engine, disconnect the fuel supply hose from the fuel pump, and the drain hose from the carburetor.
On an injection engine, disconnect the fuel drain hose from the fuel pressure regulator tube,...
...and from the fuel rail and fuel filter - a fuel supply pipe with a hose (gradually releasing the fuel pressure in the system).
On an injection engine, remove the ignition module and disconnect the “mass” wire from the camshaft drive cover mounting stud;
Engine wiring harness connectors from idle speed control, fuel rail, knock sensors, crankshaft and throttle position, coolant temperature (two sensors), oil pressure.
On a carburetor engine, disconnect the engine wiring harness connectors from the carburetor, ignition distributor, oil pressure and coolant temperature sensors. We take the wire harnesses to the side.
Disconnect the central high-voltage wire from the ignition sensor-distributor cover.
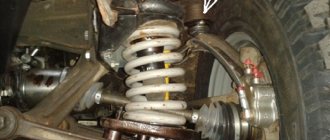
We unscrew the nuts securing the left and right power unit support cushions to the front suspension cross member brackets. (see picture)
We dismantle the middle steering rod so that it does not interfere. For this…
...using a 17mm spanner, unscrew the nuts of the two bolts securing the pendulum arm bracket to the right side member.
We remove the bolts securing the pendulum arm bracket...
.and lower the pendulum arm assembly with the middle steering rod.
On the right side of the car...
... using a 19" head with a cardan joint, unscrew bolt 1 securing the front axle gearbox, and with a 17" spanner, unscrew nut 2 of the stud securing the right support cushion of the power unit to the cylinder block bracket (or the nut of the stud securing the support cushion to the front suspension cross member bracket ).
From the left side…
...with a 19" head we unscrew nuts 2 and 3 of the studs securing the front axle gearbox to the front and rear cylinder block brackets, respectively, and with a 17" spanner we unscrew nut 1 of the stud securing the left support cushion of the power unit to the front cylinder block bracket (or nut) studs securing the support cushion to the front suspension cross member bracket).
Using a 17mm socket, unscrew the three bolts securing the bracket to the cylinder block and remove it.
We unscrew the bolts securing the clutch housing cover to its lower part and the bolts securing the clutch housing to the cylinder block.
In order not to damage the clutch slave cylinder when dismantling the engine, disconnect the cylinder from the clutch housing (without disconnecting the hydraulic drive) and move it to the side on a hose.
The implementation of the listed operations is given in the relevant sections.
We fasten the lifting device cable to the engine: on the right side - to the front eye; on the left side - behind the rear bracket of the cylinder block, to which the front axle gearbox was attached.
Lifting the engine, remove the studs of the left and right power unit mounts from the holes in the cross member brackets.
Then we move the engine forward to remove the end of the transmission input shaft from the bearing located in the crankshaft flange and from the clutch driven disc hub.
We remove the engine assembly with the clutch and side supports of the power unit from the engine compartment.
To fix the gearbox, we insert a wooden block of a suitable size between the clutch housing and the anti-roll bar.
We install the engine on the car in the reverse order of removal.
When connecting the engine to the gearbox, the input shaft of the gearbox must fit into the splines of the clutch driven disc.
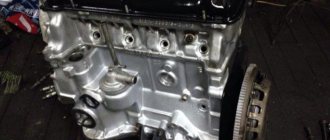
Checking parts and assembling the VAZ-21213, VAZ-21214 engine
We discussed engine disassembly in the article “Engine Disassembly”.
After disassembly, thoroughly wash the parts with kerosene, blow and dry them with compressed air (especially the oil channels of the parts).
Inspect the block, especially carefully the crankshaft supports.
Cracks in any place in the block are not allowed.
If there is a suspicion of cracks in the block (coolant has entered the crankcase or oil has entered the coolant), check the tightness of the block on a special stand.
Carry out the check in repair shops that have the appropriate equipment.
Inspect the cylinders on both sides.
Scratches, nicks and cracks are not allowed.
When inspecting cylinders, we recommend illuminating the cylinder mirrors with a portable lamp - in this case, defects are visible much better.
1. To determine the wear of the cylinders with a bore gauge, we measure the diameter of the cylinder in four zones and two planes (parallel and perpendicular to the axis of the crankshaft).
What parts are needed for assembly?
The engine was disassembled, washed, new parts were ordered and are ready to be put back together. When assembling the engine block, the following parts were installed:
- Crankshaft oil seal dimensions 70x90x10 and 40x56x7
- Main repair inserts 0.25 article 2101-1000102-11
- Connecting rod bearings standard article 2101-1000104-01
- Goetze rings article number 08-269906-00
- Gasket set for engine 21213 is also suitable for engine 2101-07
- Luzar pump article number 2101-1307011
- Tensioner and idler rollers for the generator belt from Ina, article number 531 0760 10
- The clutch kit was also replaced. Installed by Sachs, article number 3000 951 003
Chevrolet Niva | Removing the engine
Removing the engine
• Remove the hood (see chapter “Body”).
• Disconnect the ground wire from the battery first, then the positive wire.
• Unscrew the bolts securing the mudguard under the power unit and remove the mudguard • Remove the gearbox
• If the vehicle is equipped with air conditioning, unscrew the air conditioning compressor mountings and move it to the side along with the attached hoses.
Attention: under no circumstances open the working circuit of the air conditioning system, as Skin contact with refrigerant containing freon can cause frostbite.
• Drain the coolant.
• Disconnect the electrical connector from the oil pressure sensor. The illustration shows an M20 engine sensor. located under the right engine support beam. In other engines it may be located on the cylinder head or on the oil filter housing.
Attention: if the cooling system hoses are secured with clamp clamps, they must be cut off with side cutters and replaced with screw ones when installing the hoses
• Disconnect the throttle cable (1) from the throttle control lever. To do this, fully open the throttle valve and use a narrow screwdriver to push the cable tip (3) out of the holder. Squeeze the tabs (2) of the holder and push it out of the throttle control lever. Guide the cable down through the slot in the lever.
• If your vehicle has an automatic transmission, disconnect the transmission control cable from the throttle lever.
• Unscrew the bracket (indicated by the arrow).
• Loosen the clamp (1), remove the air hose from the bracket (indicated by the arrow) on the air cleaner body and remove.
• Cut the ties securing the coolant hose (2) to the air cleaner housing.
• Disconnect the connector (3).
• Open the clamp (1) and disconnect the air hose.
• Remove the air cleaner by loosening the nuts (2).
• Disconnect the coolant hose (1). To do this, loosen and slide the clamp back.
• Disconnect the fuel hoses (2) and (3), having previously marked them with adhesive tape so as not to be confused during installation. To remove the hoses, you need to open the clamps.
• Disconnect the connector (1) from the idle air regulator.
• Remove the electrical cable from the holder (2).
• Disconnect the vacuum hose (3) of the brake booster.
• Remove the heater hoses (1) and (2). having previously marked them with adhesive tape.
• Disconnect the vacuum hose (3).
• Unscrew the coolant pipe and remove it.
• Disconnect the high voltage wire from the ignition coil.
• Disconnect the hoses from the oil cooler (if installed) and plug them with suitable plugs.
• Using a screwdriver, remove the wiring harness cover under the distributor and route the harness to the left side of the engine.
• Disconnect the wires from the starter.
• Unscrew the fastenings of the rear cover of the generator, remove the cover and disconnect the electrical wires with screw terminals from the generator.
• Disconnect the electrical connector at the rear of the generator.
• Disconnect the crankshaft angle sensor connector in the wiring harness located under the intake pipe.
• Disconnect the cylinder identification sensor connector, if installed.
• Disconnect all connectors in the wiring harness under the intake pipe. Disconnect the vacuum hose, if installed.
• Unscrew the fastenings of the wiring harness under the intake pipe on the left (indicated by the arrow) and on the right, remove the harness from the intake manifold and move it to the side.
• Disconnect the ground wire.
• Unscrew the engine mounts to the right mount from above and to the left mount from below.
• Attach the chains or cables of the lift to the eyes on the engine (indicated by the arrow). Raise the engine.
• Check that all hoses and wires are disconnected from the engine. Remove the engine completely from the engine compartment.
Caution: When removing the engine, be careful not to damage the body.
Removal and installation of the Chevrolet Niva engine
Remove the oil pan protection and engine splash guard. Drain the engine cooling system, see Remove the cooling system radiator.
Unscrew the two bolts, remove brackets 9 and remove the engine cooling system radiator complete with fans. Disconnect the electrical wires: Disconnect the vacuum hose from the receiver to the vacuum brake booster.
Disconnect the adsorber purge hose from the throttle pipe. Unscrew the nuts securing the front engine mounts to the front suspension cross member brackets, remove the washers installed under them.
Washing and removing the Chevrolet Niva (VAZ 2123) engine with your own hands in a garage
Remove the bolts securing the front cover of the clutch housing, 9. Remove the two bolts securing the hydraulic clutch slave cylinder without disconnecting the hose from it, and Remove the four bolts securing the clutch housing to the engine cylinder block.
Unscrew the nut of the exhaust pipe clamp bolt, remove the bolt and remove the engine from the Chevrolet Niva with the clamp from the bracket. Disconnect the knock sensor wiring harness connector. Loosen the fastening clamp and remove the left part of the air supply pipe from the intermediate bracket.
How to remove a VAZ 2121 engine
An on-demand answer to your request on how to remove the engine from a field without removing the gearbox - we suggest you come to us. Articles, tips and tricks on do-it-yourself car repair and maintenance. How to repair a car yourself at home. We will help you with repairs and repair the car yourself. We know how to restore a car with minimal investment. I have attached video instructions.
Category: Do-it-yourself repairs
Laughter on topic: Lucy once licked a Ferris wheel in twenty-degree frost and saw her hometown four times for free!
Published by Admin: at the request of Gabriel
Reasoning of a car owner: All-wheel drive for decent money
Lada 4x4 (VAZ-21214): Removing and installing the engine
We remove the engine for repair or replacement.
We carry out the work on an inspection ditch or overpass.
Remove the hood and spare tire. We dismantle the support and spare wheel pipe.
Relieve the pressure in the power system (see “Replacing the fuel filter”, page 32).
Disconnect the wire terminal
from the negative terminal of the battery.
We disconnect the fuel hose tips from the fuel rail tubes and the fuel pressure regulator (see “Removing the fuel rail and injectors”, p. 130).
Drain the engine oil (see “Changing the engine oil and oil filter,” p. 18) and coolant (see “Replacing the coolant,” p. 20). We remove the air filter with the mass air flow sensor (see “Removing the air filter”, p. 136).
We remove the radiator (see “Removing the radiator”, p. 140) and electric fans (see “Removing fans, replacing the electric motor”, p. 141). We remove the thermostat with the hoses of the cooling system (see “Removing and checking the thermostat”, page 139).
Using the “8” head, we loosen the tightening of the clamps securing the coolant supply and discharge hoses to the heater radiator pipes.
. and remove the hoses from the radiator pipes.
We disconnect the hose of the vacuum brake booster from the receiver fitting (see “Removing the receiver”, p. 90), and from the fitting of the canister purge valve the hose connecting the valve to the canister (see “Removing the canister purge solenoid valve”, p. 135).
What can be improved in the Niva 4×4 model
Most representatives of the domestic automobile industry require high-quality improvements, and Niva is no exception. Tuning can significantly improve many parameters of an SUV, from the interior to pumping the chassis.
Changing the suspension helps increase the vehicle's passing ability. You can also change the external design of the body, making it more modern and original. Many people try to increase the power of the power plant by tuning the engine.
Most often, supporters of updates turn to professionals for help, although tuning a Niva 4x4 with your own hands is quite possible. You just have to take into account that remodeling a car will require significant costs and certain skills.
The small SUV went into mass production in April 1977. Today the VAZ 2121 is a passenger car with increased cross-country ability. Available in two body types: a three-door hatchback and a five-door station wagon. It has permanent all-wheel drive and a five-speed manual transmission.
Two-stage transfer case with center differential lock. High cross-country ability of the car is ensured by significant ground clearance (220 mm). The wheelbase is 2.2 meters. Earlier modifications were equipped with engines based on the engine of the sixth VAZ model.
When new modifications were released, the previous engine was replaced with a more powerful four-cylinder unit producing 81.9 liters. s., having a working volume of 1.69 liters. Average fuel consumption in mixed mode is 10 l/100 km.
Also interesting: Relay and fuse diagram for Lada Niva (Chevrolet) » Lada.Online
The injector installed on the Niva, although it reduces fuel consumption, is still not the most economical option in urban conditions with traffic jams and other delays. On the highway and during long trips outside the city, this is not felt so much, since the car works without stops and downtime.
Due to the unprofitability of cars in urban environments, drivers are thinking about a good and effective replacement for the old injection-type engine in their car. The best option would be a diesel engine for the Niva. It has approximately the same power characteristics, but its fuel consumption is comparatively lower. Also, diesel is less capricious in terms of fuel quality. What options from this category of motors are worth detailed consideration?
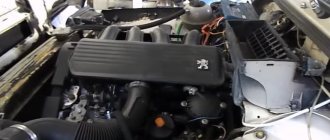
The first and most worthy candidate is the XUD 9 SD from Peugeot. This engine was used to create a modified version of the Niva - model 212151 with a French engine. It can be installed on the Niva without any problems - the fastenings of the parts and the assembly are identical, the motor fits perfectly in size, and in addition, there are some advantages from its installation.
In fact, this is the only option that suits all parameters.
Washing and removing the Chevrolet Niva (VAZ 2123) engine with your own hands in a garage
Do-it-yourself Chevrolet Niva (VAZ 2123) engine washing
A long time ago, when the neighbors were capitalizing on their engine, they suggested how to wash the engine in a garage. Here is a clear example of how you can wash the engine with your own hands and in a garage.
You will need a concentrate to clean the engine. There are different concentrations. Some are diluted 1/20, others 1/50. I use 1/20 undiluted. The one that should be diluted 1/50 is 1/1. The concentrate must be liquid. It seemed somehow gel-like. According to the seller, it was thermonuclear, but in reality it turned out to be so-so. I’ll post one that is sold in our store. Dilution 1/20. I don’t dilute it, I just pour it into a spray bottle.
1:1981
You will need a compressor with a spray can and a blower. To wash the engine and all parts, 1.5 liters is enough. WORK ONLY IN THE OPEN AIR, WITH GLASSES, RESPIRATOR, RUBBER GLOVES. Very caustic liquid. Spray the parts and wait a couple of minutes. During these couple of minutes, you can rub the carbon deposits with a paint brush; cleaning will be more effective. After a couple of minutes, rinse with water using a compressor and spray bottle. We look at what has been wiped off and where and continue the procedure.
Replacing CV joints on a Chevrolet Niva video
Removing the internal grenade of a Chevrolet Niva
Replacement of the front left outer and inner CV joint at the Niva
This is Tough! Removing the right drive Chevrolet Niva. Comparison of Chevrolet Niva and NIVA 21214 in Self-repair
How to change CV joint boots on Niva yourself
CV joint disassembly reassembly Cause of crunching
Replacing external and internal CV joints: detailed video!
How to knock out an internal grenade. Do it yourself!
Internal and external CV joint. Replacing the CV joint boot (grenade) in 5 minutes. Video
HOW TO REMOVE A NON-REMOVABLE GRENADE, CV joint. SIMPLE METHOD
Removing the outer CV joint (grenade) in 3 seconds. Super puller for CV joints and axle shafts of VAZ foreign cars
- Original number plate of Chevrolet Cruze
- American assembled Chevrolet Cruze
- Chevrolet Cobalt Rear Engine Mount
- How to replace a low beam lamp on a Chevrolet Cruze hatchback
- Chevrolet Niva vs Duster in mud video
- How to replace a Chevrolet Aveo light bulb video
- Tuning Chevrolet Lacetti hatchback 2008
- Trunk lid for Chevrolet Lanos
- How to change a turn signal light on a Chevrolet Epic
- Niva Chevrolet in stone on obi
- Disassembling the front panel of a Chevrolet Captiva
- Chevrolet niva glx 1.8 mt 122 hp 4×4
- Kit for Chevrolet Cruze
- Starline alarm system for Niva Chevrolet
- Standard anti-theft system Chevrolet Cruze
Which consumables should I choose?
The engine is the heart of the car. In order for all its elements to work smoothly and properly, the motor must always be in good condition.
Engine oil helps maintain the performance of all engine elements and is individually selected by the manufacturer for each type of power unit and vehicle in particular.
Changing the oil on a Chevrolet Niva is a rather important undertaking that requires a certain set of knowledge, which can be gleaned from the car’s operating manual or through consultation with service station specialists.
; You can also fill it with Lukoil, Shell, Castrol, Petro Canada or any other oil whose specification corresponds to the climate where the car will be used (
You also need to take into account that it is dangerous to fill your car with oil that has not passed the safety test (when choosing, give your preference to oil that has a safety class of Euro 4 or higher).
Based on technical regulations, changing the oil and filter on a Chevrolet Niva should be carried out once every 15,000 km. However, given the difficult operating conditions of our cars and the often mediocre quality of fuels and lubricants, experts recommend changing the oil at least twice as often. This will extend the life of the engine and avoid severe wear of the crank mechanism and parts of the cylinder-piston group. We will understand the intricacies of changing the oil on a Chevrolet Niva together.
How to choose the right oil? The manufacturer recommends looking at the operating instructions. The manufacturer recommends using domestic motor oil, LLK-International LLC, Angarsk Petrochemical Company OJSC.
Removal and installation of the Chevrolet Niva engine (Chevrolet Niva)
All work on removing the power unit should be carried out only by experienced specialists. The process requires a hydraulic lift with sufficiently high power, available in specialized car services.
Removing and installing the Chevrolet Niva door is a process that has its own characteristics and a certain order of execution. In this case, it is necessary to decide what exactly will be used - removal for repair or removal for analogue replacement.
What actions can lead to engine replacement?
Of course, comprehensive engine diagnostics are also necessary, aimed at finding faults using high-precision computer equipment. Only based on its results the need for this process is determined.
Avoid common mistakes, for example, removing the engine without disconnecting the coupling - this mistake can lead to serious problems, including replacing the entire Chevrolet Niva engine. You will be helped by contacting a specialized high-quality car service - Running Motors.
Our specialists thoroughly check the engine, clean the engine surfaces and engine compartment, and remove old fasteners. Depending on the configuration of the Chevrolet Niva car (Chevrolet Niva), the electrical wiring may be located differently, therefore, all disconnected electrical connectors, tubes and hose connections are marked.
The drive is also disconnected in any Chevrolet Niva car - front-wheel drive or rear-wheel drive. On front-wheel drive cars, the engine is removed downwards from the engine compartment, and after disconnecting the engine, a certain amount of work is performed, which has its own characteristics.
Services for replacement and re-installation of the Chevrolet Niva engine (Chevrolet Niva)
Removal and installation of the Chevrolet Niva engine oil pump may be required for any car after a certain mileage, as well as for major vehicle repairs. On most domestic cars, removal and installation of the engine is possible simultaneously with dismantling the gearbox, which is carefully inspected. In many cases, this requires replacing the oil seal.
After removing the gearbox, the clutches and release bearings are inspected. The engine, combined with the gearbox and clutch, and making up a single unit, has attachments to the body, which is typical for Chevrolet Niva cars. We remind you that professional removal and installation of the engine assembly is a process on which a lot depends and it is necessary to correctly follow the sequence of work.
Signs of a faulty timing chain in a Chevrolet Niva
The power unit of the Chevrolet Niva contains one camshaft, which sequentially opens 8 valves, which in turn is driven by the crankshaft through a timing chain stretched over the pulleys of both shafts.
The stability of the drive is ensured by the tensioner and damper. For coordinated operation of the intake and exhaust valves and their opening at the right moment, both Chevrolet Niva shafts must rotate synchronously. It is necessary that for one revolution of the crankshaft there are 2 revolutions of the camshaft. You can make sure that the actions are coordinated by the marks on the pulleys.
On many cars with a timing chain, this element is replaced every 80-100 thousand km. In fact, you often have to replace the chain more often. This also applies to replacing the timing drive of a Chevrolet Niva. Possible problems with the circuit must be judged by certain signs.
Thus, the links of a timing chain under tension stretch over time. As a result, the gas distribution mechanism begins to malfunction, causing the following problems:
- jerking while driving;
- overheating of the coolant;
- unstable engine operation;
- difficult starting of the internal combustion engine;
- lights up of the emergency indicator on the dashboard, etc.
If the gas distribution is incorrect, the operation of the engine is significantly disrupted, even to the point of failure, if the malfunction of the Chevrolet Niva timing belt is not corrected in a timely manner. In the latter case, it is no longer possible to do without an expensive overhaul of the motor or its complete replacement. The degree of chain wear can be assessed visually, which will require disassembling the power unit.
We recommend
Another way to assess the performance of the drive is by ear. A loud rustling sound coming from under the hood and similar to the sound of a running diesel engine signals that the timing chain needs to be checked.
Carefully and carefully, without sudden movements or guard techniques, we wash off the dirt layer by layer from all surfaces, tubes and hoses. Wiring requires special “politeness”, violation of the integrity of which will lead to subsequent financial injections. Having thoroughly washed the engine compartment, we move on to washing the battery: its service life is directly related to the amount of dirt on the surface. You should also clean the terminals from deposits - this will make it easier to start the engine and ensure its smooth operation.
After completing the water procedures, the engine compartment must be dried: blow with a stream of compressed air from the compressor and wipe with a rag. The first start of the engine should not cause any extraneous sounds or the appearance of icons on the dashboard. On the contrary, having shed the skin of dirt, the power unit should operate smoother and quieter.
Washing the engine is an optional operation, not prescribed in instructions and manuals, but extremely important in our area.
Dirty spring-autumn roads, a long winter with a sea of reagents and the sincere but unrequited love of Russians for conquering off-road terrain, diluted with the obligatory dacha primer every week, forces water procedures at least twice a year. Otherwise, the engine, threshing five days a week in dense traffic jams, will not reach its allotted resource.