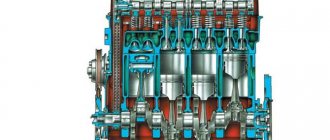
Serial Niva with diesel engine
From the very beginning, engineers at the plant tried to implement the idea of installing a diesel engine on the Niva 2121 model. For the Niva it was planned to use a domestic version of the 1.5-liter turbodiesel engine. With such a unit, prototypes were unable to effectively cope with off-road driving due to insufficient power.
Having abandoned the idea of installing their own diesel engine on the Niva, the engineers proposed the option of installing a Peugeot brand diesel engine. The French diesel engine received the factory index Peugeot xud9sd, has several versions with different boosts (69-75 hp) and is widely represented on different car models.
Engine design: diesel, in-line, 4-cylinder, longitudinally mounted. Working volume: 1905 cm3. One of the modifications of this diesel engine, when installed on the Niva, provided the vehicle with the following dynamic performance and performance characteristics:
| Maximum power: | 48 kW (69 hp) at 4600 rpm |
| Torque: | 121 Nm/2200 rpm |
| Maximum speed: | 120 km/h |
| Acceleration 0-100 km/h: | 25 sec |
| Average fuel consumption per 100 km: | 8.0-8.7 l |
The Niva with such a diesel engine turned out to be economical and performed well off-road, since the Peugeot xud9sd diesel engine provided the all-wheel drive vehicle with decent low-end torque. An additional advantage of the imported diesel engine on Niva was its reliability and relative ease of repair and maintenance.
As for the dynamics, the Niva 2121 with the Peugeot xud9sd engine accelerated to “hundreds” very slowly. The emphasis was placed on the main purpose of the car - increased cross-country ability on all-out off-road conditions. The Niva model with a Peugeot diesel engine was included in the series, but the car was produced in limited quantities and was also exclusively exported. In 2009, serial factory production of the diesel Niva completely ceased.
How to use?
By switching the operating modes of the transfer case, you can adjust the behavior of the car in accordance with road conditions.
Low gear is used in two cases:
- It is necessary to ensure low speed. For example, if you need to drive onto a curb or other obstacle, you can engage a lower gear so as not to burn the clutch.
- Need high torque. A lower gear is engaged before overcoming steep inclines.
The differential lock is activated when driving off-road, where there is a high risk of slipping.
At the same time, it must be turned on before entering a difficult area.
In general, you need to use the transfer case like this:
- Driving on the highway. The differential is unlocked, the first speed of the RK is turned on.
- Overcoming climbs and obstacles on hard surfaces. The differential is unlocked and the reduced speed is engaged.
- Overcoming difficult snowy areas, mud, slippery climbs. Locking and reduced speed enabled.
Why the rear wheel jams and what to do: advice from car enthusiasts
- “The reason is the cable.”
“I suffered with this rear wheel wedge. There was a need to transfer all new parts from an old car to a recently purchased one. I failed to notice that the defect was in the handbrake lever, to which the cable is attached. The previous owner lengthened it a little so that he could use the handbrake with the old stretched cable. This small nuance led to the rear left wheel jamming.New pads, drum, cylinder and handbrake cable were installed, but the slightest hit in the hole on this side led to jamming. A cheap item caused significant problems. How much time was lost, I rebuilt the wheel three times, but the fault appeared again.”
- “An ordinary hammer will help.”
“I had to somehow replace the drum brake pads on a VAZ 2114 car. In the process of removing the drum, the pad guides were bent. I didn’t notice this in time and, since the pad had little wear, I installed it back. After this, the wheel began to jam periodically. Repeated disassembly, straightening of the bent element - as a result, everything works without problems.” - "5 reasons for the wedge."
“I’m answering a popular question on the Internet: “Why does the rear wheel jam?” Several problems may be causing this. For example, a leaking oil seal. I myself encountered something similar in winter on a VAZ 06. Wear of the spacer bar and, as a result, mismatch of the slots. Or, for example, the tension spring has lost its properties. In some designs, the brake cylinder may be the culprit for the wedge. This applies to products with retaining rings that limit the reverse movement of the piston. When the pads are worn out, the stroke of the cylinder is no longer enough to move them apart. Designs with an eccentric have their own nuances.” - "Everything is in order."
“Many drivers have encountered a stuck rear wheel. The first thing to do here is to make sure that the levers are mobile. If there are no comments, you should check the wheel bearing. On a jacked car, move the wheel to the sides. The presence of a lift will indicate imminent wheel bearing failure.” - “A little bit of moisture and that’s it!”
“Last winter the handbrake cable froze. Even a slight jam at the end of the cable stroke led to the rear wheels blocking. If you drive a little, the brakes remain cold and the wheel does not jam. If you use the car intensively, you should put the car on the handbrake, and after turning it off, the rear wheel does not spin. I had to manually pull the cable under the car with a pry bar. We're talking about disc brakes." - "The problem is the drums."
“During the replacement of the brake drums, it turned out that the adjusting bars had lost their functionality due to age and corrosion. They no longer worked automatically; only manual adjustment was possible. This is after both rear wheels suddenly jammed while driving in the parking lot with the handbrake turned off. I had to solve the problem on the spot by opening the brake mechanisms.Removing the drums was not an easy task. The slats were completely apart. I picked at the joints of the two halves of the planks with a screwdriver and solved the problem. The slats no longer jam, but they are no longer adjustable. I'm planning to buy new ones. But they are imported and are not cheap, so now I am collecting money.”
Chevrolet car repair manuals and tips
Guide for removing and installing rear pads on a Chevrolet Niva
Chevrolet Niva is a car from the SUV class. And for an SUV, the condition of most control systems is the key to successfully passing an obstacle. Thus, an important role is played by the braking system and the parking brake, which performs the function of blocking the wheels while stationary. Blocking or braking of the rear wheels of the car is performed by drum brakes. The most important elements of these brakes are the rear pads of the Niva Chevrolet. Actually, this article will tell about them.
Removing the drum
What are pads
The brake pads are arched in the shape of the letter “C” and are installed in the rear wheel drums, where they do their work. The brake pad consists of the following elements: 1. the main part, made of special steel; 2. friction lining applied to the brake pads from the back of the head; 3. fastening elements, which are various holes.
Rear brake pads
Let's briefly consider the principle of operation of the rear pads. So, the brake pads are located in the rear wheel drums, two in each. They are located with the inner side facing each other, and the outer one, with a friction layer, interacts with the wheel drum. The resulting interacting force, which is accompanied by the release of energy, ultimately leads to the car stopping.
When you press the Niva Chevrolet brake pedal, pressure is created in the brake system, which acts on the pistons in the working cylinder. The so-called extrusion of the pads occurs; the friction part interacts with the moving wheel drum and leads to its braking. As the pads wear out, the friction layer wears off. The inside of the drum is also erased.
When is pad replacement necessary?
Before replacing the rear pads, an inspection must be carried out. A malfunctioning handbrake does not mean that the brake pads are urgently needed. They change in the following cases:
1. If the thickness of the friction layer is less than the permissible value, that is, less than 1.5 mm. 2. There is oil or other liquids on the lining. 3. There are cracks, gouges or chips on the layer. 4. The connection between the gasket and the base is weak.
Removing the brake drum
Only disassembly and detection of one of the above damages indicates the need to replace the pads.
Replacement of brake system elements
Replacing elements requires the availability of basic tools and careful implementation of repair actions. 1) It is necessary to place the Niva Chevrolet car on a flat surface and set second gear to the gearbox. Bars are placed under the wheels to secure the car in a stationary state. Set the handbrake to its lowest position. 2) Using a jack, lift the rear part and remove the wheel. Next, the drum is removed and a picture of the arrangement of the elements of the rear brake system is observed. Now you can remove the brake pads in two ways, let's look at both:
Disconnecting the spring
First extraction method: 1. One of the ends of the upper spring is pryed up with a screwdriver and removed. 2. The spacer bar installed below the spring is removed. 3. The support post, located in the middle, is held by hand on the back side of the shield and, using pliers, the outer post of the front block is rotated until the slots coincide with the protrusions. 4. The tension spring with both cups is removed and the stand located on the reverse side is removed. 5. The upper part is slightly retracted and the lower spring is removed. 6. Next, retracting the rear part, the drive lever is pulled out and freed from the tension cable. Second extraction method: 1. The support posts are removed from both edges. 2. The rear block is pryed up with a screwdriver and removed, first removing the spacer plate. 3. The upper fastenings are removed from the working cylinder. 4. The lower spring and both elements are removed along with the spacer bar and the spring. 5. The tip of the cable is removed from the lever, and the brake pads, complete with bar and spring, are removed. 6. Now holding one element, the spring and spacer are removed.
Removal and installation of Niva Chevrolet brake drum
The brake drum is removed to replace it if the working surface is damaged or worn, as well as to monitor the condition of the brake mechanisms and to replace brake pads and working cylinders. Perform the work on a vehicle with the rear wheels hanging (on a lift or a vehicle supported by a jack).
The parking brake lever must be lowered all the way down (the car is released).
You will need: 12mm wrenches, a screwdriver, two mounting blades.
Engage 1st gear and install thrust blocks under the front wheels.
Check: the parking brake lever must be lowered all the way down (the car is released).
Remove the rear wheel.
For ease of use, remove the decorative cap. When replacing the drum, the cap does not need to be removed.
Moisten the gap between the drum and the axle flange with some easily penetrating liquid (kerosene, WD-40, etc.).
Remove the two bolts (one is visible in the photo) securing the brake drum to the axle shaft.
Remove the drum from the axle shaft with light blows of a hammer.
If the drum cannot be removed by hand, knock it down with a hammer, using a wooden block, or.
Compress by screwing the bolts evenly into the two threaded holes of the drum
Remove the brake drum.
When installing the old drum, use a file to remove the collar on the working surface of the drum that has formed as a result of wear.
Install the drum in the reverse order of removal.
First, clean the axle shaft seat from corrosion, lubricate it with graphite grease or LSC-15 grease, and bring the pads together using two mounting blades.
Please note that as the pistons are pressed into the cylinders, the brake fluid level in the master cylinder reservoir rises.
If necessary, pump out the liquid.
Check that the wheel rotates easily. Light brushing of the drum against the pads is allowed.
With the car stationary on the ground, press the brake pedal 2-3 times to move the brake pads to the drum.
Replacing pads on the rear axle
To replace the rear pads, you will need to carry out the same preparatory work, after which the first thing you need to do is loosen the handbrake. Subsequence:
We remove the spring near the lever from which two cables go.
Using two “13” keys, you need to unscrew the bracket nuts, after which the cables weaken and do not affect the pads.
You can start directly replacing the pads
You need to remove the drum from the axle shaft using a “12” key by unscrewing two bolts. The drum often sticks, so you need to tap it with a hammer around the entire perimeter.
The working cylinder must be pushed inward on both sides using a flat screwdriver.
- You need to pry the tension springs by pulling them out.
- The block must be moved to the side opposite to the other block by the lower part, after which the two blocks are removed from the shield.
After removing the pads, the brake flap and drum must be cleaned and degreased and checked for the presence or absence of cracks.
Installation of pads
The two pads must be connected with a spacer bar and the spring must be charged. There is a video on the Internet showing how to cock the springs. The second spring is installed directly on the shield. It is recommended to install new springs with new pads, as they tend to stretch, which negatively affects the effectiveness of the brakes.
After installing the pads, you need to press the brake pedal several times so that the working brake cylinders take the working position. Grinding in new pads on a Chevrolet Niva, depending on the manufacturer, can last 10-150 km. At this time, the braking efficiency will be somewhat less, so at first it is necessary to maintain a greater distance than usual. After grinding in, the car will brake with maximum efficiency.
What's really in AVTOVAZ's plans? Niva Next?
It can be assumed that AVTOVAZ will bet on three models at once: a “large” crossover based on the Renault Duster (especially since the plant has suitable engines in the line of produced models) and... the next generation Niva 4×4 2015. However, with the latter It seems that this will happen no earlier than 2021, and before that new units and components under the VAZ 21217 symbol will appear in the old body.
Recently, a survey was conducted on the website avtovaz.ru, where they assessed the possibility of mastering a single-wheel drive version of the car. Considering that it would be more logical to make a rear-wheel drive version of the standard Niva, the possibility of a car with front-wheel drive can only be regarded as an application to replace the traditional manual transmission with a friction clutch. There was no limit to the anger and intensity of passions. “Nivovody”, known for their grouping, immediately reacted by unanimously voting against. This is quite understandable: there are a lot of SUVs on the market now, but the niche of specialized cross-country vehicles, but with a certain comfort, is not particularly filled.
Perhaps it's worth looking for a compromise? But for consumers, it is already planned to replace the center differential locking lever with... electric control. Push-button. The replacement of the old engine with a unit from the Lada Priora (with subsequent depowering to 90 hp) is not far off. A rear-wheel drive version of the extended (2131) car is also being prepared. It is worth recalling that earlier they wanted to stop the production of the classic Niva 4x4 for the sake of Shniva, but then they defended it.
Now there is no question of protection. Vice versa! With the arrival of Boo Anderson, the Niva 4x4 2015 project received a previously unseen favored treatment (and, of course, funding).
The new generation of Chevrolet Niva will not be an “internal” competitor, since it is being created on one of the GM platforms, and the existence of the GM-AVTOVAZ joint venture is vague, and the Duster will be in its current class by 2021 (that’s when the new Lada Niva 4 is planned to appear ×4) will already sink into oblivion...
In addition, the control of the Renault-Nissan alliance over AVTOVAZ is not complete. The deal has not yet taken place. And will it happen now?
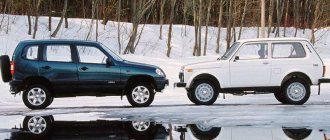
[edit] "Niva" and the bourgeoisie
Niva was actively exported to other countries. It is the only Avtotaz product that is truly known and famous in Europe, and not as a piece of socialist shit. There are more than 9,000 cars of this brand in the Spanish, French and Greek mountains; converted police and rescue Nivas are found in the mountains of Bulgaria and Montenegro. It also happens in southwest Germany. Not too often, but still. Tyoma even met the subject in harsh Greenland. Moreover, this is the only Soviet car officially exported to Japan. Occasionally he returned to his historical homeland, already with air conditioning. However, such a crappy air conditioner can now be installed right here.
Also, "VAZ-2121" appeared in the film "Detroit - City of Rock" about four rabid fans of the group KISS, for example. More specifically, the episode with the delivery of pizza to a parochial school; the delivery man arrived in a sub. And also in the funeral episode of the film “Largo Winch: The Beginning,” a red Niva with horizontal optics flashed.
Niva also appeared in the American series “Beauty and the Beast,” which takes place in New York.
In the racially Brazilian series “Cruel Angel”, a Niva with horizontal optics takes a Land Cruiser to a local rally, and even rides in the trunk of one of the negative characters.
The Niva also appeared in the film ROBOCOP, released in 2014. At the very beginning of the film, when journalists are shown the work of OSP Corporation robots in the Arab quarter, the Niva, without a fawn, stands on the side of the road.
Finally, in the plankton film “The Incredible Life of Walter Mitty,” an Icelandic native on a Niva tries to escape the Eyjafjallajokull eruption together with GG.
In 2001, AvtoVAZ management managed to sell its only asset - a VAZ-2123 prototype almost ready for mass production. This prototype was slightly modified by the GM-AvtoVAZ joint venture (in particular, they stuck on a Chevrolet badge, leaving the engine from the old Niva) and turned into the Chevrolet Niva. Prooflinks: 1, 2.
How to determine the cause of the problem
It is not uncommon for the exact cause of a rear wheel jam to be found only by disassembling several components.
The minimum set of tools required for repairs is a jack, a wheel wrench and special keys. In addition, physical strength will not hurt. It is not always easy to unscrew a wheel, especially in winter. In winter, the wheels stick very tightly to the rim. And these details are not easy in themselves. For successful repair you need to do the following sequence of operations:
The wheel cover must be removed. A flathead screwdriver or wheel wrench works well for this. Each wheel bolt should be loosened one turn using a wheel wrench. Attach the wheel wrench and handle to the jack. The jack must be installed only under special reinforced places in the thresholds of the car. Usually they are located under the doors near the arches. It is prohibited to lift the car with a jack that is not securely fixed in a specially designed place on the car. Then you can lift the car
This should be done carefully, rotating the jack handle clockwise. You shouldn’t raise it too high, just raise the bottom of the wheel to a height of at least 3 cm from the ground
Be sure to follow safety precautions and not stand under a car that is raised with a jack! Moreover, it is forbidden to start the car engine in this position! When the vehicle is raised to a sufficient height, you can remove the wheel bolts or nuts. This is done using a wheel wrench by rotating it counterclockwise. Next, the fasteners are removed and the wheel itself is removed. The wheel is now removed and you can begin removing the pad springs. To successfully carry out the operation, you need to hold them from the back, press them with pliers, turn them and remove the crackers. The brake disc blocks the path to the bearing, which allows the wheel to rotate. The bearing is covered with a cover secured with bolts.
It is necessary to carefully inspect all elements. This is the only way to determine the scope of repairs. Noticeable wear on a part is a good reason to replace it. Experienced drivers can handle this work on their own. The main thing is to approach the matter carefully and carefully perform all the necessary operations. If you do not have deep knowledge and skills in car repair, it is better to send your vehicle to a service station using a tow truck.
Replacing Niva front discs
Changing disks during repairs is as easy as shelling pears.
Required tools:
- Jack. Raise the car and be able to remove the wheels.
- Gloves. Protect your hands from any harmful substances.
- Key. To remove a wheel from a vehicle and loosen the brake caliper.
- Screwdriver. For removing the brake lining and accessing the brake disc.
- Brake cleaner. To protect the new brake disc and remove dirt.
When purchasing new wheels for installation in a car, you may notice that they are covered with a layer of paraffin. Before installation, you need to degrease the discs using a cleaner.
Replacement is required when the minimum wear thickness is reached or when any anomalies are detected (scratches, bends, cracks, breaks). Each mechanism has a predetermined minimum thickness limit below which it must be replaced. This minimum wear limit is indicated on the description sheet. If the side of the brake mechanism is equal to or less than the specified minimum limit, then replacement is necessary.
When installing a flange on a disc contour, it is difficult to accurately measure the residual thickness. To effectively measure brake thickness, you need to measure the thickness at three different heights: first near the outer flange, second at the center, and third near the inner edge. To replace the mechanisms, you will first need to remove them, that is, raise the car with a jack.
Replacement occurs as follows:
- The wheel is removed.
- The bolt at the lower brake flap is turned out.
- Using a screwdriver, bend the screw stoppers.
- Remove the bolts from the guide block.
- The shield and caliper are removed.
- The support is suspended on a wire or rope.
- The protective cap of the hub is removed.
- The hub is held, the nut is unscrewed and removed.
- The disk is removed.
- A new disk and removed parts are installed.
Electrical equipment Niva VAZ 21213, 21214, 2131 lada 4×4
The electrical equipment is made according to a single-wire circuit: the negative terminals of sources and consumers of electricity are connected to the “ground” - the body and main components of the car, which serve as the second wire. The on-board network is DC with a rated voltage of 12 V. When the engine is not running, all consumers are powered by the battery, and after the engine is started, by an alternator with a built-in rectifier and electronic voltage regulator. When the generator is running, the battery is charged.
Most electrical circuits are protected by fuses. Electric motors of gear motors (windshield wipers, tailgate glass, headlights - if installed) are protected by automatic reusable bimetallic fuses. The power supply circuit of the injection system (VAZ-21214 engine) is protected by a fuse-link made of wire with a conductor of reduced cross-section (1 mm2). The battery charging, ignition (VAZ-21213 engine), engine starting, and the “generator – ignition switch – fuse box” circuits are not protected. Powerful consumers (starter, headlights, electric motors for cooling system fans, electric fuel pump, etc.) are connected via a relay.
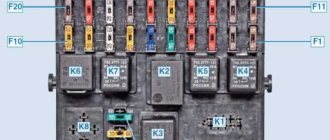
The fuses are grouped in two fuse blocks located on the left under the instrument panel. The fuse ratings and the circuits they protect are shown in the table.
The injection system fuses (VAZ-21214 engine) are located in a separate block on the left side panel under the instrument panel.
A 30 A fuse protects the power supply circuit of the electric radiator fans, and three 15 A fuses protect the electric fuel pump, the control unit (constant power input) and the injection system main relay circuits, respectively (see also Engine management system (eng)).
| When repairing the electrical system, disconnect the negative terminal of the battery (with the engine off). Before installing a new fuse to replace the blown one, find out and eliminate the cause of the burnout. Do not use oversized or homemade fuses - this may cause a fire. Due to the risk of short circuits, do not pry open fuses with metal tools (screwdrivers) unless the corresponding circuits are de-energized. |
About diagnostics of electrical equipment
For its quantitative diagnosis, it is enough to have a simple multimeter that measures the voltages acting on the car.
The car does not start - the solenoid relay clicks, but the starter does not spin. If the battery voltage is normal and there is no oxidation of the terminals, then using a voltmeter, we will check the voltage drop first at the terminals themselves, then from the positive terminal to the solenoid relay and from the negative terminal to the engine. If the voltage drop between connections does not exceed 0.3 volts, the starter is defective. If the starter turns very tightly, carry out the same operations.
There is no normal charging - repeat the same operations to search for a voltage drop on the generator grounding, moving from the generator output terminal to the terminal of the wire going to the battery, and moving from the wire terminal to the battery terminal. Depending on the design of the generator itself, the excitation voltage is checked. But, unfortunately, a voltmeter is not suitable for a qualitative assessment of the operation of a diode bridge! A device is needed to record voltage fluctuations generated by the generator.
In general, most malfunctions in the electrical part of a car are associated precisely with poor contacts on connectors, in wiring harness connections and electrochemical erosion of the wires themselves in places of cracks and damage to the insulation. These types of defects are calculated by measuring the voltage drop across a section of the circuit and then repairing or replacing the damaged section.
A short example. Customers complain about increased engine speed when the gas pedal is released while driving. This is almost 100% due to excessive voltage coming from the throttle position sensor. One of the most likely causes is poor contact at the crimp of the ground branch in the wire bundle. With the engine running, you need to check the voltage at the negative terminal of the sensor by inserting a probe into the contact, relative to the engine. The voltage drop should not exceed 0.2 Volts. Then check that the damper is completely closed until it stops, and only then repair the sensor.
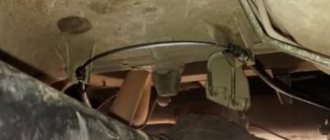
Removing the Niva transfer case
To repair the transfer case on a VAZ 21213 (21214), the unit must first be removed. We carry out removal in the following order:
- in the cabin we dismantle the plastic lining of the gearbox and gearbox levers;
- unscrew the knobs of the transfer case shift levers, remove the casing under them;
- disconnect the speedometer cable, for RK 21214 you will need to additionally disconnect the speed sensor;
- we unscrew the bolts with nuts securing the elastic coupling of the front and rear propeller shafts; in order to remove the bolts, the cardan shafts must be turned - they are removed one at a time in one specific position of the shaft;
- We install a jack (or other support) under the transfer case and mark the places where the side supports of the RC were attached. This is done in order to minimize the alignment of the transfer case during installation;
- unscrew the 4 nuts securing the gearbox to the gearbox;
- unscrew the 4 fastenings of the RC supports to the car body;
- Now all that remains is to dismantle the transfer case.
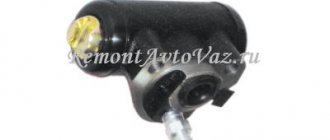
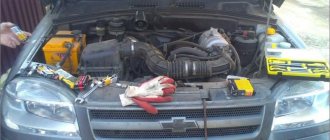
Niva Chevrolet replacement of rear brake pads, cylinders and drums. Video and photo instructions
We have a Chevrolet Niva car, produced in 2005, mileage 137 thousand km, for scheduled repairs, on which it is necessary to replace the rear brake pads, drums and cylinders. We will show you how you can do this yourself, without resorting to the help of specialists.
It looks like the pad on the rear left wheel has been torn off, there is a grinding noise when braking, and when reverse gear is engaged, the wheel jams and then breaks. Therefore, it was decided to immediately lift and change the pads, drums and cylinders on both sides. After this, we'll bleed the brakes with a vacuum.
Using a 12mm socket, unscrew the drum mounts:
Then screw in two bolts:
It really didn’t work out for us, all the threads remained on the bolts, it was very soured, so a hammer comes to the rescue, since we will eventually have to change the drum anyway. This situation arises when, when replacing fasteners, they are not coated with copper grease; I believe that there is no need to save on this!
First, soak everything in WD-40, then apply sharp blows with a hammer to the inside of the drum:
After each hit, spin the wheel a little and continue again. Next, remove the pressure springs using pliers, press and turn:
We move the lower spring by hand, disconnect the handbrake cable and remove the old brake pads. At the rear, unscrew the two bolts securing the brake cylinder using a 10mm socket:
Using a 10mm wrench, loosen and then unscrew the fitting. Be prepared, brake fluid will flow. We install and screw on the new brake cylinder. We lubricate all fastening bolts with copper grease so that in the future we will not have problems with unscrewing.
We assemble new brake pads, we have them from TRIALLI, spare parts catalog number GF-232, put on the handbrake cable and put them in place.
We put on the bottom spring; this is done conveniently using a small metal hook. We loosen the handbrake cable, to do this we hold the square with pliers, unscrewing the nut (usually there is a lock nut, in our case there was none):
We loosen it so that our new brake pads press against the cylinder. Since the pads are now compressed, the new brake drum should fit easily. We install the drum from TRIALLI, its number is TF-078. Before installation, we knock off the accumulated dirt on the seat with a brush with metal bristles, then lubricate it with copper grease. Place the drum and assemble in reverse order.
Since we drained the brake fluid a little, we need to bleed the brakes; if you did not touch the cylinders, then you do not need to do this. We will pump, or rather remove, air from the system using a special vacuum device. In the video you can see how this process works.
Video of replacing rear brake pads, drums and cylinders in a Niva Chevrolet:
Backup video on how to replace rear brake pads, drums and cylinders in a Niva Chevrolet: Read times: 1,556; Today: 1
Chevrolet Niva calipers rattle
There are 2 main types of caliper rattles and clanks:
1. Due to the fact that the springs 2121-3501166 holding the caliper bracket have weakened, this same bracket begins to bounce on the pits, moving between the levers, and ringing and rattling melodiously. In fact, the best commercially available springs are too weak, subject to rapid deformation and loss of their properties due to the poor quality of the materials used.
2. Due to the fact that the brake pads are not held in place by anything, they move freely inside the pad guide, naturally producing sounds familiar to the ear.
Eliminating reason No. 1
For this you will need: - steel wire with a diameter of 6 mm - 50 cm (I used stainless steel); - wire for the spring - steel (very hard, preferably spring wire), diameter 1.2 mm, length depends on the number of springs damaged during the manufacturing process (a long piece is better - much easier to work with). You will also need a vice, two birch blocks, sandpaper, and pliers.
First, we will make a “tool” from wire with a diameter of 6 mm, with which we will wind the spring. It's simple, here's a photo:
Now take the spring wire and thread it like this:
We clamp a thin wire by passing it between two birch bars in a vice. And we begin to rotate our “tool” by winding a thin wire. You may need a second person to hold the “tool” slightly. Adjust the distance between the turns by applying axial force to the “tool”. By changing the distance between the coils you can adjust the spring stiffness.
Cut the spring using sandpaper and use pliers to make the ends slightly tapered.
For comparison: on the left are manufactured springs, on the right are removed from the car.
If during the process of assembling the caliper you did not put significant effort into compressing the springs, then you made the springs too soft - increase the distance between the coils or use a stiffer wire. The force applied to the springs to install them must be large. When compressing them, you always really want to call a second person to insert the lever axis:
Eliminating reason No. 2
Attention: eliminating cause No. 2 without first eliminating cause No. 1 will not give the desired result. To do this you will need: a pair of rubber bushings for the rear shock absorber 2101-2906221, a sharp knife, an emery board or grinder with a thin cutting wheel, a little lithol
To do this you will need: a pair of rubber bushings for the rear shock absorber 2101-2906221, a sharp knife, emery or grinder with a thin cutting wheel, a little lithol.
Take the shock absorber rubber bushing and cut it like this:
Then, using sandpaper or a grinder, we grind a groove in the rubber band, this is what happens (left rubber band):
We put the rubber band on the block and install the block in place. In case of difficulties, you can lightly lubricate the guide of the pads under the rubber with lithol in order to facilitate its installation (the photo shows a lithol stain under the rubber). The rubber band is selected individually for each pad, so that the rubber presses the pad tightly enough.
OK it's all over Now. The mileage with such upgrades is about 15,000 km - everything is in place, nothing rattles.
Update dated July 29, 2008, by evgen.
The problem does exist with the rattling, and an even bigger problem exists in the purchase of springs. When you go to the store for something significant - about such a small thing as springs - you simply forget. And when you specifically look for springs, as luck would have it, they are not available in any of the stores.
My idea does not pretend to be technically correct, but I don’t see any specific flaws in it.
I carried out this upgrade in a much simpler way. The springs are taken out, and either a ball from a ball bearing of a suitable diameter is placed under them, or, as I did, a turnkey nut for 8. Another option - if there is not a sufficient number of nuts for 8, you can also take a nut for 10 and cut it with a chisel in half and also place it in the hole for the spring. The problem is solved with a bang.
Update from 08/26/08, by longer
Tired of the ringing and rattling noise in the right caliper (for some reason and only in it), I started researching why this happens.