How to replace a clutch release bearing
The replacement procedure is carried out in the following order:
- Remove the gearbox.
- Disconnect the ends of the clutch spring retainer.
- Remove the bearing from the guide sleeve.
- Disconnect the spring holder.
- Remove the old bearing and install the new one. Before installation, it is necessary to lubricate the bearing seat and bushing well.
The lifespan of the release bearings is 150,000 km, but this is with careful operation. When using a car by newbies or careless drivers (who abruptly release the clutch pedal or start with jerks), the service life ends after 50,000 km.
Clutch release bearing: signs of malfunction
The service life of the part is quite long (up to 150 thousand km), but sooner or later it also has to be replaced. There are several symptoms by which you can determine that the VP is worn out:
- A whistle appears when you press the pedal or change gears. There is an important point here: if an unpleasant sound appears only in severe frosts, then the bearing will last for a long time. The thing is that it itself is made of very durable steel and therefore is almost “indifferent” to temperature changes. But the clutch release bearing is placed in a metal cup, which shrinks in cold weather and therefore a whistle appears. But if it does not disappear with warming, then the VP needs to be replaced.
- Start the engine, listen to the noise it makes. Next, press the clutch pedal: a change in the nature of the sound may indicate wear on the VP.
- When you turn on the speed, you have to apply increased force.
- There is a crunching sound when shifting.
- Clutch slipping: the driver presses the accelerator pedal, but the car drives slowly and does not climb uphill well. Sometimes this is accompanied by a burning smell.
- The clutch “leads”, that is, it does not disengage completely. This is accompanied by jerking when engaging a lower or higher gear.
- There are also indirect signs of a problem with the release bearing: large free play of the clutch pedal, increased fuel consumption, engine overheating when driving (checking the part is required).
How to extend the resource?
To increase the service life of the device, you must drive on smooth roads. In our country, it is problematic to comply with this condition. Keep in mind that uneven roads destroy not only the vehicle’s chassis, but also the clutch system. Therefore, regular off-road driving is also dangerous for bearings. Don't make mistakes when operating your car. When the car is stopped at a traffic light, there is no need to depress the clutch pedal and engage first gear if you do not plan to move. This should only be done at the beginning of movement, since the part operates under high load conditions. Regular lubrication will increase the service life of the device.
Clutch master cylinder VAZ 2101
Stable operation of the clutch master cylinder (MCC) has a direct impact on the functioning of the gearbox and its service life, as well as the smoothness of gear shifting. If the hydraulic drive breaks down, control of the gearbox becomes impossible, as does further operation of the vehicle.
What is it for?
The main function of the GCS is to briefly disconnect the power unit from the gearbox when changing gears. When you press the pedal, pressure is created in the system, which acts on the clutch fork rod. The latter drives the release bearing, controlling the clutch.
How it works
The main components of the node are:
- outer cuff;
- sealing collar;
- union;
- stock;
- return spring;
- frame;
- case for protection.
The GCS housing contains a return spring, cuffs, working and floating pistons
Principle of operation
The hydraulic clutch consists of two cylinders - the main and the working (GC and RC). The operating principle of the hydraulic drive is based on the following:
- Liquid enters the GC through a hose from the tank.
- When the clutch pedal is acted upon, the force is transmitted to the rod by a pusher.
- The piston in the main center moves out, which leads to the valve closing and compression of the liquid.
- After the fluid is compressed in the cylinder, it enters the hydraulic system through a fitting and is supplied to the DC.
- The slave cylinder drives the fork, which moves the clutch with the release bearing forward.
- The bearing presses on the friction spring of the pressure plate, releasing the driven disk, after which the clutch disengages.
- After the pedal is released, the cylinder piston returns to its original position under the influence of the spring.
The pedal moves the pusher, which, in turn, moves the piston and creates pressure in the hydraulic drive system
Where is
The GCS on the VAZ 2101 is installed under the hood near the vacuum brake booster and the master cylinder of the brake system. There are also reservoirs near the clutch cylinder: one for the braking system, the other for the hydraulic clutch.
The GCS on the VAZ 2101 is located in the engine compartment near the vacuum brake booster and the master cylinder of the brake system
When is replacement needed?
The cylinder elements wear out over time, which leads to interruptions in the operation of the mechanism. Repair or replacement of the main circulation system is necessary when the following symptoms appear:
- airiness of the system;
- leakage of working fluid;
- wear of cylinder components.
The presence of air in the hydraulic drive system disrupts the performance of the system, making its operation impossible. Air can enter the hydraulic drive through microcracks in the sealing elements of the cylinder or in the connecting hoses. If, when checking the system, a constant lack of fluid in the expansion tank is discovered, you need to inspect the entire clutch mechanism, since fluid can leave not only the master cylinder. If the amount of fluid in the hydraulic drive system is insufficient, the required pressure to move the clutch fork will not be able to be generated. This problem will manifest itself in the inability to separate the engine and gearbox when pressing the clutch pedal. If the leak is caused by wear of the connecting hoses, then replacing them does not raise any special issues. If the problem is related to the GCS itself, then the product will have to be dismantled, disassembled and the cause found out, or simply replaced with a new part.
Purpose
To understand where the release bearing is located, you need to understand the purpose and design of the clutch. The clutch and all its parts belong to the vehicle's transmission. It ensures the transmission of torque from the engine to the drive axle and wheels, and must be located between these parts of the machine
But an important condition for the location is accessibility in its control by the driver. Most often this is the clutch pedal, less often the lever near the steering wheel
Using the clutch mechanism, the driver periodically disconnects the engine from the transmission. This allows you to stop the car, change the gearbox, and change the driving dynamics.
Installing the release bearing
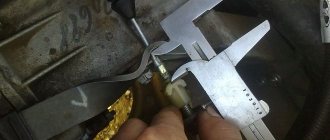
Having removed the gearbox, we need to know the sequence of further actions, how to change the release bearing.
- First you need to assess the condition of the old part. If there are signs of operational wear on it, then you have correctly identified the cause of the abnormal operation of the gearbox. A faulty part, if turned, will produce a characteristic unpleasant crunch. If the causes of the malfunction are determined correctly, you can begin installing a new bearing.
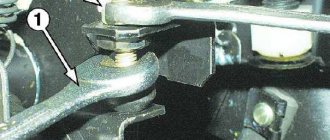
- To do this, use a screwdriver to separate the ends of the coupling retainer. We disconnect the holders of the pressure ring - “spring petals”. We remove the release bearing from the clutch release clutch.
- Next, we check the correctness of fastening and installation. In normal operating condition, the release bearing should rotate around its axis freely without characteristic sounds. The protruding part of the bearing should be located towards the coupling. We use machine oil as a shaft lubrication element and install the bearing on the shaft.
- If the installation was carried out correctly, proceed to fastening using the clamping ring holder. We perform the entire sequence of actions in reverse order.
Bearing replacement is complete.
Replacing the release bearing
Every car periodically needs to replace the release bearing. Not only the comfort, but also the safety of driving a car depends on its condition. After reading the article, you will learn how a bearing works, what functions it performs, what signs indicate its malfunction and how to replace it.
The role of the release bearing
Clear gear shifting on a manual transmission is only possible when the input shaft of the gearbox (gearbox) is disconnected from the engine. This principle is true for any car with a manual transmission. The clutch disc is in constant contact with the flywheel due to the fact that the basket presses the disc against its surface. To disconnect the gearbox input shaft from the engine, you need to press the release fork on the basket, forcing it to press the petals and release the disc. For this, a release bearing (VP) is needed, which transmits the force from the fork to the rotating clutch basket. When you press the clutch pedal, a cable or hydraulic drive activates the gearbox fork. In turn, the fork, with the help of a bearing, presses on the basket and disconnects the transmission from the engine. This device is used on those clutches where there is one disc. The clutch, where more than one disc is installed, the basket works slightly differently. The basket releases the first disc, then the springs move the second disc away from the flywheel surface. On all cars with a manual transmission, it is located in the clutch bell (housing), at the end of the fork that connects the basket and the clutch drive.
How to determine the state of a VP
The main signs of a component malfunction are extraneous sounds (the bearing makes noise or whistles) when the clutch pedal is fully depressed and the engine is running. To check the bearing, depress the clutch at different speeds. It is advisable to perform this operation together; if the part is noisy, it is better heard not from the cabin, but from the hood. If it is noisy only in a small rpm range, then most likely the problem is some kind of poorly tightened nut. If the part makes noise at any engine speed, then this indicates a bearing failure, so it needs to be replaced. If you hear these signs while driving on the highway, do not be alarmed. From malfunction to jamming, it will work for at least 10 thousand kilometers. After all, the bearing makes noise due to wear of the rollers and the vibration caused by this, and the principle of its operation is such that it is very far from noise to destruction.
Bearing replacement tools
To work you will need:
If you are repairing a front-wheel drive car, you will need:
- hub nut wrench;
- new hub nut;
- chisel;
- hammer.
Roll the car onto an overpass, pit or lift. If this is not possible, jack up the front left side and support it. Then lift the front right side and support it.
Do not work under a vehicle without a partner. If something goes wrong, he can lift the car and get you out, or at least call for help. Be sure to remove the terminal from the battery.
If you are repairing a front-wheel drive car, first loosen the front wheel and hub nuts.
After raising the car, remove the gearbox. On rear-wheel drive vehicles, this requires unscrewing 4-6 nuts and bolts that connect the flanges of the propeller shaft and the gearbox output shaft. After this, move the shaft to the side so that it does not interfere with dismantling the box. Remember, the box weighs 10 kilograms or more, and when combined with the transfer case, its weight can reach up to 50 kilograms. If you have an axle SUV, then before removing the gearbox, unscrew the bolts and nuts that connect the transfer case flange and the front shaft. If you have an SUV with independent front suspension, first disconnect the rear shaft, then do the same as with front-wheel drive vehicles.
Drive shaft
If you have a front-wheel drive car, then replacing the release bearing should be done as follows. Remove the front wheels, unscrew the hub nuts, and remove the thick metal washers from the CV shaft. Then unscrew the steering pin nut and ball joint nuts/bolts. Using a puller, remove the steering pin from the strut. Push the hub down, remove the strut from the CV joint shaft and move it to the side.
After this, on front- and rear-wheel drive vehicles, place a support under the gearbox. On powerful SUVs, if possible, it is necessary to support the transmission from the passenger compartment. Disconnect the hydraulic or cable clutch and remove all the nuts that secure the bellhousing to the engine. Pull the box to remove the input shaft from the engine. Place the box on the table.
Press the VP lock and remove it from the input shaft. Installation of a new VP must be carried out in the reverse order.
Do not forget to lubricate the splines of the input shaft with thick lubricant (Litol or its equivalent). On front-wheel drive vehicles, install new hub nuts and, after tightening to the required torque, tighten them using a chisel and hammer. After installing the shafts, be sure to check whether you have tightened all the nuts and whether you have installed locking washers everywhere.
Bearing replacement procedure
If the bearing suddenly fails, you first need to take certain measures to get to the nearest service station or personal garage.
You can get to your destination in two ways: by means of a tug or on your own, but without using the clutch, that is, without pressing the pedal.
When moving on your own, you must follow special instructions:
- The first speed is switched on.
- The starter starts.
- After starting to move, you need to release the gas and move the gearbox lever to the 2nd speed position.
- After a little acceleration, you can switch to 3rd speed. In this case, you need to catch the moment when the speed of the running engine and the shaft are approximately equal.
This method should only be used as a last resort. There is a risk of “killing” the clutch basket and even the gearbox. It is advisable to find an opportunity to organize a tow truck.
As soon as the driver is at the service station, the car is sent for diagnostics, and then the necessary repair work is carried out.
If you have certain knowledge on automotive topics, if you do not want to spend money on the help of professionals, you can carry out the replacement on your own. To carry out this process, you will need to have at your disposal the necessary tools, a special place in the garage with a pit and an overpass. The procedure for replacing a bearing yourself is as follows:
- The vehicle is driven into the pit, the hand brake is applied and wheel chocks are installed.
- The terminals are removed from the battery, after which it is completely removed so that it does not interfere with work. At the same time, you need to disconnect the wire that connects the clutch housing ground.
- It is necessary to unscrew all the screws and bolts that securely fasten the car engine protection. The protection is disconnected. This creates unhindered access to numerous components of the clutch system.
- The gearbox drive rod, that is, the rocker, is unscrewed. For this purpose, use a 13 key to unscrew the clamp bolt and move it apart. After this, the drive is disconnected from the main gearbox.
- The sensor that turns on the rear lights is disconnected, as well as the clutch cable.
- The hub nuts are loosened and the front wheels are raised. They need to be removed and the hub nuts must be completely unscrewed. After this, the ball joints are unscrewed and the hubs are turned out so that it becomes possible to dismantle elements such as boots and clamps.
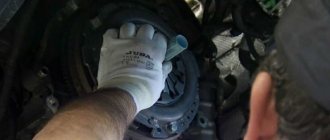
- It is necessary to place a support under the engine so that after removing the gearbox it does not fall. After this, all the screws that secure the gearbox to the engine are unscrewed, and the brackets for securing the gearbox are also unscrewed. It is advisable to carry out this work together, as this is a fairly significant part of the car. In the process of pulling out the device, you need to make sure that the input shaft does not touch the petals.
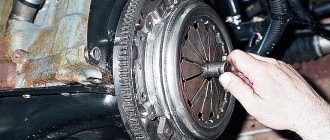
- It is necessary to remove the ends of the spring clamp using a screwdriver. After this, the clutch is pulled out.
- The petals are moved back a little and the old bearing is removed.
- Using the reverse sequence of actions, you need to install the new part in place. The bearing must be installed on the coupling so that all protruding components are directed towards the coupling.
- The new part is fixed using the clutch holder while using a compound such as grease for the clutch release bearing.
After replacing the bearing, the gearbox itself is installed, also in the reverse order. You need to put the ball joints and CV joints in place, and tighten the hub nut. Then the wheels are installed, special wheel bolts are tightened, and the car is lowered to the surface. Once the car is on the floor, you need to tighten them along with the hub nuts.
At the end of the work, you need to pour the oil back into the gearbox, or better yet, replace it with a completely new product.
The old bearing must also be replaced exclusively with a new one.
In this case, you need to pay attention to the manufacturer of the part. If multiple clutch elements are from different companies, a slight imbalance may occur during operation.
Selecting a complete clutch system kit is relatively easy. The main thing is to focus on popularity among buyers, reviews left by drivers, and the reputation of the manufacturer and supplier. The best option would be to purchase a complete set from one company.
Step-by-step instructions for replacing the clutch release bearing
The release bearing is replaced, as mentioned above, if there is increased noise when the clutch is engaged or due to other reasons.
Removing the box
Removing the VAZ 2109 box
So:
- The mudguard and engine crankcase protection are dismantled;
- The oil is drained from the gearbox;
- The drive nuts break off.
Note. It is necessary to turn off the power to the battery and hang the front of the car using reliable supports.
- The clutch cable is dismantled;
- The speedometer cable is turned off;
- The bolts securing the ball joints are unscrewed;
- The longitudinal stretch is removed;
- The drives are pulled out of the gearbox.
Removing drives
Note. To prevent the differential from turning or falling apart, a special stopper is inserted into the gearbox.
- It's time to remove the starter;
- After which the reverse speed sensor is dismantled;
- The flywheel protective casing is separated from the box;
- The gearbox linkage is detached (the position should be marked before removing it);
- The bolts securing the gearbox to the engine are unscrewed one by one.
Note. It is imperative to secure the engine with a hydraulic jack or something else.
- We unscrew all the gearbox supports that connect the box to the car body;
- We weigh the box away from the engine (you can’t do it alone, you need an assistant).
Note. Only about 10 cm is enough for the input shaft to pop out of the clutch basket.
- We remove the box, but do it very carefully so as not to damage the input shaft.
Algorithm for replacing the release valve
After removing the gearbox, we continue:
- We bring out the ends of the spring clip in the place where it engages with the bearing coupling;
Replacing the release bearing of a VAZ 2109
- Remove the bearing;
- Find the 4 legs of the spring holder and press them out;
- Take out the holder;
- We remove the release bearing from the clutch.
Replace the release bearing VAZ 2109
Installing a new bearing
Attention! Before installing a new bearing, it should be thoroughly inspected. It should rotate easily and not jam anywhere, and also have no obvious backlash.
So:
- We install the release lever on the coupling;
- We fix it with a holder.
Note. Before installing the new bearing on the guide, the bushing must be thoroughly lubricated with a thin layer of grease paste.
- We fix the coupling with the bearing with a retainer;
- We install the gearbox in place.
The work on replacing the release bearing has been completed. It remains to be reminded that this step-by-step DIY replacement instruction implies the mandatory use of visual aids. We are talking about photo and video materials. Thus, if you do everything yourself, you will be able to save a lot on repairs, the price of which in the service station is very high.
“Minor troubles”
Noise and squeaking also indicate clutch malfunctions. In this case, the release bearing becomes unusable. Like any other bearing, it begins to make noise. But if you press the clutch pedal, the basket will open and stop rotating (the engine is running, the car is stationary), and accordingly the noise will disappear. This is the simplest diagnosis. Otherwise, the bearing may simply fall apart and damage the basket.
Joker
There is one more part left - the clutch fork. If it breaks, bends or cracks, then no clutch will be released. Accordingly, a broken fork may have symptoms similar to other problems when the gear cannot be engaged.
How to recognize a broken release bearing?
Like other car parts, the unit in question does not last forever and is subject to natural wear and tear. The release bearing operates when you press the pedal, so the service life of the device depends on the frequency of operation.
In addition, the release bearing breaks faster for car owners who do not remove their foot from the clutch pedal. A breakdown can be recognized by many signs, which, if ignored, can cause the mechanism to fail.
Malfunctions of the clutch release bearing can be recognized by the following symptoms:
- The appearance of extraneous sounds.
- When you press the pedal, there is a noise, a whistle.
- Difficulty engaging gears.
It is not recommended to ignore the breakdown, because the result may be clutch failure and the inability to operate the car. Problems with the release bearing are usually associated with wear.
The key things here are:
- Operating conditions (ingress of dirt, water or other foreign objects).
- Mechanical load level.
- Temperature conditions and vibrations.
A characteristic sign of a breakdown of the release bearing is a “death” squeal, signaling the need to replace it; if this is not done, the bearing may fall apart or jam.
Symptoms of a problem
A knock or whistle when the gear is engaged are the main signs of failure of the release bearing. Most often, the driver is the cause of accelerated wear on the release lever. The habit of keeping your foot on the pedal greatly affects the resource. For example, novice drivers often keep the clutch disengaged while standing at a traffic light or in traffic jams.
The bearing itself is quite reliable and, with proper operation, the service life reaches 150-200 thousand kilometers. If a bearing fails, it only needs to be replaced; it cannot be repaired.
Signs
The main signs of an impending breakdown are its slipping and incomplete shutdown.
Clutch system
During incomplete shutdown (the pedal is depressed), it is difficult to change gears with the engine on. The appearance of noises and crackles when shifting gears, increased free play of the pedal. When the clutch slips when the pedal is released, a burning smell is felt, the vehicle's movement is deteriorated, the engine overheats, and fuel consumption increases.
If you notice such signs of a malfunction, if you cannot fix the problem yourself, immediately go to the nearest service station. If you get there on your own, then move slowly, don’t accelerate too much and be very careful when changing gears. It would be a good idea to use a double squeeze when switching.
Clutch pedal
You can also resort to a special technique. When shifting to a higher gear, the clutch must be depressed and the gear lever must be held in neutral for a while. Next you need to release, then squeeze again, then turn on the gear you need.
When switching to a lower gear, the gear lever, as in the previous case, must be held in neutral. Next, we release the clutch and lightly press the gas, then squeeze it again and go to the required gear. If you can master this kind of gear shifting, you will significantly reduce the load on the clutch and extend the life of the gearbox.
Principle of operation
The release bearing can be either push-action or pull-out. It turns the mechanism on and off. The clutch basket is connected to the disc. Today two types of these bearings are produced:
- Roller;
- Hydraulic.
The clutch is used to smoothly disengage the engine from the transmission when changing gears. This approach protects transmission elements from excessive overloads and malfunctions.
One side of the release bearing is made as a round pressure pad, comparable to the diameter of the release springs, located in the center of a part called the clutch basket.
Roller
The release bearing is located on the input shaft protruding from the gearbox, but it is attached to the shaft protective casing and drives the drive fork (rocker arm). The latter presses on a pressure mandrel equipped with special protrusions. The hub moves freely to the input shaft. Damper springs located inside dampen torsional vibrations, they ensure smooth activation.
The pressure plate with the diaphragm spring and the housing form a block called the clutch basket. To create the required force, a diaphragm spring presses on the pressure plate. Inside it is made like metal petals, which are acted upon by a release bearing. It is placed on the axis of rotation as a transmission device connecting the drive to the clutch. The fork (rocker arm) is designed to move the release clutch with the bearing.
Hydraulic
Operating principle of a release bearing
On modern cars, release bearings can be roller or hydraulic type. The first type, thanks to the rigid connection of the rod, transmits force mechanically. Hydraulic operates thanks to a hydraulic system, which makes it possible to press the pedal without much effort.
Kalina clutch diagram
The clutch is designed to smoothly disconnect the gearbox from the engine during gear changes. This way, the gearbox components are not subject to excessive stress. The second function of the clutch is to dampen vibrations.
The operation of the node consists of the following actions:
- a pressure plate, rigidly attached to the machine body, presses the flywheel to the driven disk;
- the flywheel hub is connected directly to the input shaft and moves along it;
- damper springs, which are located inside the hub, help dampen vibrations and make the car move smoothly;
- from the damper spring the force is transferred to the pressure bearing;
- the inner diameter of the damper spring, which is filled with metal “petals,” is acted upon by a VP (the author of the video is Alexey Romanov).
The release bearing is located on the axis of rotation and is a transmission mechanism between the clutch and the drive. The release bearing moves simultaneously with the release clutch, which is activated by the release/disengagement fork.
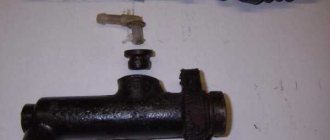
Repair and replacement of the clutch slave cylinder
When choosing a spare part to replace the clutch cylinder, you should pay attention to the material from which the part body is made. As noted earlier, such material can be cast iron, steel, aluminum or polymers
Today, many manufacturers offer aluminum and even polymer cylinders, but such parts are less reliable.
There are several types of clutch cylinder malfunctions that will require rod repair:
- leakage of working fluid through worn seals or connecting tubes with defects;
- presence of cracks in the cylinder body;
- broken working cylinder springs.
The rod consists of several components, each of which is subject to wear. Its parts - pusher, piston, cuffs, spring - experience high loads during operation, so there is a possibility that they may fail.
Symptoms of a faulty clutch cylinder:
- a decrease in the level of brake fluid in the cylinder reservoir and the appearance of spots under the car while parked;
- the pedal fails and the clutch works intermittently;
- There are problems with shifting gears.
Experts advise, first of all, to pay attention to the travel of the clutch pedal. If it runs too softly, this is not yet a reason for urgent repairs, but the operation of the cylinder should be diagnosed.
To check it, you need to bleed the clutch hydraulic drive. If there are air bubbles in the working fluid, you should understand the reasons for their appearance. As a rule, air gets inside the rods of the clutch slave and master cylinders due to depressurization of the sealing collars.
As noted earlier, repairing and replacing the clutch slave cylinder is not a very difficult task. This part is most often located on the gearbox housing.
First you need to unscrew the fastening bolts, disconnect the pusher from the fork and begin dismantling the hose that comes from the main circulation center.
Since there is working fluid in the master cylinder, the hose should be plugged (for this you can use a plug of the appropriate diameter). There is also another opinion - you need to disconnect the hose to completely drain the brake fluid (it is believed that this will help flush the clutch hydraulic system from dirt).
After dismantling, the clutch master cylinder must be disassembled and, if possible, repaired. If this part has a metal body, then it can be fixed in a vice, but if the part is plastic, then you need to be careful not to damage it.
After disconnecting the air valve, it is necessary to remove the outer cuff. After this, taking into account the design features of the cylinder, it is necessary to provide access to the rod and remove the retaining ring. After disassembling the part, you must ensure that there is no damage to the spring, rod or defects of the cylinder mirror.
All components must be washed with brake fluid. We noted earlier that kerosene, gasoline, motor oil or water cannot be used for this purpose (these liquids contribute to the swelling of rubber elements).
When assembling the cylinder, all seals and seals should be replaced with new ones.
Repair of the clutch master cylinder will not be possible if:
- body cracks;
- noticeable wear on the inner surface of the body, which appears as a result of defects in the rod.
In this case, you need to completely replace the faulty clutch cylinder with a new part.
After replacing the clutch master cylinder, do not forget to bleed the system.
The method for bleeding the hydraulic drive system after replacing the clutch slave cylinder does not differ from that described previously for the hydraulic clutch. At the same time, in some car arches (for example, on Fiats), the clutch system is back-pumped. To do this procedure yourself you need to prepare:
- a hose that fits tightly onto the exhaust valve;
- a large syringe, the diameter of the nozzle of which corresponds to the size of the hose;
- a wrench to remove the air release valve.
First, unscrew the cap of the reservoir with the working fluid and draw it into the syringe. You need to expel all the air balls from the syringe, and then connect its spout with a hose, the second end of which is connected to the release valve. After this, you need to unscrew the valve 2-3 turns, press the syringe and pump the brake fluid into the clutch cylinder. To prevent air from entering the system, you must first tighten the valve and only then remove the hose.
This sequence of actions must be performed several times until all the air is forced out of the hydraulic drive system into the tank. After this, you need to depress the clutch pedal about 10 times and, if necessary, adjust its travel height.
Malfunctions
To find out what the malfunction is, you need to depress the pedal (the engine is running). If after this the noise disappears, then the part is not at fault. These signs indicate problems with the gearbox and it needs to be repaired. When the noise continues to intensify, the fault is related to the bearing and it urgently needs to be replaced.
Torque acts on the clutch release bearing only at the moment of pressing. When the pedal is depressed, it goes back together with the driven disc (clutch basket). And then, if the gear is engaged and the pedal is held down for a long time, then uneven loads act on the part. This usually leads to rapid wear, but if all operating rules are followed, repairs will not be needed for long.
But the knocking sound when the clutch pedal is depressed (the engine is running) can intensify in cold weather. Then it's quite possible there's no need to worry. This part is made of heavy-duty steel with a low linear expansion coefficient. The glass, where all the bearing elements are located, is, on the contrary, subject to temperature influences, so knocking may occur periodically. This does not indicate a system malfunction
What is the function of the clutch release bearing?
During operation, the clutch can be in one of three states:
- fully engaged, that is, the pressure plate (basket) with all the force of its powerful spring presses on the driven disk, forcing it to press against the surface of the flywheel to transmit all the engine torque to the splines of the transmission input shaft;
- turned off, while the pressure is removed from the friction surfaces of the disk, its hub moves slightly along the splines and the gearbox is disconnected from the flywheel;
- partial activation, the disk is pressed with measured force, the linings slip, the rotation speeds of the engine and gearbox shafts are different, the mode is used when starting from a stop or in other cases when the engine torque is not enough to fully meet the needs of the transmission.
To control all these modes, it is necessary to remove some of the force from the basket spring or release the disk completely. But the pressure plate is attached to the flywheel and rotates with it and the spring at high speed.
It is only possible to come into contact with the diaphragm spring petals or the arms of a set of coil springs through the bearing. Its outer race mechanically interacts with the clutch release fork, and the inner race is directly connected to the contact surface of the spring.
Part location
The release bearing clutch is located inside the clutch housing, which connects the engine cylinder block to the gearbox. The primary shaft of the box protrudes from its crankcase, and on the outside there are splines for sliding the clutch driven disc hub.
The part of the shaft located on the side of the box is covered with a cylindrical casing, which acts as a guide along which the release bearing moves.