11.2.1 Features of repair of VAZ-2104 and VAZ-21043 cars VAZ-2104 and VAZ-21043 cars have different springs in the rear suspension and a modified electrical circuit for the rear part of the car, due to the use of a station wagon body. The body has a different design of the rear frame, rear seat and additionally has a tailgate. The rest is remo.
11.2.2 Rear suspension Rear suspension springs under a load of 3185 N (325 kgf) are divided into two groups: group A springs - length greater than 278 mm, marked with light brown paint; group B springs (length equal to or less than 278) are marked with blue paint on the outside of the coils.
11.2.3 Electrical equipment The electrical equipment of the VAZ-2104 and VAZ-21043 cars differs from the VAZ-2105 by the additional installation of: – wiper 65 (see subsection 12.2) and rear window washer 64, which are turned on by switch 37 installed on the instrument panel; – lampshade 67 for illuminating the rear part of the body. Power supply circuits
11.2.4 Body
View of the compartment for the spare wheel of a VAZ-2104 car. The mat and the cover with the fastening screw are not shown. Tailgate of a VAZ-2104 car 1 – door trim; 2 – upholstery holder; 3 – tailgate stop with hinges; 4 – loop link amplifier; 5 – door hinge link; 6 – sick.
VAZ-2104 and VAZ-21043 cars have different springs in the rear suspension and a modified electrical circuit for the rear part of the car, due to the use of a station wagon body. The body has a different design of the rear frame, rear seat and additionally has a tailgate.
Otherwise, the repair of VAZ-2104 and VAZ-21043 cars does not differ from the repair of VAZ-2105 and VAZ-21053 cars.
| « previous page 11.1.9. Ignition system | to contents | next page » 11.2.1. Rear suspension |
Copyright © 2007-2019 All rights reserved. All trademarks are property of their respective owners.
VAZ 2104 is an old-fashioned car. It can be repaired, including with your own hands. Some things are done even in a private garage, without serious experience. This is not like today's foreign cars, the repair of which consists of replacing units: the transmission is broken - we change the transmission, the starter is broken - we change the starter, the car is broken - we change... Not to that extent, of course, but close to it.
Repairing a VAZ 2104 is a “club” event. Members of the informal club “VAZ 2104 Repair” can do anything. In private garages, they disassemble the engine, grind the valves, upgrade the carburetor and increase the engine power to 200 horsepower. Not everyone can do this, but even inexperienced car enthusiasts can do simple repairs on a VAZ 2104 with their own hands.
Which machine components most often require repair and why?
VAZ 2104 is a work car, not a ceremonial one. Many car owners are rural residents; they are often driven on bad roads or off-road conditions. This determines the nature of typical breakdowns of the VAZ 2104. Suspension parts often break.
Typical malfunctions include breakdowns:
- ball joints;
- master brake cylinder;
- shock absorber struts;
- front brake cylinders;
- rear brake cylinders.
Car brakes are important from a driving safety point of view. Without the proper experience and infrastructure, brake repairs should be done by professionals. They do these jobs every day and are responsible for them. Such breakdowns of the VAZ 2104 happen often, and the technicians have a lot of experience.
The second place in the number of failures in the VAZ 2104 car is electrical equipment. Light bulbs burn out, contacts come loose, high-voltage wires break. From time to time you have to change the battery and buy an alternator belt. Electrical engineering is the science of contacts. You have to keep an eye on them.
Read also: Suzuki sx4 hatchback technical specifications
The VAZ 2104 engine is reliable, it has proven itself during operation in winter and summer. But he requires care. The fuel and air filters of the VAZ 2104 become clogged and must be changed at regular intervals. The VAZ 2104 engine does not like “left-handed” low-quality gasoline. Refuel your VAZ 2104 at trusted gas stations.
Cleaning the fuel tank, fuel supply pipes and carburetor of the VAZ 2104 is a labor-intensive and unpleasant task. The use of special fuel additives helps, but it is better to avoid the risk of filling with “left” gasoline.
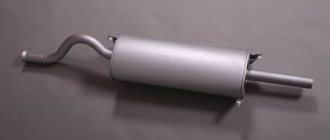
Replacement of exhaust system parts of VAZ 2104
Again, to change any part, refer to the information above in the text, but take into account the following tips. So:
- Place something under those parts that remain in place so that they don’t get torn off.
- Use the chisel carefully. Do not allow normal parts to flare, much less break them.
- The same goes for the Bulgarian. You should cut the pipes carefully so as not to touch other parts that you do not intend to change.
Well, that's probably all. Follow safety precautions, wear safety glasses when working with an angle grinder, apply the tips from the article, and this way you can avoid many problems, thereby making your work easier. Also watch the video to get a clearer picture.
Sources
- https://www.flashracing.ru/2010/03/amputaciya-nenavistnogo-katalizatora/
- https://masteravaza.ru/vozdushnyj-filtr-i-sistema-vypuska-otrabotavshih-gazov/glushitel/vaz-2104-zamena-glushitelya-110
Will the repair and operating manual help when disassembling a car?
The VAZ 2104 repair and operation manual is an indispensable source of information about your car. Where else can you find out how much oil is poured into the VAZ 2104 engine and with what frequency and what oil is suitable for your “four”. The manual says how much luggage is loaded into the trunk of a VAZ 2104, what fuel consumption is used when driving in the city and on the highway, how much anti-freeze is poured into the windshield washer reservoir, and to what pressure the tires are inflated. This information is given in the section on operating the VAZ 2104. And the more accurately you follow the recommendations from this section, the less often you will have to refer to the repair section.
The VAZ 2104 wiring diagram contains a lot of information. The manual contains an electrical diagram indicating the color of the wires that lead to electricity consumers and the current ratings for which the fuses are designed. This information is indispensable when troubleshooting problems related to electrical repairs of a VAZ 2104 car.
It is important that the repair and operation manual that you purchased along with the car contains information specifically about your modification and configuration option of the VAZ 2104. Information obtained on the Internet often refers to a version of the VAZ 2104 that is different from yours and may not be suitable for you personally. If you rely on information obtained from the Internet, you are responsible for the result. If you find a typo in the official repair manual, you can submit a claim to the manufacturer of the VAZ 2104, and he will respond.
The official manual is important when disassembling and even more important when assembling the VAZ 2104.
Illusory repair possibilities
It should be said right away that repairing throttle position sensors is extremely rare. Firstly, the part itself, even the most expensive one, costs only a few dollars, and it makes sense to spend the money. Secondly, in most cases it is simply impossible to make repairs, for example, to restore a worn-out base layer. However, in some models you can slightly shift the resistive tracks relative to the slider and thereby extend the life of the device.
So, there is a special screw on the sensors. With its help, the position of the tracks is fixed. If they are already worn out, then you should loosen this same screw, this will change the location of the slider a little, and you can be a little patient with replacing the device. But don't count on long-term respite. Naturally, we remember that the contactless sensor cannot be repaired. This completes the adjustment, repair and replacement of the throttle position sensor, now you can operate the car for several more years and not even think about such issues.
To check the supply voltage, disconnect the wire block from the sensor. Turn on the ignition and use a tester to measure the voltage between terminals “A” and “B” of the wire block. The supply voltage should be about 5V. To check the sensor, we connect the block of wires to it and, with the ignition on, measure the voltage (the wires of the block can be pierced with thin needles connected to the terminals of a voltmeter) between the sensor terminals “B” (“ground”) and “C” (slider) - it should not be more than 0.7V. Turning the plastic sector of the drive by hand, fully open the throttle valve and measure the voltage again - it should be more than 4V. Turning off the ignition, disconnect the wire block and connect an ohmmeter between terminals “C” and “A” (or “B”) of the sensor. Slowly turning the drive sector, we monitor the readings of the tester arrow. There should be no jumps in the needle throughout the entire working range. To replace the sensor, remove the throttle body from the receiver studs without disconnecting the coolant inlet and outlet hoses from it (see Removing the throttle body).
Using a Phillips screwdriver, unscrew the two screws securing the sensor to the throttle body...
...and remove the sensor.
The sensor is marked 2112-1148200
Remove the sealing foam ring installed under the sensor.
Install the sensor on the throttle body in reverse order. In this case, the damper must be in the closed position. The tightening torque for the sensor mounting screws is 2 N•m.
The VAZ 2107 throttle sensor, together with a mass air flow sensor and oxygen concentration control, acts as an element that controls the supply of fuel to the combustion chamber depending on the position of the throttle valve. As with any repair to replace electronic fuel injection sensors, they must be checked for functionality. To check, you will need a regular multimeter with the function of measuring resistance in the power circuit and a set of standard tools.
To check the throttle sensor:
- Disconnect the package with wires from the sensor.
- The connector body will be marked. Connect the ohmmeter leads to terminals “B” and “C”. We open the throttle valve; for a working sensor, the resistance will increase from 2.7 to 8.2 kOhm.
- Next, we switch the multimeter to voltmeter mode and connect its negative terminal to engine ground, turn on the ignition in the circuit, and the positive probe will turn on. For a working sensor, the voltage should be approximately equal to 5V, if absent or significantly different from the norm, there is a malfunction in the power circuit or in the computer. After measuring the voltage, turn off the ignition.
After confirming that the throttle sensor is not working and deciding to replace it, you must:
- To remove the sensor, use a Phillips screwdriver to unscrew the two screws securing it to the throttle body and remove it.
- There will be a foam gasket between the sensor and the housing.
At this point, the repair work to check and remove the VAZ 2107 throttle sensor is completed. The installation must be carried out with the damper closed, aligning the protrusion of the damper axis with the groove on the sensor body.
Sources
- https://carnovato.ru/proverka-regulirovka-datchika-polozhenija-drosselnoj-zaslonki/
- https://www.autofizik.ru/VAZ/VAZ-210721047/features-of-repair-of-a-VAZ-2107-20-with-engine-VAZ-2104/checking-and-replacing-position-sensor-d
- https://remont-vaz2106.ru/datchik-drosselnoj-zaslonki-vaz-2107
Differences in the repair of carburetor and injection versions
From a repair point of view, the carburetor and injection versions of the VAZ 2104 engine differ in that:
- a carburetor engine is easier to repair in the field, but it breaks down more often;
- The VAZ 2104 injection engine fails less often, but it is more difficult to repair without the appropriate infrastructure.
The carburetor engine of the VAZ 2104 has a device that has been familiar to consumers of domestic automotive products since pre-war times. The air-fuel mixture is prepared in the carburetor, enters the engine cylinder, ignites from the spark plug and pushes the piston. If the VAZ 2104 engine stalls while driving, if the idle speed fluctuates, if the engine reacts sluggishly to pressing the accelerator pedal, there is only one recipe. I pulled the suction towards myself and off to repairs. Gasoline consumption will increase, but you will get to the nearest auto repair shop in a VAZ 2104 with a carburetor engine.
When an engine with multiport injection needs to be repaired, things are not so simple. The operating modes of the injection engine are controlled by the electronic control unit (ECU). To understand what exactly the fault is that requires repair, you need computer diagnostics, reading error codes from the computer. This is not the case on the road. Get the cable, ask for a trailer or call a tow truck.
Both versions of the VAZ 2104 engine have pros and cons. The trend in the global automobile industry is the transition from carburetor to injection engines. Our time is the time of the injector. So, compared to a carburetor engine, an injection engine has more advantages than disadvantages. And it's not just a matter of repairs.
Injection engines are more economical, reliable and environmentally friendly.
How to remove the coolant temperature gauge sensor?
Before removing the coolant sensor, remove the air filter, it will interfere with its unscrewing. And first of all, drain the antifreeze (antifreeze). We will merge as follows:
- The engine must be cool.
- You will need spanners for 8, 13, 17.
- Prepare a container for the coolant to drain!
- We remove the engine protection, use a wrench to unscrew the radiator mounts
- We set the heater to maximum, then open the heater tap and the cap of the expansion tank.
- We place the container under the radiator and SLOWLY (if you do it quickly, you will flood the generator) unscrew the drain plug.
- Let him run away for about 10 minutes.
- Let's move on to the engine itself: similarly, we place the container under it and unscrew the plug (under the ignition module) on the cylinder block.
- Let it flow again for 10 minutes.
Before closing all the plugs, wipe the neck of each of the holes!
We remember where the coolant temperature sensor is located on the VAZ 2114, and begin to remove it:
- found it, removed the protective rubber layer;
- we look at the body, look for the markings (on one of its 6-sided parts), remember it, so that later we can put everything in accordance with the system;
- unscrew the meter with the twenty-first key;
- install a new one.
How to change the temperature sensor on a VAZ 2114:
- bought a new one;
- Using the same key number 21, we turn the new one into its rightful place;
- remember the markings;
- add a little heat sealant to the threads just to be sure;
- pour coolant (antifreeze or antifreeze) back into the heating system (radiator) and the engine cylinder block.
If the VAZ 2114 coolant temperature sensor still does not work, then carefully check the following:
- Its quality may be defective (take it to the store and ask for a replacement), therefore, always keep the receipt for any spare parts purchase. parts!
- There may be a coolant leak, or perhaps you have splashed the generator after all.
- You just might not have refilled the antifreeze.
- The sensor is not screwed in tightly enough
We checked everything, but the meter still does not show the temperature of the VAZ 2114 engine. Then you should contact a service center. As with any vehicle, everything in the fourteenth is interconnected. The system may fail for a related reason: for example, when you removed the DTOZH, you decided to remove the ignition module so as not to interfere. The decision is correct, however, removing the module and putting it in its place is also an art.
The second point related to the temperature sensor: coolant level. It may be unstable, it may be that the meter for this level (also a sensor) has failed, and so on. Keep an eye on the antifreeze and save your nerves and your coolant temperature meter.
The service will replace the sensor for you and guarantee a high-quality replacement with proper high-quality assembly of all parts in their places. Naturally, you can buy a coolant temperature sensor on the spot, and the cost of replacement work will be twice the cost of the device.
How much a VAZ 2114 coolant temperature sensor costs should be judged based on geographic location: from 80 to 400 rubles in any store that sells auto parts. The pleasure, in principle, is not expensive, but, given the fact of fairly frequent breakdowns (the car stopped being produced in 2013, breakdowns are a natural process), it is still expensive. Therefore, you should not bother with the service, you need to try to figure out the situation yourself. Moreover, now the Internet is saturated with all sorts of useful links, forums, photographs, diagrams and even videos on replacing one or another auto part.
Despite its importance, DTOZH is a relatively simple sensor; its task is to monitor the condition of the coolant (coolant) in the cylinder block jacket. The temperature sensor promptly reports changes in coolant temperature, after which it transmits this information to the electronic control unit (ECU). DTOZH is often confused with DTUOZH (coolant temperature indicator sensor)
The difference is that the second displays information on the instrument panel in order to keep the motorist informed about what is happening in the engine, essentially about the coolant temperature. While the DTOZH works with the ECU, which, after receiving information about the high coolant temperature, turns on the fan.
DTOZH is often confused with DTUOZH (coolant temperature gauge sensor). The difference is that the second displays information on the instrument panel in order to keep the motorist informed about what is happening in the engine, essentially about the coolant temperature. While the DTOZH works with the ECU, which, after receiving information about the high coolant temperature, turns on the fan.
DIY electrical equipment repair
The most common type of repair of the electrical system of a VAZ 2104 car is replacing the fuse. If an electrical appliance fails, first check the fuse. Whether it's a light bulb, an actuator, or an indicator, start with the fuse.
Read also: Nissan all-wheel drive lineup
On the VAZ 2104 in the first years of production, finger fuses were installed. They were dielectric cylinders with metal contacts at the ends and a fusible element inside the cylinder. The design was not very reliable. The contacts got hot and the fuses failed.
Subsequently, fork-type fuses were used on the VAZ 2104. A fuse of this type consists of a plastic body, on which the rated current is color-coded and numerically marked, and two contact flat electrodes connected to each other by a fusible jumper. Through the window in the upper part of the case you can see the condition of the fuse element.
The fuse box is located in the engine compartment on the right side. The block is closed on top with a lid on which symbols for the purpose of the relay, fuse numbers and the circuits they protect are printed, which is convenient for repairs. Most of the circuits of the VAZ 2104 car are protected by fuses installed in the mounting block.
By removing the fuse that protects the circuit of the failed device, make sure that it has failed. Insert new one. It is not recommended to use “bugs” made from individual strands of stranded copper wire for repairs. Is it dangerous. Remember that replacing a fuse does not eliminate the cause of its blown and often only provides a temporary reprieve. After replacing the fuse, go to the workshop as soon as possible, determine the cause of the failure and make repairs.
A supply of fuses of three ratings for repairing a VAZ 2104 should accompany you on every trip.
Video - How to change the speedometer drive on a classic (2101 – 2107)
To replace the speedometer drive you will need an inspection pit, overpass or lift.
The speedometer drive is located on the left side of the gearbox next to the support (beam). To remove the speedometer drive, unscrew the plastic cable end nut and remove it. After this, remove the tension spring from the clutch slave cylinder. Pull the cotter pin out of the pusher and unscrew the two cylinder mounting bolts and pull the pusher out of the clutch release fork. Lower the box as far as possible and unscrew the speedometer drive bolts, then pull it out of the gearbox.
Before installing a new drive, ensure that the number of teeth matches the gear ratio. 13 teeth for a gearbox with a ratio of 3.9 (speed). 12 teeth for gearbox with ratio 4.1 (standard). 9 teeth for gearbox with ratio 4.3 (traction). When installing a new speedometer drive, use a gasket from a repair kit or automotive sealant. If installing a new speedometer drive does not improve performance (the cable and indicator are in order), you will need to dismantle the gearbox, disassemble and replace the drive gear. Replacing the electric drive is carried out in the same way, the difference is that instead of unscrewing the cable, remove the wire terminal from the contact and unscrew the speed sensor (converter), after which the drive gear is removed.
DIY generator repair
A common type of repair of VAZ 2104 units is the elimination of breakdowns associated with the car’s generator. Malfunctions are divided into three groups.
- Incorrect belt tension adjustment.
- Belt failure.
- Damage to the generator itself.
The belt in the VAZ 2104 engine passes through 3 pulleys: the generator itself, the crankshaft and the coolant supply pump shaft. The correct degree of belt tension can be checked by measuring the free deflection of the belt between the crankshaft and water pump pulleys. The deflection is measured with the engine not running, in the middle of the belt span between the pulleys. The standard value is 10–12 mm. If the deflection is higher than normal, repairs are necessary: the belt is tightened.
You can do this kind of work yourself. To do this, loosen the nut securing the generator to the adjusting bar. Move it away from the engine crankcase until the belt tension is restored to normal.
To repair the generator yourself you will need:
- portable multimeter;
- three-jaw puller;
- a soft metal drift for pressing out the front and rear bearings;
- mandrel for pressing bearings;
- set of keys and screwdrivers.
During the repair, you will probably have to grind off the pierced ends of the bolts securing the front bearing cover with a grinder. You will need a fully equipped locksmith workshop. There are craftsmen who can rewind a burnt-out stator winding, but this is an activity for fans of VAZ 2104 repair. You will spend more money on the wire than on purchasing a used generator from disassembly. And you don’t need a new one: your car is “old,” well-worn. It's unlikely to survive the new generator.
Replacing a broken unit yourself is the maximum you can claim without professional experience and special equipment for repairs.
Car device
The design of VAZ-2105 and VAZ-2104 passenger cars is described and clearly shown here. issued by the Joint Stock Company "AVTOVAZ". The VAZ-2105 model is a modernization of the well-known model of the VAZ-21011 passenger car. The modernization was aimed at giving the car a more modern appearance, increasing its comfort, active and passive safety. efficiency while reducing the vehicle's environmental impact.
VAZ-2105 and VAZ-2104 cars meet all safety requirements of the UN Economic Commission for Europe. The layout (location of components and assemblies) of cars is carried out according to the so-called classical scheme, i.e. The engine is located at the front, and the rear wheels are driven. The engine is pushed forward as much as possible, which ensures optimal weight distribution along the axles, and therefore good vehicle stability on the road.
This engine arrangement allows for a spacious interior for passengers with a given wheelbase. Good car comfort, which is also one of the safety factors, is achieved due to ease and convenience of operation, good visibility from the driver's seat, low noise in the cabin, minimal influence of body vibrations and vibrations and effective interior ventilation.
In addition, the shape and softness of the seats, the ability to adjust their location and backrest angle, as well as the convenient placement of controls improve the driver’s working conditions and reduce fatigue. The fact that the interior is located inside the base also increases the comfort of cars (especially when driving on roads with poor surfaces). those. in the zone of best smoothness.
Vehicles equipped with a towing device can be used to operate a trailer with a ball-type towing device. The permissible gross weight of a towed trailer with brakes is 750 kg. and a trailer without brakes is 500 kg.
The engine installed in cars is four-stroke, carburetor, in-line, with an overhead camshaft. The use of a toothed belt in the camshaft drive and a well-muffled air filter have significantly reduced engine noise.
The engine lubrication system is combined: the bearings of the crankshaft and camshaft and the drive shaft of auxiliary units are lubricated under pressure, and the cylinders and gas distribution mechanism are lubricated by splashing. Closed crankcase ventilation system. The system contains an oil separator and a flame arrester.
The engine power system includes an air filter 5 with a thermostat, a two-chamber carburetor with a falling flow, a diaphragm fuel pump 29 with a manual fuel pumping lever and a fuel tank, an Ozone carburetor equipped with an electronically controlled forced idle economizer system, and an ignition distributor with Centrifugal and vacuum ignition timing regulators provide reduced fuel consumption and lower toxicity of exhaust gases.
The engine cooling system is liquid, closed type, with a translucent (for visual control of the liquid level) expansion tank. The centrifugal pump and fan are driven by a V-belt from the crankshaft pulley. The cooling system has a thermostat designed to speed up warm-up and automatically ensure the engine's thermal conditions. The gas exhaust system is made with two mufflers located in series.
Transmission. A vehicle's transmission includes the clutch, gearbox, driveline, final drive, differential, and axle shafts. It serves to transmit torque from the engine crankshaft to the driving rear wheels of the car.
Clutch. The cars are equipped with a single-plate dry clutch with a diaphragm pressure spring, with a torsional vibration damper (damper) on the driven disk. The clutch is controlled by a foot pedal with a servo spring and a hydraulic release drive with a fluid reservoir installed on the front panel of the vehicle. Transmission 22 has four gears for forward movement (five gears in the variant) and one gear for reverse. All forward gears are equipped with synchronizers, which equalize the rotation speeds of the connected parts before turning on the gears. Optimal selection of gear ratios provides the car with confident starting, good acceleration and high efficiency.
The gear shift lever is located on the floor of the body. Cardan transmission 17, consisting of two shafts with an intermediate support and equipped with two cardan joints on needle bearings and a rubber coupling, transmits torque from the gearbox to the main gear. The front driveshaft is connected to the driven shaft of the gearbox through a rubber elastic coupling and a flange that moves along the driveshaft on splines.
The rear propeller shaft is connected through a flange to the final drive gear. An intermediate elastic support with a ball bearing supports the middle part of the driveshaft and absorbs its vibration. The main gear is hypoid, consisting of a pair of bevel gears with spiral teeth, the axes of rotation of which intersect. The torque from the driven gear on the axle shaft is transmitted through a bevel differential with two satellites. The differential allows the vehicle's drive wheels (left and right) to rotate at different speeds when cornering.
Steering. The steering consists of a steering mechanism and a steering gear, which transmits force from the driver to the steered wheels. The steering wheel, through the steering mechanism and drive, turns the front wheels, thereby changing the direction of movement of the car.
The steering gear worm gear housing is attached from the inside of the engine compartment to the left side member of the body; on the opposite side, the pendulum arm bracket is attached to the right side member. The steering gear includes two steering linkage levers. bipod, pendulum arm and three rods: one middle and two extreme. The middle link is solid, has ball joints at the ends for connection with the pendulum arm and the steering bipod. Each extreme link consists of two threaded tips connected to each other by split adjustment couplings, which change the length of the side links and regulate the toe-in of the wheels.
The adjusting couplings are fixed on the rods with tie clamps. Each extreme link has ball joints at the ends for connection to the levers or steering bipod. Chassis The chassis of the car consists of suspension units of the front and rear wheels with shock absorbers and an anti-roll bar in the front suspension, wheel hubs and wheels with tires.
The front wheel suspension is independent, lever-spring, with coil springs, double-acting telescopic hydraulic shock absorbers to dampen body vibrations on the elastic suspension elements, equipped with an anti-roll bar and two compression buffers that limit suspension travel. Stamped upper and lower control arms are pivotally connected to a forged steering axle. Two ball joints are placed in housings and attached to the arms with bolts and nuts. Using rubber-metal hinges, an axle, bolts and nuts, the lower arm is connected to the cross member of the front suspension, mounted on the longitudinal beams (spars) of the body.
The upper arms are connected to the load-bearing part of the body using similar rubber-metal hinges and an axle. The suspension coil springs are placed between the lower control arms and the mudguard strut supports. The torsion stabilizer bar, which reduces the lateral tilt of the body when turning and reduces the lateral sway of the body, is connected to the body and lower arms using brackets that cover the rubber cushions of the stabilizer bar. Hydraulic shock absorbers located inside the springs have an eye in the lower part for attachment to the lower arm, and in the upper part there is a rod with a threaded end for attachment to the body.
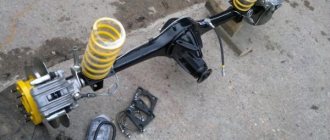
The front wheel hub rotates on two tapered roller bearings mounted on a axle. The rear wheel suspension consists of two cylindrical coil springs 14 with double-acting telescopic shock absorbers 15, four longitudinal and one transverse rods, two compression buffers located at the ends of the rear axle beam, and one central one. located in the middle.
The rear suspension shock absorbers are installed outside the springs and are attached from above to the body, and from below to the ends of the rear axle beam through conical rubber bushings. Rubber buffers attached to the body floor above the rear axle beam are designed to soften possible impacts of the rear axle beam that may occur when driving on unimproved roads. A buffer over the front neck of the final drive housing limits the upward stroke of the crankcase, preventing the driveshaft from touching the body floor.
The wheels of the car are disc, stamped, with removable decorative caps. Radial tires with tubes are mounted on the wheels. The front wheels are fastened with four bolts to the hub flanges, the rear wheels - to the axle flanges. Wheel and tire assemblies are balanced statically and dynamically. Imbalance is corrected using weights attached to the wheel rim.
continuation>>
Announcements of articles from friendly sites
DIY chassis repair
Regarding the repair of the chassis, there is one operation that is mandatory for every car enthusiast. This is a replacement for a flat tire. It is not for nothing that the set of tools supplied with the cars includes a jack and a wheel wrench. Many people get punctured wheels. Be prepared for repairs.
Modern tubeless tires can travel several tens of kilometers with small punctures. If you have an electric pump in your car, you can drive to the nearest tire repair shop. But you shouldn’t count on this and drive a VAZ 2104 without a spare wheel. Punctures can be large and the tire will need to be replaced immediately. A spare tire, a tire, a jack and the corresponding repair skills are mandatory accessories for driving a VAZ 2104.
Read also: Auto ru personal account
Every car trip begins with an external inspection. You just see a flat tire and put on a spare. When driving, a sure sign of a broken tire is that the car is driving, the car is being pulled away from the direction of travel. If such a slip occurs, you must immediately pull over to the side of the road and stop the car in a safe place. Install a warning triangle.
To change a wheel, the car must be securely locked in place. Put the switched off engine into gear, pull the parking brake lever all the way, and place a brake shoe or an improvised object, such as a stone or brick, under the fixed wheel. Install the jack in the socket closest to the wheel to be repaired.
The order of further actions is as follows.
- Remove the decorative cap.
- Raise the car slightly, but not until the damaged wheel lifts off the road surface.
- Using a wheel wrench, unscrew the four nuts securing the wheel to the hub.
- Raise the car with a jack until the wheel lifts off the road surface.
- Remove the damaged wheel and install a spare one in its place.
- Place the nuts in their original places and tighten by hand until they contact the surface of the wheel rim. Lower the car until the wheel touches the road surface.
- Use a wheel wrench to tighten the nuts completely.
- Lower the car. Install the decorative cap. Remove the jack and the damaged wheel.
- Upon completion of the repair of the VAZ 2104, remove the warning triangle.
Go to a tire repair shop as soon as possible after replacing it. Repair the flat tire and continue driving with a working spare tire.
Vehicle interior
The original interior of the VAZ 2104 has an ascetic design. All devices, parts and products are designed to perform their functions; there are no decorations or even a hint of any design solution. The task of the model's designers was to make a working car, suitable for passenger and cargo transportation, without focusing on comfort and beauty.
The interior contains the minimum necessary set of instruments and vehicle controls, standard upholstery in wear-resistant fabric and removable faux leather headrests on the seats. The picture is complemented by standard rubber mats on the floor.
The design of the Four's interior was borrowed from the base model, with the exception of the rear sofa, which was made foldable for the first time in the history of VAZ models.
Video: review of the Quartet’s interior
VAZ 2104 cars were discontinued in 2012. Therefore, even today you can meet amateurs who do not change their beliefs and use only time-tested and road-tested domestic cars.
Other repair options for VAZ 2104
The best repair is prevention. The climate in our country is such that the famous quality of car painting by AvtoVAZ renders the car bodies unusable in just five years. Therefore, the most important type of preventive repair is anti-corrosion treatment. You did not get a new VAZ 2104, and you may not want to undergo expensive anti-corrosion treatment at a specialized service center. In this case, you will have to cover the body of the VAZ 2104 with anticorrosive yourself.
Choose a clear, sunny day to work. If you don't have an inspection hole in your garage, use an overpass. Free repair overpasses can be found at garage cooperatives and highway parking lots. To cover the VAZ 2104, use specialized materials from well-known or Movil. It is not recommended to use folk remedies, such as cannon lard or grease. They are not intended for anti-corrosion treatment of car bodies. After application, the preparations set in about a day. During this period, it is better to refrain from operating the car.
The procedure for anti-corrosion treatment.
| Stages | Actions |
| Washing. | Wash the car from below with hot water. If possible, under pressure. |
| Drying. | If the car is not blown with hot air, drying time is 3 hours. |
| Inspection and troubleshooting. | The condition of the underbody of the car is determined with the fender liners and mudguards removed. |
| Treating damaged areas with a rust modifier. | Supply of the composition into hidden cavities. If possible, under pressure. |
| Anticorrosion application. | On the bottom and wheel arches. |
| Careful handling of the engine compartment. | Avoid contact with wires and belts. |
The VAZ 2104 station wagon was produced from 1984 to 2012. This means that your car is already at a considerable age - take care of it. Do not miss the scheduled deadlines, change the oil on time. Take care of the suspension: do not drive over bumps and potholes. Treat the body with care: avoid driving on roads covered with anti-icing compound. And the VAZ 2104 will still serve you.
Replacement of electrical wiring of VAZ 2104
If there is a failure in the power supply to electrical equipment, you should first check the integrity of the electrical circuit. To do this you need:
- De-energize the area being tested by disconnecting the negative terminal of the battery or the corresponding fuse.
- Connect the contacts of the multimeter to the ends of the problem section of the circuit, and one of the probes to ground.
- If there are no readings on the multimeter display, there is a break in the circuit.
- The wiring is replaced with a new one.
Selection of wires and replacement of wiring is carried out according to the VAZ 2104 power supply diagram. In this case, standard components or components from another model with suitable characteristics are used.
Video: replacing wiring, fuses and relays of classic VAZ models
To replace the wiring, the front part of the cabin is disassembled. Wires of insufficient length are extended, and connections are soldered and insulated.
Video: replacing electrical wiring in the cabin and under the hood
It is almost impossible to completely replace the electrical wiring of a VAZ 2104 with your own hands. If such a situation arises, it is better to contact a car service.
Weight of passenger cars in tabular format
We present to your attention a table that shows the weight of the car by brand.
| car model | Curb weight |
| Weight of the Oka 1111 car, weight of the Okushka | 635 kg |
| Weight of the car Oka 1113 | 645 kg |
| Weight of a VAZ 2101 car, weight of a penny | 955 kg |
| Weight of the VAZ 2102 car | 1010 kg |
| Weight of the VAZ 2103 car | 965 kg |
| Weight of the car VAZ 2104, weight of tens 2110 | 1020 kg |
| The weight of the VAZ 2105 car, the weight of the five | 1060 kg |
| Weight of the VAZ 2106 car, weight of the six | 1045 kg |
| Weight of the VAZ 2107 car, weight of the seven | 1049 kg |
| Weight of the VAZ 2108 car | 945 kg |
| Weight of the VAZ 2109 car, weight of the nine | 915 kg |
| Weight of the VAZ 2111 car | 1055 kg |
| Weight of a VAZ 2112 car, weight of a twelve-wheeler | 1040 kg |
| Weight of the VAZ 2113 car | 975 kg |
| Weight of the VAZ 2114 car, weight of the four | 985 kg |
| Weight of the VAZ 2115 car, weight of the tag | 1000 kg |
| Weight of the VAZ 2116 car | 1276 kg |
| Weight of the VAZ 2117 car | 1080 kg |
| Weight of the Niva 2121 car | 1150 kg |
| How much does a Chevrolet Cruze weigh (Chevrolet Cruze weight) | 1285-1315 kg |
| How much does a Chevrolet Niva weigh (Chevrolet Niva weight) | 1410 kg |
| How much does a GAZ (Volga) weigh, the weight of a Volga is 24 | 1420 kg |
| How much does GAZ 2402, GAZ 2403, GAZ 2404 weigh? | 1550 kg |
| How much does GAZ 2407 weigh? | 1560 kg |
| Car weight Moskvich 314 | 1045 kg |
| Weight Moskvich 2140 | 1080 kg |
| Weight Moskvich 2141 | 1055 kg |
| Car weight Moskvich 2335, 407, 408 | 990 kg |
| How much does a UAZ 3962, UAZ 452 weigh, how much does a UAZ loaf weigh? | 1825 kg |
| How much does UAZ 469 weigh? | 1650 kg |
| How much does UAZ Patriot weigh? | 2070 kg |
| How much does UAZ Hunter weigh? | 1815 kg |
| How much does Nissan weigh (weight of nissan x-trail car) | 1410-1690 kg |
| How much does Qashqai weigh (weight of Nissan Qashqai car) | 1297-1568 kg |
| How much does a Nissan Juke weigh (Nissan Beetle weight) | 1162 kg |
| Ford Focus car weight (how much does a Ford Focus weigh) | 965-1007 kg |
| Weight of the Ford Focus 2 car (how much does the Ford Focus 2 weigh) | 1345 kg |
| Weight of the Ford Focus 3 car (how much does the Ford Focus 3 weigh) | 1461-1484 kg |
| Ford Kuga car weight (how much does a Ford Kuga weigh) | 1608-1655 kg |
| Weight of the Ford Escort (how much does the Ford Escort weigh) | 890-965 kg |
| Weight of the Renault Logan car (how much does the Renault Logan weigh) | 957-1165 kg |
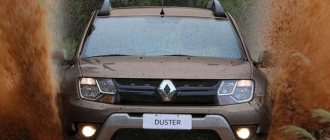
| Renault Duster car weight (how much does a Renault Duster weigh) | 1340-1450 kg |
| Renault Sandero car weight (how much does a Renault Sandero weigh) | 941 kg |
| Weight of the Opel Mokka car (how much does the Opel Mokka weigh) | 1329-1484 kg |
| Weight of the Opel Astra car (how much does the Opel Astra weigh) | 950-1105 kg |
| Mazda 3 car weight (how much does mazda 3 weigh) | 1245-1306 kg |
| Weight of the Mazda CX-5 (how much does the Mazda CX-5 weigh) | 2035 kg |
| Mazda 6 car weight (how much does mazda 6 weigh) | 1245-1565 kg |
| Volkswagen car weight (how much does a Volkswagen Tuareg weigh) | 2165-2577 kg |
| Weight of a Volkswagen Polo car (how much does a Volkswagen Polo weigh) | 1173 kg |
| Weight of the Volkswagen Passat car (how much does the Volkswagen Passat weigh) | 1260-1747 kg |
| How much does a Toyota Camry weigh (weight of a Toyota Camry) | 1312-1610 kg |
| How much does Toyota Corolla weigh (weight of Toyota Corolla) | 1215-1435 kg |
| How much does a Toyota Celica weigh (Toyota Celica weight) | 1000-1468 kg |
| How much does a Toyota Land Cruiser weigh (Land Cruiser weight) | 1896-2715 kg |
| How much does the Skoda Octavia weigh (weight of Skoda Octavia) | 1210-1430 kg |
| How much does the Skoda Fabia weigh (Skoda Fabia weight) | 1015-1220 kg |
| How much does the Skoda Yeti weigh (Skoda Yeti weight) | 1505-1520 kg |
| How much does a Kia Sportage weigh (KIA Sportage weight) | 1418-1670 kg |
| How much does Kia Sid weigh (weight of KIA Ceed) | 1163-1385 kg |
| How much does the Kia Picanto weigh (KIA Picanto weight) | 829-984 kg |