Firmware selection
The developer of the operating system is Google, which releases kernel updates. The program version is indicated by 2 or 3 numbers with a dot between them. The first digit allows you to determine the version, the remaining numbers are intended to separate modifications. Depending on their value, the assembly contains additional programs and features.
The firmware of the radio on Android is built on the basis of a basic kernel, into which additional drivers and utilities are added to ensure the functionality of the head unit and the equipment connected to it. The Chinese are the leading manufacturers of Android-based audio devices; each developer modifies the source code of the operating system to suit their own requirements.
In addition, private companies are creating original programs for Android radios.
The released product differs in the appearance of the dialog boxes and additional features that the official software does not support.
The advantage of alternative firmware is the exclusion of the user tracking mechanism, which is integrated by Google into its products by default.
But if problems arise with the performance of the device, warranty repairs are not provided.
Installing such an operating system requires creating a backup copy of standard programs, which will allow you to restore the functionality of the head unit.
How to flash a radio
Firmware for a radio on Android consists of the following steps:
- Download the desired version of the operating system to your computer's hard drive.
- Format a removable USB or microSD drive in accordance with FAT32 requirements. To flash Chinese radios on Android, it is recommended to use devices with a capacity of 0.5-2.0 GB. The use of larger storage devices leads to failures when replacing the program.
- Unpack the firmware update files from the archive into the root directory of the USB drive. When using microSD memory cards, the original files are preserved without creating an additional partition.
- Turn on the head unit, and then go to the menu section responsible for updating the equipment. After pressing the touch key, a dialog box will appear in which you need to specify the type of media on which the new files are located.
- During installation, it is strictly forbidden to press buttons or turn off the power to the equipment. Entering new information takes 3-5 minutes (depending on the radio model), the process status is displayed on the screen. Once the firmware update is complete, an automatic reboot occurs.
- After installing the kernel, additional programs are loaded into the memory of the head unit. A rectangular dialog box is displayed on the screen to help you understand the update status.
- After the procedure, no additional configuration is required; the configuration files existing in the player’s memory are saved.
An alternative method for updating an Android radio:
- Prepare a USB drive by formatting it according to FAT32 requirements.
- Unpack the firmware files to disk (without creating an additional folder).
- Set the ignition key to the ACC position, and then press and release the Reset button.
- Turn off the ignition, and after 5 seconds return the key to the ACC position.
- The head equipment will automatically enter update mode.
Before starting the update, you need to run a special utility that allows you to determine the manufacturer of the radio. It is not recommended to flash equipment with programs intended for products from another manufacturer.
Some radios are updated in forced mode; to start the procedure, you need to simultaneously press the Power and Reset or Power and Home buttons. You can start installing programs by pressing the Reset key and then Power. The buttons must be held down until a dialog box appears confirming the start of the firmware.
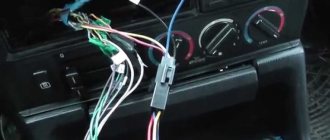
Part of the forced start equipment requires the Key 1 cable (equipped with orange insulation) to be connected to the vehicle body. To connect, you need to remove a fragment of the protective coating and then install a jumper. After the update starts, the additional element is removed and the procedure will continue automatically.
RECXON iSmart 10.1 – the best 2 din Android radio tape recorder
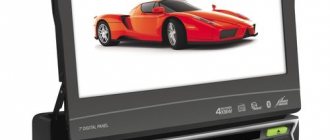
The key feature of the model is that the radio uses a 10-inch display with a rotating mechanism. But due to this design, I had to abandon the CD/DVD player, since the disk drive simply would not fit. Android version – 5.1 The average price of this car radio is 18 thousand rubles. Specifications:
- display – 10 inches with a rotating mechanism, resolution 1024x600 (TFT LCD, but with a good brightness reserve);
- processor – 4-core RockChip RX3 with a frequency of 1.6 GHz;
- RAM – 1 GB (DDR3);
- pre-installed memory – 16 gigabytes (you can add an SD card up to 32 gigabytes, and also connect a USB drive);
- communications – Wi-Fi, BlueTooth, GPS (you can connect external modems);
- maximum output power – 4x45 W;
- additional functions - radio with auto search and station memory, composite video input, RCA (for connecting external displays), external antenna for GPS and radio (combined), A2DP support (for connecting a stereo headset).
Also, buyers of RECXON iSmart 10.1 claim that this radio has a very convenient software shell installed. All icons are large, there is a screensaver in the form of a clock, and the map image can be scaled during navigation. By the way, the kit includes an 8 GB flash drive with pre-installed iGO (according to many, the best offline navigator for motorists).
- large display with good brightness reserve; convenient graphical shell for Android; The kit includes an SD card with iGO and RF maps; good sound, as well as flexible equalizer settings.
- no USB on the front panel; no CD/DVD; frequent delays in software operation (but updates are still coming out, optimization in the future is possible
How to flash a Chinese car radio on Android (Android)
The Android operating system is used in many devices, including car gadgets. A radio tape recorder based on it can be used as an on-board computer. Firmware for a car radio on Android is not difficult, and for this purpose the device does not even need to be connected to a PC via USB.
Why flash a car radio?
The capabilities of a car radio running the Android operating system are on par with those of far from the cheapest tablet computers. In some properties, they are even superior to tablets. The advantages of an “average” car radio are the following features:
These devices are too complex, and therefore, they cannot eliminate the occurrence of failures in the operating system during their operation. Therefore, in order to eliminate accumulated errors, as well as to update the functionality of the radio, periodic maintenance is required; this maintenance consists of flashing the device with a new version of the software.
Sooner or later, the “native” car radio program will require updating. In fairness, it should be noted that sometimes the radio can get rid of malfunctions, and firmware with the same version of the software that is currently used in the radio, yes, in some cases this can also help. Naturally, with such an “update” there can be no talk of any change in functionality.
Firmware selection
Android OS was developed by specialists from Google. Each software version has a special designation consisting of 2 or 3 numbers with a dot between them. The first numeric character indicates the version, and the others indicate modifications.
The firmware for the Android radio must be special. Both large and small companies produce such software. The firmware version for the car radio differs in functionality and appearance.
How to flash
To flash the firmware for a radio based on Android OS, you need to go through several steps. Among them are the following:
- Download the required OS version to your computer or MicroSD card.
- Format the external storage device according to FAT32 requirements. It is advisable to flash Chinese-made devices with cards with a capacity of 500 MB to 2 GB. Using larger capacity memory cards may cause problems when changing software versions.
- After this, you need to unpack the updated firmware to the root of the USB drive. If a memory card is used, then files must be saved without creating auxiliary partitions.
- Then you need to start the head unit and go to the menu item that is responsible for updating the software. After selecting the desired sub-item, a window will appear on the display. It requires you to select the type of storage medium on which the required firmware files are located.
- During the software installation process, do not turn off the device or press any keys. Installing the data takes about 3-5 minutes. You can monitor the firmware status using the display. Once the update is complete, the device should restart automatically.
- First, the core is installed on the car radio. After this, auxiliary applications are installed in the device memory. A rectangular dialog box appears on the display indicating the update status.
To flash the radio, you can use a simpler method. It is produced according to this scheme:
- First you need to prepare the data drive. It must be formatted in FAT32.
- After this, you need to unpack the files of the selected firmware version to the disk.
- Then you need to put the ignition key in the ACC position. After this, you need to press and immediately release the Reset key on the radio.
- Then turn off the ignition, wait 5 seconds and turn the key back to the ACC position.
- After the completed manipulations, the radio should automatically start in update mode.
Before updating the Android firmware, you need to activate a special application that determines the manufacturer of the car radio. It is not advisable to update with software that is intended for devices from another manufacturer.
To update some models, you need to put them in forced mode. For this purpose, you must simultaneously hold down the Home, Power or Reset keys. The keys must be held until a dialog box appears on the display.
AUTOPOLIS › Blog › Firmware for MyDean S100 head unit from WINCe to Android and back
Installation Android 4.0.3.
Create a bootable SD card on Windows.
1. Download SD-Flasher 2. Download Android 4.0.3 3. Create a folder in a convenient place for you. For example: "SD". 4. Unpack “SD-Flasher” and “Android 4.0.3” into the “SD” folder. 5. Run “SD-Flasher” as administrator 6. Select “Min210/Tini210” in the window 7. Insert the SD card into the computer slot. 8. In the “Image File to Fuse” line, select the path to the file “SD/make_upgrade_sd/u-boot_udsd.bin’ 9. Press the “Scan” button 10. Mark the SD card and press the “ReLayout” button. After completion, we should see: “ Relayouting, please wait… 1 Total, 1 Succeeded, 0 Failed"
11. Next, mark the SD card and press the “Scan” button 12. After completion, mark the SD card and press the “Fuse” button After completion, we should see: “Fusing... u-boot Image 1 Total, 1 Succeeded, 0 Failed, 0 "Skipped"
Installing WinCe 6.0
Create a bootable SD card on Windows.
The first step is to use a 1 GB SD card. Several unsuccessful manipulations showed that larger SD cards do not work correctly after creating the boot area. It is better to turn off all external drives except our SD card for a while. (On Win 7 and others, run as administrator via Win XP emulation)
0. Unpack the archive to the root of the disk (C:\SDBOOT) 1. Format the card in FAT32 2. Run SDBOOT.exe - SD Drive - specify our SD card. — Image flie to fuse — select the boot area, a file in the SDBOOT folder called SDBOOT_bootimage.nb0 — Press START.
12. After successfully creating the boot area, copy our firmware to the SD card. 13. Next, everything follows the standard procedure. We insert the card into the GPS slot. Turn on the GU. We are waiting for the end.
ATTENTIVELY! If an error occurs when creating the boot area, the flash drive will have to be formatted again. If, after successfully creating the boot area, the flash drive asks to be formatted, do “QUICK formatting”. Next, copy the firmware onto the card. If after turning on nothing happens and the device is still in a “bricked” state, we try again through RESET.
Also, if the firmware does not pick up, then we try to insert/remove the disk from the drive; for some S100 devices, to start loading from a prepared card, you need to hold down the SRS & MUTE buttons (they were highlighted) and then press RESET
Firmware options for Android radio for cars
For modern youth, it is not difficult to understand such concepts as device, din, gadget, Android, smartphone firmware, etc. In our article, we will give a clear definition of what is firmware for a car radio running on the Android platform 2, 4, 4.4.4, 4.4.2, 4.2, with a resolution of 2 din.
Android radio
DIN is an abbreviation made up of the first letters of the German Institute for Standardization (Deutsches Institut für Normung), which develops and creates technical documentation in various areas. In particular, determining the size of the niche for installing standard car radios.
- 1din is a hole in the front panel of the car, measuring 50 by 180 millimeters.
- 2din – 100 by 180 mm.
Android radio
Firmware
Firmware is the installation of converted or modified software on a computer device, which opens free access to additional functions of the device, which for some reason are not included in the officially provided or hidden package of services provided by the manufacturer.
Firmware options
As we just found out, firmware for radios on Android is an OS modified over time, designed to correct errors and shortcomings in the previous version, as well as add new features to the system.
In total, since the advent of the Android operating system, Google has released forty versions of software updates, which are assigned a numerical code from 1 to 7 and at the same time duplicated with the letter name of famous sweets. The versions themselves are also constantly being improved and have several options. So, for example, the firmware for a radio on Android 2 ultimately looks like 2, 2.0.1, 2.1.
And one of the most frequently installed versions, firmware for radio on Android 4, (4.4.4, 4.4.2, 4.2) has 16 variations.
Chinese firmware for Android OS
The main official provider of updates for Android is Google. But, as a rule, all major manufacturers of computer devices on the basic platform of the Android operating system release their software aimed at improving the quality of their devices.
In our case, we are talking about Android 4.4.4 radio firmware from Chinese companies that produce sound-reproducing equipment for passenger cars. It should be noted that there is an undeniable improvement in the quality of both the car radios themselves made in China and their software (firmware) for the OS.
The concept of android firmware and the reasons for its use
The process of replacing the software of an Android device is very similar to the process of installing Windows OS on a laptop or PC (many PC or laptop users have encountered this). At the same time, firmware may be needed for any device controlled not only by the Android OS, but also controlled by any other operating system.
Device firmware may be needed for various reasons. Here are just a few examples of cases where firmware may be needed:
Of course, there are many more reasons why you may need to flash your device with a different version of the program; this is just a small part of them. But even they are quite enough to understand that firmware is not just an activity with nothing to do, but a completely serious action during the operation of the device.
Where can you download firmware for radio on Android for free?
Official updates and completely new programs for Android can be downloaded from the Google online store - Android Market (for a fee). In addition, you can obtain such firmware for free (in some cases) on the official websites of the companies whose computer equipment you use.
Alternative types of firmware
In addition, there are a number of communities that develop software for Android, the so-called open form of firmware. The initial goal is, of course, to improve existing OS parameters and supplement it with completely new options, features, games, and so on.
But, as many users believe, the main thing in such software is the function of excluding the possible, if necessary, transfer to Google of information about the location of the user of the official OS at a real time and other, no less confidential information. Which has repeatedly led to the filing of legal claims from Google.
I would also like to warn readers of this article that updating the firmware of any computer device is associated with a certain risk. That is, as a result of such actions (upgrading the firmware), you can get three different results. Namely:
After updating, the quality and functionality of the software will improve significantly.
The device will ignore the changes made and everything will remain in the same state.
Your car radio will stop working. If you tried to install software from unlicensed manufacturers, and in the case of alternatives, this is just such an option, you will simply be denied warranty repair of the equipment.
Thus, it is better to make a decision about firmware for the device as a last resort.
What is firmware and how does it work
Almost all modern technology has something like consciousness. These are programs that are built into its memory. Reflashing is a change in the consciousness of technology and its programs, sometimes quite significant. Firmware can be legal or illegal.
If the equipment model is new, legal firmware with good, better, modern functions must be constantly developed for it. If there was a flaw in the model’s software and the error ended up in mass production, which, alas, happens, firmware also helps fix it.
Thanks to the firmware, you don’t have to constantly spend extra money on a new device, or worry that someone just got a model with amazing features just a month later and the recent purchase is no longer any good. Neither manufacturers nor buyers need extra costs - this is clear. No one is going to stop inventors from creating something new so often either. The equipment will last a long time, while being in keeping with fashion. When the device is objectively outdated, the production of updates and firmware stops and the person is offered to use what is available or buy a new device.
Official updates and firmware are available to all people completely free of charge and can be easily found on the manufacturer’s website and on partner sites. In addition to official updates and firmware, homemade versions of amateur programmers are sometimes offered to anyone who wants to upgrade their equipment. The question arises: how legal is it, should we use them?
Firmware
This section presents the latest firmware and updates for the produced series of Newsmy radios.
Please read the instructions carefully before proceeding. Before flashing or updating, make sure that the power supply is working properly and that the voltage supplied to the radio is stable. If the actions are performed in a car, we recommend that you carry out the work with the engine running. All data and settings of the car radio will be erased; take care to save them prematurely to external media. If during the firmware process you receive a faulty radio, then subsequent restoration and repair of the radio will be paid; this is not a warranty case.
Program and drivers for flashing CarPAD via computer
Using this program Rockchip Batch we do the firmware. Drivers must be installed on your computer before installing the firmware so that the connected car radio is correctly detected by your computer. Otherwise, the firmware will not be able to start. Firmware via a computer is used to restore the car radio or to switch to a new version of the Android OS (for example, from version 4.1 to 4.2 or 4.4, etc.), or, on the contrary, they roll back to the old version. To install the firmware you will need a special USB male/male cable.
Download the program with drivers and instructions here. Download video instructions here. Download the burning program, drivers, instructions for burning the MCU for CarPad 4 (NM series) here.
Updates for Android, MCU, etc.
Attention: there may be different versions of the update depending on the screen resolution. In this case, use the firmware version that is suitable for your screen. Otherwise, you may get a flickering screen; to fix it, update the firmware again, but use a different update file. In the same sections, if necessary, there are updates for the MCU (Microcontroller Unit).
Think of a car radio as a device consisting of two parts. The MCU is the first stand-alone computer that has its own processor and memory. Car radio modules such as radio tuner, DVD, Bluetooth, Wi-Fi, audio amplifier, GPS, etc. are connected to the programmable inputs and outputs of the MCU. The second part of the car radio is a computer, which is controlled by the Android OS. She constantly interacts with the MCU computer, exchanging commands with it.
Car radio CARPAD I DUOS. BOX (Android + WinCE). The Newsmy logo is white on the box. Download here. Car radio CARPAD II DUOS. BOX (Android + WinCE). The Newsmy logo is red on the box. Download here. Car radio CARPAD 2S (NU series). Download here. Car radio CARPAD 3 (NR series). Download here. Car radio CARPAD 4 (NM series). Download here.
Radio configurator
Used only for CARPAD DUOS I and II series models. And for car radios on WinCE OS. This file is used to change the car logo, change car radio parameters, and configure options for the car. Copy the file to a microSD memory card. Insert it into the head unit. Launch Explorer and use it to open the configuration file BcuVehicleConfig.exe. If unsuccessful, try opening a different version of the configurator.
Download configuration files here.
Software update for car radios on WinCE OS
Create a separate folder on the microSD card and copy the data from the archive into this folder, insert it into the car radio. In the radio settings, find the “Updates” item and launch it. Next, specify the path to the directory you created earlier. After confirming your selection, the firmware update will begin.
You can download the firmware for WinCE here .
This section contains operating instructions for Newsmy car radios
CARPAD DUOS (DT series). Download here. CARPAD 2S (NU series). Download here. CARPAD 3 (NR series). Download here and here CARPAD 4 (NM series). The NewYan program for synchronizing with a smartphone (it can also be downloaded from the Play Store), but sometimes we have a new version available earlier than there. Download here. CARPAD 4 (NM series). Instructions for connecting NewYan (synchronization with a smartphone). Download here. CARPAD 4 (NM series). Instructions for connecting CAN BUS and changing Logo. Download here.
Firmware for Japanese car radios: how to do it yourself
Firmware for Japanese car radios
Firmware for Japanese car radios, a procedure that the user will sooner or later encounter. After a failed battery is replaced or the battery is simply disconnected for repair work, the owner of a foreign car is in for a surprise.
His Japanese car radio stops functioning normally and produces some errors. Car radio firmware is also needed for other purposes.
When the device’s software is outdated, but you want to take advantage of new functions, the device is flashed.
Firmware for car radios
Modern Japanese and Korean car radios often require Russification. As a rule, it is not possible to change the menu of all devices in this way. In this case, flashing the car radio radically changes the capabilities of the device and Russification takes place easily and quickly.
Note. To carry out the Russification process, you will need special firmware for a specific car radio model and a recording disc.
Algorithm for Russification
So:
- We find the firmware, preferably the original one. The program must include the Russian language. As a rule, finding the firmware on your own is not so easy. You will have to turn to familiar specialists or somehow try to find them online;
- This very program will need to be written to disk (CD);
Firmware for car radios
Note. In most cases, the service menu is activated as follows: hold the “Setup” button and simultaneously turn the scale knob clockwise and counterclockwise. The service or second menu includes a list of system numbers, personal and system settings, self-testing, etc.
- Let's move on to updating the software. The disk acts as a storage medium.
Note. On the other hand, some modern car radios support firmware from flash drives.
- We are waiting for the new software to load;
Firmware for car radios
- We check the operation of the car radio, strictly following the information written in the instructions for a specific model of the device.
If it was not possible to Russify the radio, you will have to turn to specialists. In some cases, if the warranty period is still valid, contact the service center.
TV standard
How to flash a car radio
Frequent requests from a Russian driver who wants to reflash his Japanese or Korean car radio are also related to a TV monitor. It cannot be used for its intended purpose, since it does not support the standard of our Secam television.
Note. In Asian and European countries, as a rule, a different television standard is adopted: NTSC or PAL.
Due to some features of television broadcasting, it may also be impossible to watch high-quality television programs while driving. To ensure traffic safety, some cars use a lock that turns off the image on the monitor while driving.
How to reflash a car radio
To improve the TV systems of car radios from Japan (reflash the software, change the standard, remove locks), it is customary to use special adapters. They can be installed in any car.
Flashing car radios
Tampering with car radio
In addition, there are a number of manipulations that help improve the devices. Often these interventions are also called flashing and they are aimed at improving the capabilities of the device. Below is a table showing these manipulations.
| Remaking car radios | D864 is unsoldered (if Toshiba) |
| Decoding | The code (9507) is dialed and then BAND |
| If the laser loses sensitivity and is unstable | The variable resistor RV14 is soldered |
| Stereo reception has deteriorated, the mechanics fail, there is no sound | The electrolytes in the red shells on the board are removed, the space under them is washed, and then new electrolytes are sealed in |
| If you need to change the range from Asian to European | Diode D701 is unsoldered. Resistor R752 is changed to 2.2K. After this, the voltage is set on FM VT |
| If you hear a gurgling sound in one or even more channels | Electrolytes near the amplifier are to blame. They began to flow because the paths underneath them collapsed. |
| The quality of playback of recordings from a cassette decreases. The sound is getting quieter, but the radio is coming through normally | Electrolytes are replaced with conventional small-sized ones |
| The changer does not accept the disc and only works to eject | LED emissions are reduced. Typically, the limiting resistor is halved |
| FM receiver does not pick up even-numbered stations | A 2Kohm resistor is placed on R824 and the capacitor is discharged to power the car radio |
| 4 linear outputs of the amplifier fail, but the subwoofer continues to work (trouble often happens on standard Toyota car radios) | The electrolytes in the red shells change again |
| The car radio does not pick up the FM range or does so only after warming up | The reason lies in the communication coil |
| Some buttons do not work when you need to enter a code | The firmware is changed, the code is installed. If that doesn’t help, look for the oxide under the buttons |
| Receiver frequency tuning | Switch the broadcast network or change the local oscillator frequency in the tuner |
| Transferring the car radio to European mode | Solder in diode D2 instead of D1, which is located closest to the processor on the board |
Flashing Japanese car radios
Tips for beginners
The methods for flashing Japanese car radios were presented above. I would like to give some important tips to novice decoders:
- Never install a firmware program from another model, even if it is also Japanese;
- Microcircuits must be soldered evenly, in no case crookedly;
- Working with dumps is not a very good thing. It is much better to do the pouring, although it is much more difficult.
Uploading the firmware
When installing the firmware program yourself, you should do everything exactly according to the instructions. Video reviews, useful diagrams, and photo materials will also help here. In some cases, programs have to be purchased and the price for them depends on the specific car radio model.
- Grigory Romanchuk
Source: https://avtozvuk-info.ru/remont-i-nastrojka-avtomagnitol/proshivka-yaponskih-avtomagnitol-158