Reasons for the appearance of failures during acceleration of the VAZ 2109
So, why can failures appear when accelerating a VAZ 2109? The Nines were equipped at the factory with a Solex carburetor, which, as owners of cars with this carburetor know, regularly fails. And failures during acceleration of a car that is equipped with this particular type of carburetor can be caused by both incorrect operation of the economizer and an oversaturated or undersaturated fuel mixture. The cause may also be a malfunctioning accelerator pump. Let's look at everything in order.
To determine if your car has problems with proper saturation of the fuel mixture, you will need to remove the spark plugs, after which you will need to look at the carbon deposits on the electrode. If the candles have a milky-whitish color, it means that the mixture is most likely poor. A blackened spark plug electrode indicates that the mixture in the car is rich, and accordingly, more fuel is consumed than it should be. With a normal mixture, a brown soot forms on the candles, but there are no traces of oil combustion on it.
Difficulties during acceleration of the VAZ 2109 can be caused by a malfunction of the economizer, and to check the operation of this device, the carburetor should be completely removed. Then you will need to disassemble the assembly and see what condition the economizer diaphragm is in. If you have any suspicions, it is best to replace the diaphragm with a new one.
Difficulty in accelerating a car also occurs due to malfunction of the accelerator pump, as well as due to clogging of the nozzle, which is located in the primary chamber of the main dosing system.
Ozone or Solex?
Starting with the VAZ-2108 and VAZ-2109 models, AvtoVAZ design engineers abandoned the use of Ozone carburetors. The reason for this was the complexity of the design and the inconvenience of operation. Initially, functionality was laid down that implied a certain type of driving. But these techniques were not common among ordinary motorists, and road situations did not imply the use of these control techniques.
For example, for engine braking, a forced idle economizer (EFS) was introduced. The problem is that no one used this type of braking, and the EPHH microswitch failed, which prevented the engine from starting in the future. With the Ozone carburetor on the VAZ 2109, there were often failures when pressing the gas, the car twitches and does not really move.
Ozone's place was taken by Solex. A simple, convenient carburetor that provides all engine operating modes. In Solex you can no longer find either a pneumatic drive for the secondary chamber flap, or a semi-automatic starting device, or an autonomous idle system.
Correct setting of the VAZ 2109 carburetor
Failures during acceleration of the VAZ 2109 very often occur due to incorrect settings of the carburetor; accordingly, it is very important to configure this device correctly. In addition, failures during acceleration can occur as a result of carburetor clogging. To clean it, you will need a special liquid that is sold in stores, a new gasket, and a sprayer.
The carburetor itself is cleaned after complete removal from the car. To clean the device, you need to unscrew the idle air valve and spray a special liquid into the hole that appears. After filling the liquid, you need to blow out the carburetor - you can use a vacuum cleaner. It is also worth installing a new gasket after dividing the carburetor into two parts - the gasket is placed on the part on which there is a float. It is necessary to completely clean the jets with membranes and other carburetor parts.
The carburetor is adjusted after removing the negative terminal from the battery and the air filter. You will need to find the bolt that is needed to attach the linkage to the choke lever. Having found this bolt, you should unscrew it slightly. Then you will need to turn the choke lever, and you need to turn it until the choke is completely open. Then you need to press the damper drive lever, which you will find inside the car, all the way.
Pull out the rod and tighten the bolt, which is responsible for attaching the rod to the air mixture lever. After this, return to the car interior and pull out the choke lever. These actions should lead to the complete closing of the air damper. Finally, you need to put the negative terminal with the air filter back in place.
Causes of malfunction
Troubleshooting is an incorrect air-fuel mixture ratio in the combustion chamber or a lack of spark. In this case, the crankshaft may turn with difficulty, or there will be misfires.
Many car enthusiasts started with carburetor engines and therefore know perfectly well why the engine misfires, but not everyone can fix the problem because they don’t know what the problem is. It is worth understanding that the tripping effect occurs due to a disruption in the supply of one of the elements - air, fuel and spark. It is in the systems that are responsible for these elements that we should look for the cause.
A little about the Solex carburetor
Initially, VAZ equipped its cars with carburetors of the Weber family. These carburetors were completely mechanized. They lacked any electrical wiring and were not very reliable. Practically, they constantly needed attention, since the main struggle of car owners was aimed at returning the engine to idle speed. Only rear-wheel drive cars of the Zhiguli family VAZ 2101, 2103 and 2106 of the early versions were equipped with it.
“Weber” was replaced by “Ozone”, which began to be successfully used on VAZ 2105-07 cars. It was a perfect design, which was equipped with idle economizers and an autonomous system. The idle problem has been resolved. Ozone was also used on Niva cars.
With the advent of the front-wheel drive VAZ 2108 on the assembly line, a perfect design was required, aimed at reducing exhaust toxicity and maximizing fuel economy. This is how Solex was born.
Initially, it was a French design, which was purchased under license and was successfully installed not only on Samaras, but also on Zhigulis. Its design took into account all the mistakes of previous units, and efficiency increased to the limit. A properly tuned mechanism lasts a long time, and maintenance and repairs are cheaper than many modern cars. Unlike the Ozone family, it uses a long rod drive or cable, which significantly softens the accelerator pedal when depressed.
Almost all domestic carburetors are called DAAZ, and an index is written through a dash, the beginning of which corresponds to the car model.
Why do dips appear when you press the gas sharply?
Classification of failures on the Solex 21083 carburetor:
- Short dip - the car does not respond to the gas pedal for about 2-3 seconds;
- Deep failure - the car does not respond to the pedal for about 10 seconds, sometimes stalls;
- Jerking – The car jerks every second and as the speed increases, the jerking stops.
Before considering the carburetor problem, it is necessary to remember that this can be influenced by a contaminated power system (air filter, fuel hoses and fine filter), as well as an ignition system that is not configured correctly. If you are sure that their operation is correct, then you can conclude that the carburetor is faulty.
The phenomenon itself may be due to a lean or too rich mixture that enters the cylinders. Further diagnostics depend on the symptoms of the malfunction and the problem can be eliminated at the lowest cost.
Ways to eliminate failures
ATTENTION! A completely simple way to reduce fuel consumption has been found! Don't believe me? An auto mechanic with 15 years of experience also didn’t believe it until he tried it. And now he saves 35,000 rubles a year on gasoline! Read more"
Before you interfere directly with the design of the carb with the intention of eliminating failures, you need to make sure that there is an uninterrupted supply of fuel fluid to the carb. It is also recommended to ensure that the ignition is functioning without failure. It is imperative to test the cleanliness of the fuel intake and the gasoline supply line from the fuel tank to the carburetor, as well as the serviceability of the filters and their tightness.
There are also some other recommendations that you must follow.
- It is especially important to check the ignition system at the UOZ, the tightness of hoses and tubes, the serviceability of spark plugs, etc. Only after all the tests can you remain convinced that the cause of the problem was a problem in the carburetor.
- It is also recommended to carefully evaluate the housing of the fuel mixing device in order to determine the presence of various defects.
If no problems were found, the carb should be removed and then the cover should be removed. Continue a thorough inspection.
- The fittings must have a seal. If, for example, there is no rubber seal on the screws, then the element will not be able to function normally, and all attempts to adjust the quality of the mixture or engine speed will remain fruitless.
- The filter mesh must be clean a priori and not have any breaks.
- The outer part of the needle valve is a tight fit on the lid. In other words, it must be firmly fixed.
- The needle ball is free to go in and out.
- The floats should not have any jamming or distortion.
- The jets must be clean, the channels must not be clogged, otherwise this will negatively affect the operation.
- The valve must tightly close the inlet hole, and it must turn without jamming. It has a lever, as you know, which it is desirable not to have even the slightest play.
- The needle that locks and opens access to fuel must not leak and be sealed.
- The jets are marked. So, it must fully comply with the values given in the manual of a specific car model. The channel cross-section should not be smaller or larger. Often jets are changed in order to reduce fuel consumption, but this affects failures during acceleration in the future.
- Valves or jets are screwed in thoroughly.
How to eliminate dips when you press the gas sharply?
There is nothing terrible in such a phenomenon. You can fight the reasons. Why this happens depends on how the fault manifests itself. We remove unnecessary symptoms and can find out why this happens when you press the pedal.
- Short failure . It usually appears when starting to move or smoothly accelerating. In both cases, the problem manifests itself when the gas pedal is gently pressed. The problem is contamination of the first chamber of the carburetor, but it can also affect the accelerator pump. This implies the operation of all transition systems that need to be checked. It is recommended to start repairs by cleaning the carburetor.
- Jerks . They appear when operating at medium speeds and smoothly pressing the accelerator pedal. The malfunction may disappear if you press the pedal sharply. A series of sharp pressure helps to restore speed and continue driving. Here the list can be significantly expanded, namely:
- The jet located in the dosing chamber is dirty;
- The jet is not fully screwed in;
- The jet marking does not correspond to the nominal value;
- “Suction” of excess air;
- The fuel level in the float chamber is too low or the valve is stuck;
- Check the diaphragm, it may be torn.
- Deep failure at high speed at medium crankshaft speeds. Accompanied by loss of power. The car does not reach maximum speed and “freezes” at medium speeds of the carburetor engine. The list of “culprits” is as follows:
- The throttle valve of the second chamber did not open;
- The fuel system filter element is dirty;
- Economizer malfunction;
- The econostat is damaged;
- The jets are dirty or not up to specification.
Carburetor or injection engine?
The difference between a carburetor and an injector is where the mixture of gasoline and air is formed. In the injection system, directly in the cylinder or intake manifold. This design requires an additional control system, that is, electronics. There are no electronics in the carburetor, only mechanics. However, it also contains channels of significantly small diameter and calibrated holes, which are very sensitive to contamination.
Disputes between adherents of different food systems are still ongoing. Carburetor fans claim that repairs can be done on the road, but electronics cannot be fixed without equipment.
Supporters of fuel injection are inclined to believe that even a carburetor car will not go anywhere with a broken fuel pump. And the bottlenecks, in their opinion, are a malfunction of the crankshaft position sensor (CPS) and a breakdown of the gasoline pump. At the same time, the sensor can be easily changed without complex tools, so there is no need for service here.
Do not panic because of failures when you sharply press the gas pedal of the VAZ-2109 carburetor and switch to electronic injection. Gasoline consumption will not always be less with an injector.
The reliability of mechanics is always higher than that of electronics, so you can drive home with a “half-dead” carburetor. If there is a fault in the electrical circuit, then the entire circuit will not work.
How to remove and clean a Solex 21083 carburetor?
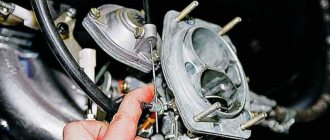
To solve the problem, you need to start by cleaning the unit, which is located under the air filter. To do this, it must be removed from the car and completely disassembled. If necessary, carry out repairs with a special kit.
To do this, you need to unscrew the nut securing the air filter cover, unfasten the cover and remove the filter element. Remove all hoses from the body and unscrew the mounting nuts from the carburetor. Next, you need to remove the body and disconnect all the damper rods from the carburetor to free it from all the holding moving elements. These include hoses.
The last step is to remove the carburetor itself. To do this, unscrew the four fastening nuts and remove the unit from the car. If this is difficult, then carefully pry it off with a thick flat-head screwdriver and generously lubricate the perimeter with WD40. It can only be removed with sudden movement.
After removal, the carburetor is completely disassembled and smoothly cleaned using kerosene, gasoline or special products for cleaning throttle valves. All elements and channels must be wiped dry, and faulty parts should be replaced with a repair kit. Now you can reassemble in reverse order, place it on the engine and fully adjust. If you have any questions about removing and cleaning the Solex 21083 carburetor, I recommend reading the review article on our website, here it is.
Marking of Solex carburetor jets
| Carburetor designation | Econostat jet | Jet | ||
pneumatic drive
This is how problems with dips that accompany pressing the gas pedal are solved. It’s easy to guess that the problem can be solved in a garage, which is why it’s not necessary to go to a specialized service center.
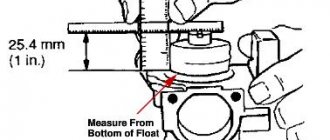
| Starter damping jet | Throttle openings at start-up (dimension A), mm | Slight opening of the air damper with the starting device (size B), mm | Fuel level in the float chamber | |||||
| 2101-1107010 | 150 | 90 | 170 | 70 | 0.75-0.85 | 7±0.25 | 7±0.25 | |
| 2101-1107010-02 | 150 | 90 | 170 | — | 70 | 0.75-0.85 | 7±0.25 | 7±0.25 |
| 2101-1107310-03; 2101-1107010-30 | 150 | 120 | 150 | — | 70 | 0.75-0.85 | 7±0.25 | 6.5±025 |
| 2103-1107010 | 180 | 120 | 160 | 70 | 0.8-0.9 | 7±0.25 | 7±0.25 | |
| 2103-1107010-01; 2106-1107010 | — | — | — | — | 70 | 0.8-0.9 | 7±0.25 | 6.5±0.25 |
| 2105-1107010-10 | 150 | 120 | 150 | 120 100 | 70 | 3.7-0.9 | 5±0.5 | 6.5±0.25 |
| 2105-1107010; 2105-1107010-20 | 150 | 120 | 150 | 120 100 | 70 | 0.5-0.8 | 5±0.5 | 6.5±0.25 |
| 2107-1107010; 2107-1107010-20 | 150 | 120 | 150 | 150 120 | 70 | 0.9-1.0 | 5.5±0.25 | 6.5±0.25 |
| 2107-1107010-10 | 160 | 120 | 150 | 150 120 | 70 | 0.9-1.0 | 5.5±0.26 | 6.5±0.25 |
| 2108-1107010 | 60 | — | — | — | — | 0.85 | 3±0.2 (bottom) | 25.5±1.0 (remainder) |
Dismantling, disassembling and cleaning the carburetor
In order to restore the functionality of the Solex carburetor, you must:
- remove the device from the engine;
- take it apart;
- clean and rinse;
- replace faulty elements;
- assemble and install on the engine;
- make adjustments.
Removing the Solex carburetor from the engine
Required tools:
- slotted and Phillips screwdrivers;
- keys for 7, 8 (2 pieces), 10, 13 (preferably a cap).
Execution order:
- Raise the hood.
- Using a 10mm wrench, unscrew the air filter cover fixing nut.
- We snap off the latches (4 pcs).
To remove the filter, you need to unscrew the nut and press the latches
- Remove the air filter from the “pan”.
- Using a size 8 wrench, unscrew the nuts securing the air filter housing.
- Using a 7 key, loosen the clamp screw on the gas exhaust hose. Let's remove this hose.
- Remove the filter housing.
To remove the filter housing you need to unscrew 4 nuts
- Disconnect the wires from the terminal of the EPHH valve and from the contact of the quantity adjustment bolt.
Disconnect the wire tips from the valve and from the quantity screw contact
- Disconnect the vacuum hose from the fitting.
Disconnect the vacuum hose from the fitting
- Using a 7 key, loosen the clamps on the fuel supply hose and on the return hose. Let's take them off.
Disconnect the fuel hoses
- Remove the crankcase ventilation hose.
Disconnect the crankcase ventilation hose
- Using two 8 keys, release the air damper rod screw. Disconnect the drive cable.
Remove the air damper drive rod
- Remove the spring from the damper drive.
Remove the spring
- In the damper drive sector, disengage the cable tip. Disconnect the cable.
Disconnect the throttle valve cable
- Using a 13mm wrench, unscrew the nuts securing the carburetor body (4 pcs).
- Using a screwdriver, unscrew the screw securing the heating module.
- We dismantle the carburetor. If it cannot be removed, pry out its body with a slotted screwdriver.
Remove the carburetor from the studs
There should be three gaskets under the carburetor: top (thickest), middle (heat insulating) and bottom (sealing).
Disassembling the Solex carburetor
Required tools:
- crosshead screwdriver;
- hammer;
- drill (knitting needle) with a diameter of 2.5 mm;
- keys for 11, 13, 14;
- tweezers;
- awl;
- toothpicks.
Execution order:
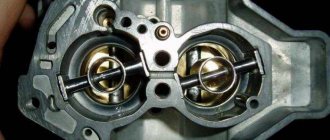
- Unscrew the five screws securing the cover with a Phillips screwdriver. Disconnect the cover.
Unscrew 5 screws
- Using a drill (knitting needle) and a hammer, remove the float axis. We dismantle the floats.
Disconnect the float axis
- Carefully remove the cardboard gasket from the sealing surface of the lid.
Carefully remove the cardboard spacer
- Using a 11mm wrench, unscrew the needle valve. Let's take it off.
Unscrew the needle valve
- Using a 13mm wrench, unscrew the solenoid valve. We remove the seal, cup, and jet from it.
We unscrew the valve, remove the jet, seal, cup from it
- Use the same tool to unscrew the filter plug. Remove the filter.
Unscrew the plug and remove the filter
- Without changing the tool, unscrew the fuel fitting. We take it out together with the sealing ring.
- Using a 14mm wrench, unscrew the bolt securing the air damper lever. We remove it, trying not to lose the fixing ball and pressure spring located under it.
Remove the lever
- Using a Phillips screwdriver, unscrew the 4 screws on the starter cover. We remove it with the diaphragm and spring.
Removing and disassembling the starting device
- Using the same tool, unscrew the 2 screws securing the air damper. We remove its axis from the carburetor cover.
Removing the air damper
- Remove the rubber seal on the idle air passage tube.
Remove the seal on the fuel channel tube
- Using a slotted screwdriver, unscrew the choke rod holder screw. Let's take it off.
Removing the bracket
- We also unscrew and remove the air jets of the dosing systems.
Unscrew the air jets
- We remove the sprayer by prying it with a screwdriver at the top “spout”.
We remove the sprayer by prying it with a screwdriver
- Use a screwdriver to unscrew the fuel nozzles. If they do not shake out of the channels, we take them out with a toothpick.
We unscrew the fuel nozzles (if necessary or, for example, in order to reduce fuel consumption, they can be replaced later)
- Using pliers, carefully remove the diffusers from both chambers.
We remove the diffusers using pliers
- Using a Phillips screwdriver, unscrew the 4 screws securing the accelerator pump cover.
Disassembling the accelerator pump
- Remove the cover with the diaphragm and spring.
- Using a Phillips screwdriver, unscrew the 3 screws of the power mode economizer cover. We remove it with the diaphragm and spring.
We disassemble the economizer of power modes
- Using a slotted screwdriver, unscrew the economizer nozzle. Let's take it out.
- Disconnect the wire contact from the quantity adjustment screw.
- Using a slotted screwdriver, unscrew the screw of the wire holder. We remove the wire.
Disconnect the tip of the screw wire, then unscrew the screw itself
- Unscrew and remove the quantity screw.
- Using a Phillips screwdriver, unscrew the screw securing the throttle valve drive. Remove the mount.
Removing the throttle control sector
- Using a slotted screwdriver, unscrew the quality screw.
- We remove it using tweezers.
- If the screw comes out without a rubber seal, remove it using an awl.
- Using a size 11 wrench, unscrew the nut securing the accelerator pump drive cam. We remove the cam along with the washer that is located under it.
Remove the accelerator pump drive cam
- Using a Phillips screwdriver, unscrew the screws securing both dampers. We remove the flaps.
- Remove the spring and plastic sleeve from the damper axis of the first chamber.
- Remove the axis of the first camera.
- Using a slotted screwdriver, pry up and remove the lock washer of the shutter axis of the second chamber. Remove the axle.
We disconnect and remove the throttle valves - the carburetor is completely disassembled. Assembly is carried out in reverse order
Important: do not disconnect the dampers or remove their axles unless necessary! If installed incorrectly, they may become skewed, which will lead to incomplete opening or closing!
Cleaning and flushing the Solex carburetor
Required tools:
- a compressor or pump with a tapered fitting at the end of the hose;
- carburetor cleaning liquid in an aerosol can or acetone;
- toothbrush (preferably a children's one);
- thin wooden spatula;
- toothpicks;
- clean rag.
Before washing the carburetor, it is recommended to soak the disconnected elements in a special washing liquid for 8–10 hours. This does not apply to rubber and plastic products!
If you don't have that much time, spray the parts on the outside and inside with carburetor cleaner and wait 30 minutes.
Carburetor cleaning fluid
The most convenient way to remove external stains is with a toothbrush. Dirt deposits on the inner surface of the carburetor cover and body are removed using a thin wooden spatula wrapped in a clean rag.
After washing, parts with internal openings (nozzles, diffusers, tubes, and internal channels of the carburetor cover and body) must be blown with a stream of compressed air (preferably at least 6 atmospheres).
Replacement of faulty elements and assembly of the Solex carburetor
When completely disassembling the carburetor, it is recommended to replace all its elements that show signs of damage or deformation. The best solution when repairing a device yourself is to purchase a repair kit, which includes all the parts that may need to be replaced:
- jets;
- springs;
- seals;
- diaphragms;
- gaskets (carburetor covers and housings);
- needle valve;
- filter;
- screws (quality, quantity);
- repair studs, etc.
Assembly/cleaning or other actions with the carburetor are carried out using the Solex carburetor repair kit.
Having replaced the rejected elements, we proceed to assembling the carburetor. We produce it in the reverse order to that described above. We do not screw the carburetor cover to the body!