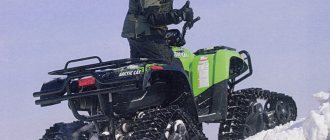
Homemade 4x4 ATV with an engine from an Oka car: photo and detailed description of the manufacture of the ATV.
In previous articles, we have already considered several options for manufacturing rear-wheel drive ATVs, now let’s take a look at the all-wheel drive design. 4x4 all-wheel drive significantly increases the capabilities of the ATV; in fact, it is already a full-fledged all-terrain vehicle for off-road use.
The author of this homemade technique is Sergey Pletnev. Let's take a closer look at the design of the homemade product.
Homemade ATV from a scooter
Homemade ATV made from a scooter: photo of production with a description of the homemade product, as well as video testing.
The author decided to accustom his son to technology from a young age; for this, the craftsman assembled an ATV from a scooter with his own hands. To build the homemade product, we bought a broken scooter, wheels from a walk-behind tractor, and some spare parts from a children's ATV.
Below are a few photos of the vehicle assembly.
The front suspension is made, the levers are homemade, the steering knuckles are from a children's quad.
The rear axle with a star is mounted on housing bearings.
The engine with variator remained from the scooter.
The author installed wheels from a walk-behind tractor.
The result is this mini ATV.
The craftsman named his homemade product “Egorushka.”
We recommend watching a video of a homemade ATV.
Homemade ATV from the outback: a toy for $3,000 without the right to travel
Belarusian villages are like this: behind unsightly-looking fences you can sometimes find a real treasure. It would seem, what can attract a small village between Vitebsk and the border with Russia, transit through which does not stop around the clock? Likewise, the hero of our material, Sergei, does not see much merit in the ATV he created with his own hands, which can easily be mistaken for a factory model.
“The idea was born thanks to the Internet: I saw enough and wanted to do it myself. Besides, I'm a biker, I have a lot of spare parts from my motorcycles. There have been similar models for a long time, there are plenty of Chinese ATVs, and more or less beautiful ones.”
A homemade ATV should definitely be considered “more” beautiful. Yes, upon closer inspection, some flaws are visible, but the development is not finished yet! What else were you looking at from Chinese models?
“I developed plans and drawings on my own, and began development with the purchase of four beautiful wheels with R16 rims. They cost 700 dollars. First I welded the frame - this was the most enjoyable part for me. Then I took up the suspension. At the front are BMW 3-series hubs, at the rear are from a Passat B3, machined onto 5-bolt discs. A ball joint from BMW was converted into levers from an Audi 80.”
BMW, Audi, Volkswagen are the permanent Belarusian top three in demand and in disassembled form. Just like Soviet motorcycles, which do not want to retire to their well-deserved retirement.
“I decided to install shock absorbers at the rear. The ones from Izh Jupiter turned out to be completely useless, so I put in a stronger one from the Dnepr. I would like a normal factory ATV, but their prices are sky-high. The brakes are a simple cylinder from an UAZ. There was a vacuum booster before it, but it turned out to be unnecessary: the ATV immediately skidded.”
Talking about shock absorbers, Sergei points to a Yamaha Grizzly all-terrain vehicle standing nearby, against which the road ATV looks like a toy. But that’s exactly the point: why make another one?
“According to the project, the ATV had to go fast, so we initially planned to install the engine from a motorcycle. But its use on the roads is prohibited. Of course, everything is at the inspector’s discretion, but in order not to put the ATV “behind the grid”, I decided to install a simpler engine, like a walk-behind tractor. This Lifan is enough to drive back and forth around the village. It cost 12,000 Russian rubles. I didn’t measure the consumption: I’ll pour as much as needed.”
“After the first ride, I realized that with a variator it was difficult for an ATV to start moving, and there wasn’t enough reverse gear. I installed a gearbox from Dnepr and covered the chain with a metal casing. So that your pants don’t get caught there, and as protection if the chain breaks, otherwise it can be very unpleasant. The “star” with a chain from Izh turned out to be explosive. Are the “stars” now such that the tooth cannot be hit properly? I plan to convert it to a timing belt. Now 4 gears and one reverse are available for movement. I only accelerated up to third gear, nowhere in particular.”
“The body was made of fiberglass. I took the wheel, made a pattern based on it, and worked long and hard on the body kit. I painted it, although there are a few streaks, but this is a preliminary version. Then I will take everything apart and bring it to its final appearance. Signals will be added to the rear like a car. The front part is not finished yet. I would like a beautiful bumper, but I don't have enough ideas. Someone would have given it! Headlights from Toyota Celica.”
When asked whether the bumper will be a power bumper or a regular one, Sergei grins modestly: such excesses in the form of excess iron are clearly useless, just to cover the front part from dust.
“The side drawers are made of waterproof plywood: one sheet of this material costs $90. Supports - furniture gas elevators. They were found at home, but they cope with their functions. “Music” from an ATV, waterproof, with a switch on the steering wheel, which also came from Izh. But I made a slight mistake with the speakers: it was supposed to be waterproof, but I just bought waterproof ones.”
“If I lived in Russia, I would be able to drive from and to work (this is about 4 km of good asphalt with a wide shoulder. - Author’s note ). But its operation is prohibited here, and you can’t drive it across the fields. So it turns out that for speed I have a good motorcycle, and for off-road use an ATV. And this is so, a toy. Although I’ve invested about $3,000 in it over the entire period.”
On this slightly sad note we part ways. The destiny of an almost finished ATV remains rural roads and rare trips to good asphalt under the threat of being stopped by traffic police officers. But Sergey is not discouraged and is going to equip a trailer to transport the device. Who knows, maybe one day the ATV will be covered with dust, but it would be nice if it was dust from roads, and not from endless parking.
Andrey GORELIK Photo by the author and the hero of the material ABW.BY
People's alteration: how a pensioner assembled a competitor for MTZ with his own hands
Preparation for work, tools and equipment
First of all, you need to carefully consider when, where and for what purposes the future ATV will be used - hunting and fishing, motorcycling in nature, transporting goods, etc. It is on this basis that you need to make a choice of a “donor” vehicle, deciding how powerful the engine is needed, what kind of suspension is suitable, what kind of trunk, etc.
You can take ready-made drawings from the Internet, create them from scratch yourself, or combine both options and ready to remake them at your own discretion.
List of required tools:
- welding machine;
- Bulgarian;
- drill;
- a set of keys;
- various small tools - calipers, hammer, knife, screwdrivers, pliers, etc.
To make your own frame, you will also need equipment for bending pipes. If you don’t have one, you can rent it or outsource the necessary work to another craftsman. Only with remarkable skill can you bend the pipes manually by heating the bend with a gas cutter or torch.
- engine;
- frame;
- rear and front suspension;
- steering;
- brake system;
- cooling system;
- muffler;
- electrical equipment - battery, headlights;
- body, body kit
It is quite possible to make a muffler yourself. Everything else is to purchase used parts on the shadow market.
Parts selection
ATV frame
Depending on the “donor” and the design of the quad, you either have to make the frame yourself, or you can reconstruct a finished, used one.
The most important thing is that the engine is securely bolted to the bottom along the frame, which can be located either front or rear. The transmission and drive should also be firmly attached to the frame to avoid play.
Homemade frame
The material used is ordinary water and gas pipes with a wall thickness of no more than 3 mm:
- for spars - 25 mm;
- for crossbars and struts - 20 mm.
The pipes are connected using spot welding, followed by solid welding. Ears for attaching shock absorbers and levers are welded to the frame immediately. Brackets - during installation of units and components.
Reconstruction of an existing frame
To reconstruct a finished frame, you should remove everything, leaving the frame, dismantle the back part and build up the front. Then weld elements for fastening a complete set of components and assemblies of the ATV. When reconstructing a motorcycle frame, the seatposts should be moved back by 40 - 45 cm.
The front and rear luggage racks are cut out of a metal sheet and welded to the frame. Finally, the finished frame is painted; there is no need to varnish it.
Additionally, we recommend reading our expert’s article on how to choose a roof rack for your car.
We also recommend reading our specialist’s article, from which you will learn how to select and install a box on the roof of a car.
ATV from a motorcycle
Another ATV by Sergei Pletnev, this time based on the heavy Ural-2 motorcycle with a range of 12,000 km. The main components were taken from the motorcycle - engine, gearbox, clutch, as well as a modified frame.
Main components
- Front wheels from Zhiguli;
- shortened rear drive axle and wheels from a VAZ-2101;
- steering wheel with steering shaft from the Urals;
- fuel tank and muffler from the Urals;
- driveshaft - axle shaft from Oka;
- CV joint from Oka;
- saddle from the Urals;
- The front shock absorbers are from Zhiguli, reinforced with a Ural shock absorber, the rear shock absorbers are completely from the Urals.
The front suspension of the ATV is built on homemade double transverse A-arms made of a square profile. The brakes were also borrowed from the Zhiguli - they came without a booster and a parking brake. The brake cylinder drive is connected to the motorcycle pedal. The engine is cooled by a fan from a VAZ stove. The rear wheels have well-treaded tires, and the front wheels have regular road tires.
The steering turned out to be hybrid. The lever steering wheel itself is borrowed from a motorcycle, and the rest of the spare parts from the car are a bipod, a column, fists and rods for them. The pendulum-type rear dependent suspension was not very successful - it has a hard ride and large torsional loads on the unit. The ATV has a front and rear rack. After testing, duralumin sheet fenders and rubber mud flaps were added.
In terms of parameters, the ATV turned out to be similar to the Ural motorcycle. Its maximum speed decreased slightly, but its torque increased. Car shock absorbers are better than motorcycle ones, so riding an ATV is more comfortable than riding a bike. To control such an ATV, you need sharpness and strength.
Stages of assembling an ATV
To create a homemade ATV with your own hands, you need to go through 9 stages of work step by step:
- Acquisition and preparation of everything necessary;
- Welding (alteration) of the frame;
- Installation of suspensions, brakes, chassis, shock absorbers, wheels;
- Installation of engine, gearbox, drive assembly;
- Installation of the fuel system;
- Installation of electrical equipment - turn signals, headlights, dashboard, battery;
- Case manufacturing;
- Priming, sanding and painting the body, (if desired) sophisticated custom tuning;
- Installation of the body and seat.
After the final stage, the finished miracle of home-made equipment will need to be thoroughly tested, gradually making road (and off-road) conditions more difficult.
ATV from Oka
Designer Sergei Pletnev from the Perm region assembled an ATV based on the Oka compact car. It took him a year of work to assemble.
Main components
- Steering wheel from a Ural motorcycle;
- VAZ CV joints and cross-wheel gearboxes;
- 15-inch front and rear wheels from Niva Chevrolet;
- gas tank from a 20-liter canister;
- engine, gearbox, clutch, part of the dashboard and headrest from Oka.
Specifications
Weight 430 kg Dimensions 2300 x 1250 mm Handlebar and saddle height 1250 / 900 mm Ground clearance 300 mm Wheelbase 1430 mm Track 1045 mm Maximum speed 65 km/h
ATV drawings
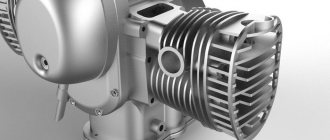
The two-cylinder four-stroke liquid-cooled engine from Oka produces 32 hp. With. This is not enough for a car, but for an all-terrain vehicle it is quite enough. The steering is of a hybrid type. A motorcycle lever and shaft are used on top, and car tie rods on the bottom.
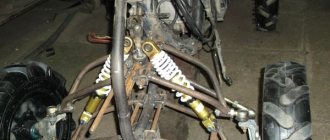
The transmission of a homemade ATV is unique. It is based on modified components from VAZ. To reduce speed and increase torque, the gear pair was removed and a chain drive was used instead. Inter-wheel gearboxes are borrowed from VAZ classics. The auto mechanic decided to remove the axle shafts and replace them with VAZ front-wheel drive CV joints. CV joints were also used in other transmission components.
The ATV is built on a welded spatial frame made of round pipes of the VGP-25 and VGT-20 types. It received independent suspension on triangular wishbones and shock absorbers from Oka. The bumpers and guards are welded from 20 mm round pipes. The muffler was designed by Pletnev himself. It consists of two chambers, the inlet pipe is sealed with asbestos. To create a fiberglass body kit it took 10 kg of epoxy, 1 kg of plasticizer and 1 kg of hardener, 5 m of glass mat and 15 m of fiberglass.
Do-it-yourself homemade ATV: how to make a decent device
An ATV is a vehicle equipped with four wheels. The main manufacturers of mini cars are: Yamaha, Polaris, BRP, CF Moto. Utilitarian quadrics are used as all-terrain vehicles, and stunt models are used for fast driving. The categories differ from each other in technical characteristics, which is taken into account when you need to assemble an ATV with your own hands.
Steering
Assembling an ATV with your own hands is not an easy task. And, perhaps, the most difficult thing is to make the steering. To do this, first weld the frame of the front part of the ATV. Then you will need steering knuckles from a car, for example from a Niva, but any others will do. After which you need to build the suspension arms. Pay special attention to the design of the mounting of the levers, since when they are connected to the frame, large loads arise, so additional stiffening ribs will not be superfluous. Levers are usually bolted through silent blocks. This is a rubber-metal joint that is an essential link in the suspension. It dampens wheel vibrations, preventing vibration from being transmitted to the frame. Levers can be made according to these drawings.
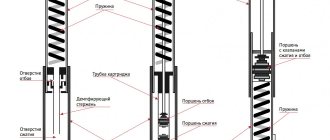
Go ahead. What is the front suspension without shock absorbers? Here you can use 4 motorcycle shock absorbers, one for each arm in the front, and two for the swingarm to dampen the rear axle. Rear shock absorbers from Izh will do, but if you are willing to shell out for gas-oil shock absorbers with pumping, this will give you the opportunity to adjust the suspension to suit road conditions, which is very useful for equipment such as an ATV!
Description of the vehicle
A modern ATV is equipped with four or six small wheels, but with increased maneuverability. The main technical characteristics include: light weight, all-wheel drive and low gear. Due to the unique configuration, the vehicle can easily travel on country roads. It can be used in summer and winter.
To make a homemade ATV, it is recommended to decide on its type:
- Utilitarian. The model has a lot of weight and good maneuverability. The vehicle easily carries several people and accelerates to 90 km/h.
- Stunt. Equipped with a narrow platform and radiator. The car weighs little and can accelerate to 137 km/h.
Preparatory stage
When assembling the structure yourself, the power of the motor, the type of suspension, and the need to install a trunk are taken into account. To perform the upcoming work you will need: a welding machine, drill, grinder, keys, hammer, pliers, jack. As a basis you can take:
- Motorcycle Ural.
- Motorcycle Izh.
- Scooter.
- Oka or Niva car.
If necessary, transport is assembled from motorcycle and car parts. If the frame is made independently, special equipment will be required to deform the pipes. In this case, it is recommended to separately make drawings of the frame for the ATV with your own hands. This will simplify the process of assembling components:
Selection of systems
The brake system uses new parts or with minimal mileage. It is dangerous to install old brakes. The muffler is removed from the old car or made independently from a pipe. If a frame from another machine is used, it must be securely bolted to the bottom of the motor. The power unit is installed at the rear or front. Experts advise securely attaching the drive and transmission to the frame.
If the frame requires reconstruction, the component elements are dismantled. The front part needs to be extended onto the frame. At the next stage, the components of the frame are welded. When reconstructing the frame of a motorcycle, the seatposts are moved back by 40-45 cm. Racks are cut out of metal and welded, which are then fixed to the frame. The resulting homemade quad part can be painted with any paint.
To make your own frame, use a regular pipe with a wall thickness of up to 3 mm. It is better to make the spars from a pipe with a diameter of 25 mm, and the struts from a 20 mm pipe. The elements are fixed by spot and then solid welding. In a similar way, the ears from the levers and shock absorbers are welded to the frame. It is recommended to fix the brackets when installing other components and assemblies.
Power unit
The motor is removed from a sports or regular motorcycle, scooter, or car. Auto mechanics advise using a four-stroke engine with a power of more than 15 hp. With. The power units of scooters differ from other analogues in their low fuel consumption. An ATV based on a scooter weighs little, so it can be pulled out quickly if it gets stuck in sand or mud.
To transport cargo or drive off-road, a stronger motor is installed:
- from Izh-1, Izh-2 or Izh Jupiter with a power of 24 hp. With.;
- from the Urals 32 or 36 l. With.;
- from Oka two-cylinder engine 35 liters. With.
To transport heavy loads, a three-cylinder engine is installed. To drive in hot weather, a motor with a cooling system is used. It is not available on older motorcycles. In such units, the cooling system will need to be modified.
Front and rear suspension
Homemade ATVs are equipped with front or rear suspension. It is easier to mount a ready-made front suspension from an old motorcycle. You can use other options:
- Rear axle from the car. It must be shortened to fit the parameters of the quadric. The advantage of this method is the presence of a differential. The disadvantage of the bridge is its large mass.
- Cardan + gearbox on the rear axle. An independent suspension with high ground clearance is suitable for an all-terrain vehicle. In this case, the suspension arms are fixed to the frame using bolts.
To prevent the ATV from turning over while driving, it is recommended to tilt the front suspension strut. The shock absorbers are from Izha. If you have the financial opportunity, it is better to install gas-oil shock absorbers with pumping. They provide suspension adjustment based on the road surface.
The steering system of an ATV is similar to that of a car. A steering wheel or motorcycle handlebar is installed . Some experts advise combining 2 types:
- motorcycle handlebars, shaft and lever at the top;
- parts of the steering system from the car are below.
You can make the steering shaft with your own hands. For this, a pipe with a diameter of 20 mm and a wall thickness of 3 mm is used. You will need to install a travel stop at the bottom of the part.
Army and weapons
Dear visitors to the “ Samodelkin Friend ” site, today we will look at a homemade tricycle created on the basis of a Soviet light-class motorcycle of the “Minsk” type. Step-by-step photos of assembly and a description are attached. A homemade tricycle from a Minsk motorcycle was assembled by Ivan Krylov from Kostroma. The front part of the motorcycle remained unchanged, the only thing added was forced cooling in the form of a fan from the Zaporozhets stove, connected via a diode bridge, it does not boil under any riding conditions.
The rear of the motorcycle was radically changed, namely, a new frame was welded to accommodate the axle and two drive wheels driven by a chain drive. Homemade fenders are installed to protect the motorcyclist from splashes of mud and water from under the wheels.
The wheels are homemade, made from the hub of a Zhiguli car, the rim is from a Ural motorcycle, at the place where the rim is welded to the hub, a strip from a pipe (1.25) is passed, welded through the holes of the spokes (from the inside) Suspension: pendulum on Zhiguli silent blocks of the rear suspension, hydraulic part of the shock absorber from Zaporozhets with spring from the rear shock absorber of the Ural motorcycle, the suspension travel is 26 cm, very light. There is no differential, it turns normally with its light weight. The towbar for a 300 kg trailer pulls calmly) The rear sprocket, chain and axle are from the Domestic grain harvester SK-4 “Niva”
Exhaust system: homemade, curved part from the muffler of a tractor launcher, and the red pipe is borrowed from the air conditioner of a DT-75 crawler tractor.
And so, let's take a closer look at the design features of the presented tricycle.
Materials
- motorcycle "Minsk"
- motorcycle wheel rim "Ural" 2 pcs.
- VAZ hub 2 pcs
- chain, axle and sprocket SK-4 "Niva"
- pipe from the starter and air conditioner DT-75
- Cossack stove fan
- VAZ silent blocks
- shock absorber spring "Ural"
Tools
- welding inverter
- Angle grinder (grinder)
- set of wrenches
- drill
- measuring and plumbing tools
- skillful hands
Do-it-yourself photo of the components of a homemade tricycle from a Minsk motorcycle. The tires on the rear wheels are from the sports Urals, the grip on the ground is excellent) The tricycle flies up a steep climb with ease, even rears up)
Ural motorcycle rim, VAZ hub
The exhaust system is homemade, assembled from tractor spare parts, namely pipes from the launcher and the red pipe of the DT-75 air conditioner.
Additionally, a towbar for a trailer with a carrying capacity of 300 kg is installed.
Forced cooling is carried out by forcing an air flow onto the cylinder head from the fan of the heating stove of the Zaporozhets car.
Note! There is no gearbox on the tricycle; the reduction is carried out by an intermediate shaft with sprockets with a different number of teeth and only then to the rear sprocket.
A trip to nature with a trailer and friends of Ivan Krylov.
Belarusian villages are like this: behind unsightly-looking fences you can sometimes find a real treasure. It would seem, what could attract the attention of a small village between Vitebsk and the border with Russia, transit through which does not stop around the clock? Likewise, the hero of our material, Sergei, does not see much merit in the ATV he created with his own hands, which can easily be mistaken for a factory model.
“The idea was born thanks to the Internet: I saw enough and wanted to do it myself. Besides, I'm a biker, I have a lot of spare parts from my motorcycles. There have been similar models for a long time, there are plenty of Chinese ATVs, and more or less beautiful ones.”
Gearbox and brakes
If the quad is assembled on the basis of a car, the chain drive is replaced. This greatly simplifies vehicle maintenance. A manual transmission is installed, as it improves maneuverability. The input shafts are directed to the front and rear axles. Wheels can be removed from small cars: Oka, Niva.
The brake system is selected taking into account the mounted wheels. The steering knuckles are removed from the Niva or Oka. To assemble an all-wheel drive model, you will need: car steering, transmission drive and differentials. In this case, the frame is not used. It is better to weld the structure to suit the engine size.
The suspension is also removed from the car. A gearbox is installed on the front-wheel drive model. The next stage is the manufacture of the body. For this you will need fiberglass, fiberglass. Experts advise using the first material, as it is easier to work with.
A drawing is pre-prepared and body elements are cut out from polystyrene foam. To fix them together, glue or foam is used. Fiberglass is glued to the foam. The resulting structure is attached to the frame. The body is well dried, primed, sanded and painted.
Tires of the required size are selected. If the vehicle will be used off-road, it is necessary to create the appropriate ground clearance (distance from the bottom to the surface of the earth). For this, R17 wheels are installed.
The resulting ATV is equipped with turn signals, headlights, a dashboard, and a battery. Electrical equipment is connected according to a pre-designed diagram. For this, wiring and a multimeter are used to check the voltage in the network. The next step is to install the seats. The vehicle is checked for serviceability, and the data displayed on the drawings is compared. A quadric, correctly assembled, is not inferior in technical and operational characteristics to finished vehicles.
ATV with four-wheel drive
To make it, you will need a steering system from a car, a drive from a manual transmission, suspension and differentials. The suspension, like the steering, can be removed from the car. In such cases, the frame is cooked completely from scratch, based on the size of the engine of the future ATV. On the front suspension, you should take into account the space for the drive gearbox.
Using automotive products purchased on the secondary market, you can relatively inexpensively assemble vehicles for difficult roads and rural areas. One of the budget options for the source is the Ural motorcycle, since it is inexpensive, has rear-wheel drive and a four-stroke engine. Due to its positive aspects, it is popular.
A self-made ATV is not only a convenient and practical vehicle, it is a reason for pride and an opportunity to demonstrate your skills. Outwardly, it may be inferior to factory designs, but in terms of its technical characteristics, home-made ATVs are no worse.
Perhaps the only negative (apart from the time spent, since doing what you love is never a burden) is the need to involve auto experts in order to obtain documents and be able to register the ATV.
A quad bike is actually any four-wheeled vehicle, since in Latin “quadro” means “four”. In the CIS, this name most often means all-wheel drive, representing a symbiosis of a motorcycle and a car. From a motorcycle, an ATV has adopted mobility, maneuverability, lightness, and speed, and from a car - excellent cross-country characteristics, power and controllability. The result is a unique vehicle designed for a variety of purposes.
The domestic market provides only foreign models of ATVs, the cost of which is often exorbitant. At the same time, you can easily find used motorcycles and cars on the secondary transport market at an extremely low price.
For example, the Ural motorcycle is large, bulky, heavy and power-hungry, has an excellent four-stroke engine with reverse gear and costs a penny. For this reason, it is much cheaper and more fun for enthusiasts to create their own designs of these SUVs.
A typical factory ATV - shiny, neatly built, strong and powerful.
Its homemade counterpart, which is slightly inferior in appearance, and even more so in terms of power.
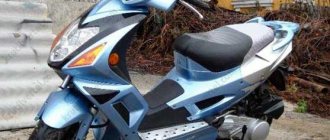
ATV from a scooter: assembly features
An ATV is a useful household, fashionable and functional appliance. Therefore, scooter owners dream of switching from two-wheeled to four-wheeled motor vehicles. It is quite possible to make an ATV from a scooter with your own hands. To do this, you need to prepare the appropriate components and tools. This is a fascinating process that will result in a universal self-propelled vehicle.
The scooter is a lightweight motorcycle that can easily make an excellent ATV. The engine of this scooter is located under the seat, which is an advantage, since the all-terrain vehicle will have to be driven on rough terrain, rocky or muddy roads. The motor in this design will be reliably protected from dirt and moisture entering the system.
The scooter turns into a lightweight ATV that has all the advantages of popular all-terrain vehicles. The low weight is explained by the absence of a heavy body, which guarantees the maneuverability of the motorcycle, as well as its low inertia. Another advantage of an ATV assembled from a scooter is the fact that even one person can pull it out of a hole or sticky mud. This technique is perfect for both entertainment and simple household tasks. For example, with the help of such an ATV it will be possible to transport small loads. The advantage of motor vehicles assembled from a scooter is low fuel consumption.
DIY ATV frame drawings
The false tank has a complex shape. It was not possible to bend it out of hardboard. Therefore, having wrapped the engine with plastic film, I began to fill the space intended for it with layers of polyurethane foam. After each layer, drying is mandatory, otherwise the thick volume of foam may not dry out inside. Filled until the layers went beyond the contour. Finally, after the foam had completely dried, I began to draw out the desired shape with a knife. The edges were smoothed with coarse sandpaper.
Part of the Oka dashboard was used under the instrument panel. I secured it to the blank also using polyurethane foam. Since the foam is large-porous, the pores were filled with gypsum and then processed. When the shape of the blank began to correspond to the intended design and its surface became more or less smooth, I coated the blank with PF-115 paint. Since I was not going to make a matrix for gluing the body kit on the block, but immediately glued the body kit on it, followed by finishing the surface to an ideal state, putting plaster and painting the block could be neglected.
So, the blockhead is ready and to glue a high-quality product, it was required: 10 kg of epoxy resin, 1 kg of plasticizer for it and 1 kg of hardener, 15 linear meters of thin fiberglass fabric, 5 m of glass mat, brushes, gloves. It is highly advisable to wear breathing protection. And the more expensive they are, the more reliable they are. But, as you know, you can’t buy experience, so I gained it in the process of work.
How to make an ATV from a scooter?
To assemble an ATV from a light scooter, you need to prepare a number of tools. Welding equipment and a grinder must be used in the work. You will also need a variety of hand tools, from screwdrivers to wrenches.
The workshop is equipped in a heated, well-ventilated room or outdoors under a canopy in the summer.
To make an ATV from a scooter with your own hands, the design drawings will need to be examined in detail before starting work. It is best to develop the scheme yourself, working out every detail of the future system.
You need to start assembly with the frame, which is taken from the donor scooter. It will need to be modified, additionally boiled and a trunk located in the front or rear made.
Additional material will definitely be needed to assemble the frame. It should be a thin-walled pipe with a round or square cross-section. It should not be heavy, otherwise the weight of the ATV will be large. Because of this, it will lose maneuverability and controllability, and too much load will be placed on the engine. Because of this, it can fail quite quickly.
It is not recommended to use water pipes, as they are very fragile and are not suitable for such purposes. To install all the necessary components and mechanisms, brackets are welded to the frame.
How to turn a children's ATV into an all-terrain racing car
Nothing in this world lasts forever, but some Chinese products simply surprise with their “durability”.
I will tell you about my experience in upgrading a children's ATV. What we have: a children's ATV KL-789 with minor faults, a little free time and the desire to plug in an arduino that was lying around.
What we want to get: something that will work longer than one month, preferably with improved driving characteristics. The ATV has two RS550 12V brushed motors, with a shaft rotation speed of 19300 rpm at idle, connected to the rear wheels with a diameter of ~30 cm through gearboxes with a gear ratio of ~131. Simple mathematics suggests that the maximum speed of this vehicle should be 19300/131/60 * 3.14 * 0.3 = 2.31 m/s or 8.3 km/h. In practice, it travels at about 7 km/h. While choosing new components, I was battling the desire to make it as fast as possible, and the fear that it would be too dangerous a vehicle for children. Therefore, it was decided that he should go 1.5-2 times faster. Besides the engines, I was unsatisfied with it:
- Battery.
Gel 12V 10Ah, losing most of its capacity at high discharge current - Control system.
The first speed is a pedal, the motors are connected in series. The second speed is a knob on the steering wheel, the motors are connected in parallel. The brake is automatic when the pedal is released, the motor windings are closed. This scheme leads to a too sharp start, a complete absence of free rolling, an equally sharp brake, all this leads to large current loads (the pedal button melted within a month of operation), and mechanical loads on the gearboxes and wheels, not to mention the banal discomfort ride - Power wires.
Section 0.75-1 sq. mm, which with rated currents of 20A heat up to a significant temperature
Those. I was not satisfied with absolutely all the electrics. After some thought, it was decided to use:
- Two 11.1V lithium batteries with a maximum (promised) current of 240A each (yes, they can start a car, tested)
- Two touch BC motors at 36000 rpm at nominal 11.1V, and ~40000 rpm with fully charged batteries
- Two touch BC regulators for 120A (I like everything with a reserve)
- Proportional throttle control based on Hall sensor
- Five-position gear selector, we will have three speeds forward, one reverse and neutral
- 100A current sensor
- Bluetooth module for telemetry on the phone
- Headlights
- Brake light/tail light, red, red
- Sound signal, where would we be without it?
- FET module, 4 channel, for headlight control
- Teensy 2.0, as the controller of it all
- Two-section light switch
- Well, a few small things - a dongle for setting up and flashing the regulators, connectors, wires, heat shrink, a tool for removing the pinion from the stock motor
In addition, to reduce the rumble of plastic wheels and improve the smoothness of the ride, 4 12.5″ tires for baby strollers were purchased, after which they were slightly modified with a stationery knife, and then they were stretched onto the wheels of the ATV and secured with self-tapping screws:
When everything arrived, the prototype was assembled on the knees, it turned out that the engines, even without load, heat up to 70 degrees in 3-5 minutes of operation, I had to buy two additional coolers for them, and the regulators, on the contrary, do not heat up even with the fans turned off (looking ahead to They also don’t heat up on an ATV under load). Because we have two motors on two different sides, it was necessary to solve one more problem - the touch motors only rotate in one direction. Initially, it was planned to disassemble one motor and turn the sensor in it 180 degrees... but reality showed that this cannot be done with little effort. Moreover, during experiments with the sensor and timings, one of the regulators partially burned out, in the end I abandoned the sensor and connected them like regular BCs. The sensor itself consists of three Hall sensors that monitor the rotor position and a temperature sensor. It was decided not to leave all this equipment, but to connect it to the MK and use it as an engine temperature sensor, an engine rotation speed sensor, and subsequently, knowing the gear ratio, as a speed sensor.
The pwmservo library was somewhat puzzling; it is designed to control servos (in my case, regulators) through hardware PWM, with an accuracy of 1 degree, a total of 180 states, and the “forward” direction is only half the range, i.e. 90 states. It seemed to me that this was not enough, I had to edit the library to the detriment of the cross-platform Arduino (it worked only for controllers with 16 MHz), the result is 1000 states in each direction (a unit is equal to 0.5 μs of PWM duration, PWM from 1 to 2 ms).
After the work “on the knee” was more or less debugged, all this equipment was installed on the ATV:
Photo
Motor + gearbox:
Inside there is a small creative mess of wires (I just threw all the wires inside, I wanted to test it faster, later it was brought into human form):
Because the power turned out to be more than 500 W, it was necessary to limit the rate of increase in the gas; if you sharply turn the gas to maximum from a standstill, the power will increase smoothly and reach its maximum in about 3 seconds. I am sure that without this the effect of instant capsizing would have occurred.
In general, here is a telemetry video recording from the phone screen, everything is visible there, only due to a slightly glitched speed sensor in the left engine (left green column), the speed data is slightly underestimated, the maximum speed achieved on fresh batteries is 18 km/h Column values: blue - engine temperature in degrees, green - engine speed in rpm, orange - power supplied to the engines in conventional numbers from 0 to 1000, gray - throttle position.
And here's how it goes:
It didn’t drag me away... it’s slipping, but I rode the ATV itself, and judging by the telemetry, it absolutely doesn’t care who’s on top
In the first video you can hear a crunch at the start. On the very first evening, the gearboxes completely failed. The problem turned out to be that the gearboxes consist of nylon gears rotating on a 9 mm steel axle without bearings, so the friction force of the gears turned out to be so great that in one gearbox the middle of the gears simply melted and the alignment was lost. In another gearbox, the gear was welded to the axle, and the axle began to rotate in the housing and melt it, as a result of which the gear also lost alignment.
To solve this problem we needed:
- Axles from 450 pro helicopters
- Bearings from them
The new axles are 5mm, so we had to 3D print bushings with an outer diameter of 9mm (like the old axles), and an inner diameter of 5mm, so that the new axles could be installed in the old gearbox housing, 11mm holes with a depth of 5mm were drilled in the gears both sides (bearing seats).
The gears are now installed on bearings, and also generously lubricated with lithol, and for more than six months everything has been running perfectly in all conditions: Photo
But I don’t stop there, the next step is custom gearbox gears in order to increase the speed to 25-30 km/h.
The kids learn very quickly and are already great at entering a 90-degree turn with a little braking and then slamming on the throttle as they exit the turn.
The sketch, the modified pwmservo, pinount library can be downloaded here, all this is in draft form, there is a lot of unfinished and debugging code in the code, for which I apologize in advance.
Wheels
It is better to choose wheel rims from light alloy materials, since otherwise the weight of the vehicle will be significant. You can take wheels from a walk-behind tractor, the tread of which has a rather aggressive pattern. But for a light ATV you should not choose wheels from a car. They are large and heavy, so there will be a high load on the engine.
Motor
An ATV with a scooter engine will not differ in significant power. But when driving off-road, the driver will be able to get his share of drive. Once the frame is assembled, the motor can be mounted on it. This is a painstaking process that requires accuracy from the master. The motor must fit firmly into its seat. Otherwise, it will be subject to strong vibrations.
The motor shaft must be connected to the gearbox on the rear axle. To do this, you need to attach a chain drive to the gear. The transmission is installed immediately after this, bringing all controls, including those from the engine, to the frame. The pedals and control levers are secured to the appropriate seats.
All wheel drive and car engine
How to create an ATV with 4-wheel drive yourself, you ask? Above we looked at the simplest option. But the option is possible not only with a motorcycle engine, but also with a car engine! And then we will tell you how to make an ATV with an Oka engine. In the case of an all-wheel drive ATV with a car engine, things are much more serious. Here you can no longer use a motorcycle frame as a basis; it will have to be welded completely from scratch for a car engine. By the way, it can be not only from Oka, but also any other, depending on your desires and capabilities. Don't forget about the liquid cooling system right away. Design the frame in such a way as to place the radiator and fan in a protected place from forest branches. The engine and gearbox should be mounted along the frame so that the drive shaft from the gearbox is directly directed to the rear axle. To distribute wheel rotation, each wheel will need 2 identical axles, for example from a Zhiguli. But for installation you will have to shorten them. To increase cross-country ability, if desired, you can make a reduction chain gearbox, combining it with a standard gearbox. In this case, the drive gear should be slightly smaller than the driven one. By simple calculations of the ratio of the diameters of these gears, you can find out how much the maximum speed will decrease and the thrust will increase. If the ATV is not planned to be used for driving on public roads, then this will be a very significant technical solution.
Accessories
It is recommended to use the engine, power and ignition from one scooter so that the entire system functions smoothly. It is advisable to modify some components; for example, it is advisable to equip the ignition system with a battery with characteristics suitable for an ATV. It is better to take the fuel tank from a scooter, as it is large enough for such a system.
The front and rear axles are taken from a cargo scooter, since they are subject to heavy loads. If these system elements are not strong enough, they will quickly deform and fail.
Springs for the shock absorber can be taken from any motorcycle that is large enough. They are fixed on the frame movably, with a configuration resembling the letter “A”. You can purchase shock absorbers separately, as they should provide a smooth ride. New parts perform better than used parts.
Control can be either steering or motorcycle. The choice depends on the taste preferences of the master. The brake lever is connected to the transmission brake, connecting the system to the rear axle sprocket.
Body kit
Exterior body kits can be made from fiberglass material or old motorcycles or cars. To make the body, it is recommended to glue a “blank” of plastic or wood. When using this technology, it is possible to fit the parts of the body kit to each other as efficiently as possible. Fiberglass is applied to the model, forming the parts of the body kit.
After this, the body needs to be sanded and primed. When the layer dries, special paint is applied. Then the operation of all systems and mechanisms is checked, and appropriate modifications are made if necessary.