Signs of a malfunctioning knock sensor
If the DD fails completely or partially, a malfunction of the knock sensor manifests itself according to one of the symptoms:
- Engine shaking. If the sensor and control system in the engine are working properly, this phenomenon should not occur. By ear, the appearance of detonation can be indirectly determined by the metallic sound emanating from a running engine (knock of fingers). And excessive shaking and jerking during engine operation is the first way to determine a malfunction of the knock sensor.
- Reduced power or “dullness” of the engine, which is manifested by deterioration of acceleration or excessive increase in speed at low speeds. This happens when, with an incorrect DD signal, the ignition angle is spontaneously adjusted.
- Difficulty starting the engine, especially “cold”, that is, at low temperatures after a long period of inactivity (for example, in the morning). Although it is quite possible for the car to behave this way even at warm ambient temperatures.
- Increased fuel consumption. Since the ignition angle is disturbed, the air-fuel mixture does not meet optimal parameters. Accordingly, a situation arises when the engine consumes more gasoline than it needs.
- Fixing knock sensor errors. Usually the reasons for their appearance are the signal from the sensor going beyond the permissible limits, a break in its wiring, or a complete failure of the sensor. The occurrence of errors will be indicated by the Check Engine light on the dashboard.
However, it is worth considering that such symptoms may indicate other engine failures, including other sensors. It is recommended to additionally read the ECU memory for errors that could arise due to incorrect operation of individual sensors.
Knock Sensor Circuit Malfunctions
In order to identify DD faults more accurately, it is advisable to use electronic error scanners for the electronic control unit. Especially if the check indicator light on the dashboard lights up.
The best device for this task will be Scan Tool Pro Black Edition - an inexpensive Korean-made device with great functionality that works with the OBD2 data transfer protocol and is compatible with most modern cars, as well as programs for a smartphone and computer (with a Bluetooth or Wi-Fi module).
It is necessary to consider whether there is one of the 4 errors in the knock sensor and errors in the mass air flow sensor, lambda or coolant temperature sensors, and then view real-time indicators for the advance angle and fuel mixture composition (an error in the DD sensor appears when it is significantly depleted).
Often, error p0325 “Open in the knock sensor circuit” indicates problems in the wiring. This could be a broken wire or, more often, oxidized contacts. It is necessary to perform preventative maintenance on the connectors on the sensor. Sometimes error p0325 occurs because the timing belt slips by 1-2 teeth.
Error P0328 “Knock Sensor High” often indicates a problem with high-voltage wires. In particular, if the insulation on them or the piezoelectric element breaks through. Similarly, this error can also occur due to the fact that the timing belt has jumped a couple of teeth. To diagnose, you need to check the marks on it and the condition of the washers.
Errors p0327 or p0326 are usually formed in the ECU memory due to a low signal from the knock sensor. The reason may be poor contact from it, or weak mechanical contact of the sensor with the cylinder block. To eliminate the error, you can try treating both the mentioned contacts and the sensor itself with WD-40
It is also important to check the tightening torque of the sensor, since this parameter is critical to its operation
In general, it can be noted that the symptoms of a malfunction of the knock sensor are very similar to the symptoms characteristic of late ignition because the ECU, for the sake of safety for the engine, tries to automatically do it as late as possible, since this prevents destruction of the engine (if the angle is too early, then in addition detonation occurs, not only does the power drop, but there is also a risk of valve burnout). So, in general, we can conclude that the main symptoms are exactly the same as with incorrect setting of the ignition timing.
Knock sensor: how to check and change
About the sensor
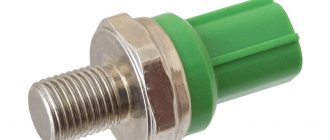
The sensor is used to detect detonation and misfires in the engine. Structurally, the DD is similar to a piezoelectric element; a winding is placed inside the sensor. When detonation occurs in the engine, a slight vibration occurs through the sensor, which allows a small amount of voltage to be generated and transmitted to the electronic control unit. When the ECU receives signals from the DD, it understands that detonation is occurring in the engine and it is necessary to adjust the fuel mixture.
Symptoms of a problem
It should be noted that judging the operation of the sensor by signs is not an accurate method, since other sensors can also exhibit symptoms of failure similar to sensor failure. You can accurately determine whether the sensor is failing using diagnostics.
- Ringing of fingers when sharply pressing the gas pedal;
- High fuel consumption;
- Misfires;
Symptoms of sensor failure
As already noted, damage can be determined visually. If the knock sensor is faulty, it will affect the performance of the entire vehicle.
Among the most common symptoms indicating a breakdown in the knock sensor are:
- Reduced engine power. Compared to ordinary situations, it will be quite noticeable. So, for example, when operating a car when transporting goods or passengers, the movement of the vehicle will be difficult, the engine will practically stop responding to the accelerator pedal.
- Increasing the length of acceleration. Basically, this symptom is considered a consequence of the previous point.
- Increased fuel consumption. This is explained by the fact that the engine control unit ceases to control the ignition angle level.
- Smoky exhaust. A large amount of smoke from the car's exhaust pipe can signal a problem. However, such a symptom may not always be associated with a malfunction of the knock sensor.
- The occurrence of detonation effect in the internal combustion engine. A fairly striking sign that should serve as a signal to the car owner about the necessary replacement.
Also, symptoms of a motor failure include a lighted indicator on the dashboard. The “Check-engine” icon can indicate several types of breakdowns, but it is recommended to check the knock sensor first.
Problems
It is the Lada Kalina knock sensor that can cause breakdowns. For example, the engine loses power, etc. If the reason is in the specified sensor, the “Check Engine” indicator on the car’s dashboard will light up. In addition, machine diagnostics will reveal one of the error codes:
- P0325 - means an open circuit of the knock sensor Lada Kalina;
- P0327 – Low signal level;
- P0328 – Signal level high.
As for the location, the Lada Kalina knock sensor is marked in the photo with the number 16.
Signs of a malfunctioning knock sensor
If the DD fails completely or partially, a malfunction of the knock sensor manifests itself according to one of the symptoms:
- Engine shaking. If the sensor and control system in the engine are working properly, this phenomenon should not occur. By ear, the appearance of detonation can be indirectly determined by the metallic sound emanating from a running engine (knock of fingers). And excessive shaking and jerking during engine operation is the first way to determine a malfunction of the knock sensor.
- Reduced power or “dullness” of the engine, which is manifested by deterioration of acceleration or excessive increase in speed at low speeds. This happens when, with an incorrect DD signal, the ignition angle is spontaneously adjusted.
- Difficulty starting the engine, especially “cold”, that is, at low temperatures after a long period of inactivity (for example, in the morning). Although it is quite possible for the car to behave this way even at warm ambient temperatures.
- Increased fuel consumption. Since the ignition angle is disturbed, the air-fuel mixture does not meet optimal parameters. Accordingly, a situation arises when the engine consumes more gasoline than it needs.
- Fixing knock sensor errors. Usually the reasons for their appearance are the signal from the sensor going beyond the permissible limits, a break in its wiring, or a complete failure of the sensor. The occurrence of errors will be indicated by the Check Engine light on the dashboard.
However, it is worth considering that such symptoms may indicate other engine failures, including other sensors. It is recommended to additionally read the ECU memory for errors that could arise due to incorrect operation of individual sensors.
Knock Sensor Circuit Malfunctions
In order to identify DD faults more accurately, it is advisable to use electronic error scanners for the electronic control unit. Especially if the check indicator light on the dashboard lights up.
Often, error p0325 “Open in the knock sensor circuit” indicates problems in the wiring. This could be a broken wire or, more often, oxidized contacts. It is necessary to perform preventative maintenance on the connectors on the sensor. Sometimes error p0325 occurs because the timing belt slips by 1-2 teeth.
Error P0328 “Knock Sensor High” often indicates a problem with high-voltage wires. In particular, if the insulation on them or the piezoelectric element breaks through. Similarly, this error can also occur due to the fact that the timing belt has jumped a couple of teeth. To diagnose, you need to check the marks on it and the condition of the washers.
How to check the knock sensor yourself
Errors p0327 or p0326 are usually formed in the ECU memory due to a low signal from the knock sensor. The reason may be poor contact from it, or weak mechanical contact of the sensor with the cylinder block. To eliminate the error, you can try treating both the mentioned contacts and the sensor itself with WD-40
It is also important to check the tightening torque of the sensor, since this parameter is critical to its operation
In general, it can be noted that the symptoms of a malfunction of the knock sensor are very similar to the symptoms characteristic of late ignition because the ECU, for the sake of safety for the engine, tries to automatically do it as late as possible, since this prevents destruction of the engine (if the angle is too early, then in addition detonation occurs, not only does the power drop, but there is also a risk of valve burnout). So, in general, we can conclude that the main symptoms are exactly the same as with incorrect setting of the ignition timing.
Symptoms of a problem
After several years of operation of the Lada Kalina, the engine knock sensor may fail. In most cases, this happens for natural reasons, such as a break in internal contacts. In this case, the car exhibits the following symptoms:
- there is a distinct knocking sound from the engine;
- fuel consumption increases;
- engine troits;
- craving disappears;
- dark smoke;
- error P0327.
Perhaps the problem is related to oxidation of the contacts, a broken wire, or a pop-out block. But most often, it is the knock sensor that needs to be replaced.
For reference! The ECU unit can remember the registration of 2 errors: 0327 and 0328. The first indicates a low amplitude, and the second, on the contrary, indicates that it exceeds the norm.
Features of phase sensor and shock sensor
The phase sensor (PF) of the Lada Kalina is installed on the cylinder block plug. Its signal is used by the ECU to sequentially inject fuel into the cylinders, that is, the phase sensor helps the ECU monitor the so-called engine strokes (intake, compression, combustion, exhaust) and supply fuel when needed.
It is possible to verify that the phase sensor is faulty only with the help of diagnostic devices, because the nature of engine operation when the phase sensor fails usually does not change. Fuel consumption may only increase slightly. Sometimes the engine starts with a slight delay because the ECU is looking for a signal from the sensor, but does not find it.
If it is necessary to replace the DF, you need to remove the plastic cover of the cylinder block to make it easier to get to the device itself. Carefully remove the connector with wires from it and, using a 10mm wrench, unscrew the fastening bolt, after which the sensor can be removed from the engine.
The new device is installed in the same place. DF is also called camshaft position sensor. When dismantling the device, it may happen that the sensor seems to grow to its place and does not want to be removed. In this situation, special pliers will help.
The shock sensor is installed as part of the standard anti-theft alarm system for the Lada Kalina. As a rule, a car of this model has a mount for such a sensor, and of a single-level type. However, car enthusiasts have learned to install non-standard two-level devices. The two-level shock sensor is connected quite easily without major changes to the standard wiring.
Sensors with an output transistor are often installed, configured for certain security zones (for example, the hood or doors). A two-level impact sensor is the most preferable because it reacts differently to impacts of different strengths, which allows you to assess the degree of danger to the vehicle
- Replacing an old model with a new knock sensor for a VAZ 2110
But it is important to consider that this device requires fine tuning. As a rule, this is done using a special adjusting screw.
Diagnostics and replacement of the knock sensor
Symptoms of a problem
If you begin to notice that your car’s engine is running unevenly (troiting), or its dynamics have deteriorated and the “CHECK ENGINE” indicator lights up on the instrument panel when you start to climb or when accelerating, then you should check the knock sensor for possible malfunction. The following instructions will help you diagnose and replace the knock sensor yourself.
Examination
So, on VAZ 2110, 2112, 214, 2115, replacing the knock sensor begins with reading engine fault codes:
Error code 0325 indicates that there is a break in the electrical circuit of the sensor circuit.
It is necessary to carefully inspect and, if necessary, “ring” the entire circuit and clean the contacts in the sensor connectors, since the main cause of this error is oxidized contacts. In addition, it is necessary to check the timing belt, namely, whether it is installed correctly according to the marks; perhaps it has become loose and has jumped several teeth.
Error number 0328 indicates a high signal level from the knock sensor.
In this case, you need to pay attention to high-voltage wires. This error is issued when there is a breakdown of the power supply and the piezoelectric element, as well as when the valve clearance is increased
Again, recheck the timing belt.
Error codes 0326 and 0327 indicate that the signal level from the sensor is too low.
As in previous cases, we check the electrical circuit circuit; with the sensor removed, we treat the sensor and its contacts with special anti-corrosion agents. Pay special attention to the tightening torque of the sensor, which should be 10-24 N*m. If the instrument panel does not signal you with the “CHECK ENGINE” indicator light, then replacing the knock sensor on VAZ 2114, 2110, 2115 is accompanied by checking it with a voltmeter, for which:
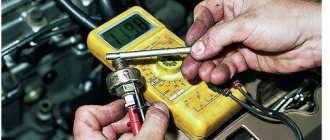
- In the multimeter, set the voltmeter mode and enter the reading limit of 200 MV;
- On a two-contact sensor (broadband type) we connect the multimeter probes to the contacts, and on a one-contact (resonance type) - one to the contact, the second to the sensor body;
- Lightly tap the sensor body with a subsequent increase in impact force with a metal object (screwdriver or bolt) and observe the voltmeter readings;
- When impacted, a voltage surge should be observed: a stronger impact means a higher surge, otherwise the sensor definitely needs to be replaced.
Also, replacing the VAZ 2115 knock sensor may be accompanied by checking it with an ohmmeter, in which the resistance reading should be on a scale of 1-10 MOhm.
Checking with a multimeter
Replacement
Replacing the knock sensor of a VAZ 2112, 2110, 2114, 2115 is not difficult at all, so this instruction will not contain any additional video materials. As mentioned above, sensors of both types are installed on the engine cylinder block. The entire replacement process is as follows:
- With the ignition off, disconnect the wire connector from the sensor, or one wire for a resonant type of sensor;
- In the first case, use a key set to “13” to unscrew the bolt securing the engine...
Replacing the knock sensor VAZ 2115
VAZ 2110 knock sensor replacement
...and in the second, using a key set to “22”, we unscrew the block from the body and dismantle the device itself;
Install in reverse order.
Tips for choosing
In the catalog of assembly units compiled by AvtoVAZ, the knock sensor is designated as follows: 21120-3855020-01 or 02. Both options are suitable for all engines standard installed on Kalina-2. It is clear that the part with the designation “01” is produced by AvtoVAZ OJSC. Products from other factories are characterized by alternative designations: “02” and “03”.
You can check the performance of sensors based on the principle of the piezoelectric effect:
- A voltmeter is connected to the sensor terminals;
- Set the minimum value limit;
- Tapping the housing with a screwdriver controls the voltage.
Knock sensor on Priora - we check and change it ourselves
Knock sensor on Priora - all the details of operation and replacement
Purpose and location of the knock sensor
A knock sensor (DS) is a device that is installed on the outside of the cylinder block wall to monitor the occurrence of abnormal vibrations caused by detonation in the engine. that is, explosive self-ignition in the combustion chamber of the working mixture. The DD produces an alternating current signal, the voltage amplitude and frequency of which depend on the vibration parameters of the cylinder block.
Each level of intensity and frequency of oscillations of the engine walls corresponds to its own signal. The engine control controller constantly analyzes the data received from the engine. When detonation occurs in the cylinders, the amplitude of vibrations of the corresponding frequency increases, and the DD generates a signal, after processing which the controller adjusts the ignition timing, making it later, which leads to the suppression of detonation of the working mixture.
The Priora DD consists of a washer-shaped plastic body, which has a hole in the center for a bolt with a 13-head head, and on the side there is a two-pin connector for connecting wires from the controller. The main part of the DD is located inside the case - a sensitive piezoceramic disk element, which, in fact, generates voltage (signal) when exposed to vibration.
The DD Priora is installed on the cylinder block, namely: on its front wall under the intake module, next to and slightly above the dipstick socket for monitoring the oil level in the engine. It is not visible from the top of the hood. It can only be seen from below, for example, from a pit, when the lower engine protection is removed.
When is the DD changed on Priora?
The DD is removed for inspection or replacement if signs of its malfunction appear or if it is diagnosed at an engine operation test bench. The sensor cannot be repaired, and if it breaks, it must be replaced. When the DD or the electrical circuit from it to the controller fails, the latter (control unit) signals this to the driver by turning on a warning lamp on the instrument panel.
At the same time, the controller switches to another engine control mode, called reserve, in which the ignition timing is constantly at a late angle. This mode is characterized by increased fuel consumption and lower engine power.
The error code indicating a breakdown of the Priora DD is 0327.
The appearance of this error is the main reason why the sensor is changed. However, in some cases, the DD may be only partially faulty, that is, it will work, but incorrectly. In this case, the warning lamp will not light up, no error will be displayed, but the engine will begin to detonate in certain modes. However, there can be many reasons for such motor operation, and if a malfunction of the motor is suspected, it is removed for inspection.
How to remove and check the sensor?
Access from above to the Priora DD is difficult due to the intake module located above it. The easiest way to get to the sensor is from below, first removing the engine protection or at least unscrewing and folding its front part. When working from above, you will have to do everything by touch. In any case, before starting work, it is necessary to disconnect the ground wire attached to the “negative” terminal from the battery.
To remove the crankcase protection, you need to:
- unscrew 5 nuts with a 10mm head;
- unscrew the 2 19 nuts installed on the back of the shield;
- remove protection.
- by pressing the metal latch of the DD connector, disconnect the block of wires going to the controller;
- using a 13mm wrench, loosen the bolt securing the sensor;
- Unscrew the bolt and remove it from the threaded hole, removing the sensor.
- We connect a multimeter to the DD terminals. We set the device to voltmeter mode, choosing a measurement limit of up to 200 mV.
- We take a metal object - pliers or a bolt - and lightly tap it on the DD.
When you tap on a working sensor, the voltmeter will show voltage surges. A faulty DD will not react in any way. A more accurate diagnosis of a removed sensor can only be done using a special stand.
Installation of a new DD is carried out in the reverse order of dismantling. Experts recommend installing a similar Bosch instead of the “native” one. Before going to the store for a new sensor, you should write down the markings of the removed sensor. The bolt securing it to 13 must be tightened with a slight force - 10.4–24.2 Nm (1.1–2.5 kgf). Tightening too tightly will affect the operation of the sensor.
https://carnovato.ru
What is a knock sensor?
It is necessary to obtain information about the operating mode of the internal combustion engine. The internal combustion engine control system is quite complex; it includes many devices, one of which is a sensor that signals the occurrence of detonation in the engine. In addition, it allows you not only to determine the presence of detonation knocks, but also to measure their magnitude. This phenomenon occurs when fuel is not supplied correctly to the combustion chamber. In particular, if the ratio of air and gasoline is disturbed. Thanks to the timely detection of these knocks by the control system, the composition of the air-fuel mixture is adjusted. The sensor has a very convenient location - between the second and third cylinders. In other words, clearly in the middle of the engine block. This allows you to record even the slightest detonation knocks in the engine. This is the kind of embarrassment that happens if the knock sensor fails. The signs of a malfunction, whether it is a Priora or any other car, are the same.
How to replace the sensor yourself in a couple of steps
First of all, pay attention to where exactly the part called the “sensor” is attached to the cylinder block:
On an 8-valve engine, the M8 screw holding part “30” is simply unscrewed. To perform this step, take a flat wrench with a long handle. But if we are talking about a 16-valve internal combustion engine, you may need to use a spanner. A 13mm wrench is suitable for an M8 hexagon.
By immediately loosening the sensor, you can create unnecessary problems for yourself: it will be difficult to disconnect the electrical connector. Therefore, at the first stage, a shutdown is carried out. All the actions listed above are illustrated in the photo:
Here we discuss how to perform dismantling. Installation of the sensor is carried out in the reverse order.
Replacing the knock sensor Lada Kalina
To carry out the work conveniently and quickly, you will need the following simple tools: - a flat-head screwdriver; - a wrench, or better yet a 13mm socket.
- Before working on the car's electrical system, disconnect the negative terminal from the battery. This way you will protect yourself from electric shocks, and your car’s electronics from short circuits and failures.
- To ensure that nothing interferes with the work, the first step is to disconnect the high-voltage wires connected to the spark plugs. Attention! To avoid burns, perform all work with a cold engine.
- Take a 13 mm wrench or socket and unscrew the fastening bolt in a counterclockwise direction. To prevent it from falling, it is recommended not to unscrew it completely. After loosening the fastening using a tool, the bolt can be easily unscrewed by hand.
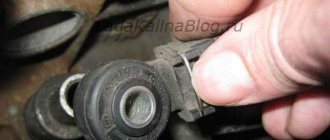
- Using a flat-head screwdriver, press out the metal bracket securing the contact chip attached to the DD body. Remove the bracket and disconnect the sensor itself.
- Assembly is performed in reverse order. When installing and tightening the fastening bolt of the product, pay attention to the fact that its tightening torque should be 20-25 newton per meter.
- After installation, make several starts of the engine and make sure it is operating normally.
The video shows a Lada Granta car, but since they have the same engines, the replacement occurs in the same way:
Malfunctions and their elimination
Like any electronic system, the knock sensor is also susceptible to malfunctions, as indicated by the CheckEngine indicator. Most often, the knock sensor fails in the event of a signal wire break, short circuit, damage to the sensor itself, or damage to the wire insulation. If the signal wire is broken, you need to check the connection between the wiring harness and the knock sensor plug. If it is not damaged, then there is a violation of the integrity of the socket contacts or wires.
In the event of a short to ground, disconnect the mass air flow sensor (MAF) from the wiring harness and check the condition of the circuit with the ignition off using an ohmmeter. If a short circuit occurs in the on-board network, disconnect the cover of the sensor socket and check the voltage between the socket and ground by turning on the ignition. If the voltmeter readings do not exceed 12 V, you need to check whether there is a short circuit in the harness circuit.
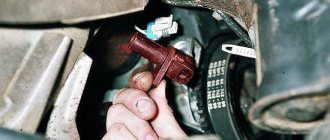
Next, the presence of a signal is checked with a voltmeter, while the ignition must be turned off. If there is no signal, the DD must be replaced. On Kalina, the knock sensor is located slightly higher than the oil level dipstick. It is secured to the thread, and to unscrew it, you need a 13mm wrench. As soon as the DD is unscrewed, the plug with wires is carefully disconnected from it by pressing the latch-lock. The new sensor is simply inserted into its original place and screwed on.
A common problem is error 0326, which means that the sensor signal amplitude has deviated from the threshold value. This usually occurs when the wires on the path from the sensor to the engine controller are damaged. In this situation, it is necessary to check the condition of the circuit and, if necessary, repair the break.
The knock sensor is an inexpensive part, costs about 280 rubles, and is easily replaced. There are other electronic systems of the Lada Kalina that also require consideration.
Features of the phase, detonation and fuel level sensor on VAZ cars
Description of the sensor and detonation process
The so-called detonation process occurs when explosive combustion of fuel occurs even when the ignition is turned off. The cause of this process is usually overheating, as well as glow ignition. Another reason could be poor quality fuel and carbon deposits on the engine walls.
The sensor itself is a ceramic piezoelectric element. It is used by the ECU of 8 valve and 16 valve engines to record vibration. When indicators are characteristic of detonation, the automation adjusts the ignition angle to correct the situation.
Typical faults
Signs of malfunction of this element are recorded by the CheckEngine indicator.
Common reasons for this item to fail are:
- signal wire break;
- damage to the sensor itself;
- wire insulation.
Only the second reason requires replacing the element; in the case of the first and third reasons, it will be necessary to work with the wiring. A voltmeter is used to test the performance of the part.
Features of DIY replacement
If a problem occurs, dismantling and installing this sensor is very simple. On a Lada Kalina car it is located just above the oil dipstick. The two bolts are unscrewed with a 13 key. Also, disconnect the wires by pressing the lock on the block. Installation is carried out in the reverse order of dismantling.
Description of the phase sensor
The phase determiner is located on the plug of the 8-valve engine block. His role is quite simple. It determines the engine operating cycles (intake, compression, combustion, exhaust). Using this data, the ECU regulates the fuel supply.
If an element breaks down, the car continues to work, but gasoline consumption may increase. Also, late ignition can sometimes occur. In this case, the phase sensor needs to be replaced.
Typical faults
Since the effect of a breakdown is not immediately noticeable, only testing equipment will help determine the faulty part. The causes of the malfunction are either problems with the wiring or with the device itself.
In the latter case, you will need to replace this part. This is done quite quickly.
Features of DIY replacement
Replacing the phase sensor on a Priora and other VAZ cars with 8 valves requires completely removing the plastic cylinder block cover. This will make it easier for you to access the part. Next, you need to remove the wire terminal. There is a lock on it, press it to remove it.
Next, simply unscrew the bolt using a “10” wrench. The device can now be removed. Installation is carried out in the same place. Sometimes the part cannot be removed by hand, in which case you will have to use special pliers. Dismantling and installation are shown in detail in the video below (author - In Sandro's garage).
Description of the fuel level sensor
The fuel level sensor, also known as FLS, is used to display information on the instrument panel. If you no longer see information about the gasoline level, this is most likely the reason.
This element is located on the fuel pump, both on the Lada Kalina and on other cars. Because of this, replacing it is difficult. You will first need to remove the tank itself, through a special hatch in the cabin, in order to get to the FLS. Its position is the same on 8 cl and 16 cl engines.
Typical faults
It should be taken into account that it is not only the failure of the FLS that can disrupt the normal operation of the gasoline level needle. The cause may also be a failure of the instrument panel itself. Due to the complexity of replacing the FLS, first check whether the cause of the breakdown is on the panel.
Most often, the causes of problems with FLS are oxidation of contacts. You can try to clean them, but it’s better to replace the part with a new one.
Features of DIY replacement
As mentioned above, first you will need to remove the gas tank itself and the pump, on which the part is located. Once you have it in your hands, all you need to replace the fuel gauge is a flathead screwdriver.
Replacing the fuel level sensor is done as follows:
- disconnect 8 or more wires from the sensor by squeezing the clamps or bending them;
- now bend the housing latches to the side;
- move the part up until it pops out;
- Installing a new device is done in the reverse order.
Checking the Sensor
To check the phase sensor, you must use a multimeter. Using this device you can check almost all sensors in the car.
Step by step verification process:
- Turn on the ignition on the car, check the voltage on the battery and make sure that it corresponds to the operating voltage of 11.8-12.6V. To check the voltage, you need to set the switch on the multimeter to constant voltage mode, on the 20V division scale.
- Now you need to check the power supply to the sensor necessary for its operation. To do this, remove the connector from the sensor and connect a multimeter to it. We connect one multimeter probe to ground, the second to the central connector of the block - the voltage should be 12 V. The outermost connectors of the block should show up to 5V.
- After the sensor's power supply circuit has been checked and no damage has been detected, it is necessary to begin checking the DF itself. To check it, it must be removed from the cylinder head. After dismantling, we connect the sensor to the connector and check the voltage on the back side of the block with multimeter probes. At contact “B” the voltage value should be at least 0.9V. Then you need a small metal plate, which needs to be inserted into the slot of the sensor and when the plate is in the sensor, the voltage on the multimeter should drop to 0.4V. If all parameters match, then the Priora phase sensor is working. If the parameters differ, then the sensor must be replaced, since it is not repairable.
Checking the knock sensor with an oscilloscope
There is another method for checking DD - using an oscilloscope. In this case, it is unlikely that it will be possible to check the functionality without dismantling it, since usually an oscilloscope is a stationary device and it does not always make sense to carry it to the garage. On the contrary, removing the knock sensor from the engine is not very difficult and takes a few minutes.
The check in this case is similar to those described above. To do this, you need to connect two oscilloscope probes to the corresponding terminals of the sensor (it is more convenient to check a broadband, two-terminal sensor). Next, after selecting the operating mode of the oscilloscope, you can use it to look at the amplitude shape of the signal emanating from the sensor being diagnosed. In quiet mode it will be a straight line. But if mechanical shocks are applied to the sensor (not very strong, so as not to damage it), then instead of a straight line, the device will show splashes. And the stronger the blow, the greater the amplitude.
Naturally, if the amplitude of the signal does not change during the striking process, it means that the sensor is most likely faulty. However, it is better to diagnose it further by measuring the output voltage and resistance. Also remember that the amplitude surge should be short-lived, after which the amplitude is reduced to zero (there will be a straight line on the oscilloscope screen).
You need to pay attention to the shape of the signal from the sensor
However, even if the knock sensor worked and produced some kind of signal, its shape must be carefully examined on an oscilloscope. Ideally, it should be in the shape of a thick needle with one sharp, pronounced end, and the front (sides) of the splash should be smooth, without jagged edges. If the picture is like this, then the sensor is in perfect order. If the pulse has several peaks, and its front has jagged edges, then it is better to replace such a sensor. The fact is that, most likely, the piezoelectric element in it is already very old and it produces an incorrect signal. After all, this sensitive part of the sensor gradually fails over time and under the influence of vibration and high temperatures.
Thus, diagnostics of a knock sensor with an oscilloscope is the most reliable and complete, giving the most detailed picture of the technical condition of the device.
