For normal operation of the car, you need to promptly diagnose and repair the Chevrolet Niva chassis with your own hands or at a service center. To save money, it is better to do it yourself according to the instructions that we have prepared for you in this material.
The front suspension of the domestic SUV has an independent design. On each side there are two wishbones, coil springs, telescopic shock absorbers and anti-roll bars.
Diagnostics of Niva chassis
To check the technical condition of the car's suspension elements, you need to lift it on a lift or place it over a hole and go down. It is important to suspend the front wheels. The rubber elements should not show any signs of aging or mechanical damage. There should also be no cracks, signs of aging, one-sided bulging of the rubber or its separation from the reinforcement on the rubber-metal hinges. All damaged parts must be replaced.
Be sure to check the condition of the protective covers of the ball joints and supports. If they are damaged, you will have to replace the entire hinge assembly.
Take a good look at the rubber cushions of the upper hinges and check the condition of the rubber bushings of the lower hinges. Do not forget to inspect the rubber-metal bushings of the levers - lower and upper. Inspect the rubber bushings of the anti-roll bar and the quality of the attachment of the stabilizer brackets to the arms and side members.
Symptoms of malfunctions and diagnostics of the Chevrolet Niva suspension
Having identified faults in the suspension of a Chevrolet Niva, you can make repairs yourself or in a workshop . Some motorists, even without inspection, can listen to the operation of the vehicle and understand the reasons.
Common signs:
- knocking in the wheel area;
- while moving, moving to the side;
- problem with wheel alignment;
- weak squeak;
- vehicle vibration;
- different condition of tires on the left and right sides;
- creaking suspension;
- increased rigidity of shock absorbers.
To diagnose a vehicle, it is necessary to inspect all components . The ideal option is when the vehicle can be lifted on a lift or driven onto an inspection ditch. The technician should be concerned about the presence of mechanical damage on the parts.
Adjusting the wheel bearing clearance
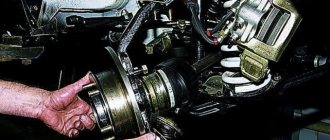
Wheel bearing
If the clearance in the front wheel wheel bearings is increased, you will feel vibration in the steering wheel at certain speeds. Because of this, the tires will wear unevenly (spots will form), and the life of the bearings will be reduced. Their service life can also be reduced by the complete absence of clearance, which causes tight rotation of the hub. The clearance in the wheel bearings of the front wheels of the Chevrolet Niva should not exceed 0.15 mm. To adjust the front bearings, use a wheel wrench, a 27mm wrench, and a hammer.
Try swinging a suspended wheel in a vertical plane. If you feel any play, you will have to adjust the gap. Also ask a helper to press the brake and hold the pedal while you swing the wheel vertically again. If the play is gone, there is definitely some play in the bearings.
Remove the decorative cap and unscrew the hub locknut. Holding it with a knob to prevent it from turning, unscrew the nut. In the process of adjusting the hub when repairing the Niva chassis, it is recommended to install new hub nuts, since the old nuts may, even after adjustment, take the old position, and you will not lock it with sufficient reliability. As a last resort, you can take a used nut from another car.
Screw and tighten the hub nut to a torque of 19.6 Nm, turning the hub 90 degrees in two directions 2-3 times. This will ensure the bearings self-align. Loosen the adjustment nut and retighten it to 6.8 Nm, then back it out 25 degrees.
Push the collar of the nut into the two grooves on the outer drive joint journal, thus locking the hub nut. Install the removed parts in reverse order.
After adjusting the clearance in the Chevrolet Niva bearings, make sure that the wheel rotates easily. The final adjustment check should be assessed by the degree of heating of the hubs after traveling one kilometer without braking.
Replacing grease in wheel bearings
When repairing the Chevrolet Niva suspension, the lubricant in the bearings should be changed at the intervals indicated in the service manual. If there is little lubricant or it is dirty, the bearings will wear out quickly. To work, you will need a pair of 13mm wrenches, a wrench for wheel bolts, a torque wrench, a hammer, a screwdriver, Litol-24 and a container for washing the elements.
Lubrication process
First you need to remove the wheel and brake pads. The caliper is dismantled without disconnecting the hydraulic hoses. Just move it to the side and hang it on a wire so as not to load the hose. Pull the rubber holder out of the hose bracket.
Replace the grease in the bearings at the intervals specified in the service book. If the lubricant is insufficient or contaminated, the bearings will quickly fail. To replace, you will need 13" keys (two), a torque wrench, a wrench for wheel nuts, pliers, a screwdriver, a hammer, clean Litol-24 lubricant, and a container for washing parts. Remove the wheel and brake pads.
Next, you need to loosen the pin nut of the outer joint of the side link and unscrew it. Install the puller and press out the steering joint pin that is held in the steering arm boss. Unscrew the three nuts of the bolts that hold the ball joint and the support on the arms, and unscrew the hub nut. Remove the bolts and remove the steering knuckle and joint assembly. Using a suitable bushing, press the hub out of the bearing races.
Use a screwdriver to pull the oil seal out of the hub, but keep in mind that it will have to be replaced after this. Pull out the spacer and inner races of the bearing, and then wash all the elements with kerosene and fill the internal cavity with lubricant. Also apply Litol to the inner and outer rings of the bearings.
Insert the inner and spacer rings into the steering knuckle, and then press the oil seal into the steering knuckle socket. Reinstall everything in the reverse order and adjust the wheel bearing clearance according to the instructions described above.
Replacing wheel bearings
Replacing the Niva Chevrolet wheel bearing on the front wheel is quite difficult work, but we will tell you how to do it further. The need for this may arise if noise occurs when the wheel rotates, as well as the inability to achieve the desired clearance using adjustments.
To dismantle and install the front hub bearings, you will need a wheel wrench, a screwdriver, a hammer, a wrench for 13 and 17, a bit, a torque wrench, a mandrel for pressing the oil seal, Litol-24, kerosene and a container for washing the elements.
Bearing replacement
Dismantle the steering knuckle and pull out the hub, spacer ring, oil seal and inner races with the bearing, and then thoroughly wash everything with kerosene. Inspect the inner and outer races of the bearings and check the condition of the running surfaces of the rollers.
Noticeable wear of cages, rings, rollers, all kinds of chips and cavities - all this is unacceptable. If all these defects are discovered during the repair of the Chevrolet Niva suspension, the bearings need to be replaced.
Using a punch and a hammer, begin to lightly tap around the perimeter of the outer ring and press the ring out of your fist. Then, with gentle blows with a hammer along the perimeter of the ring through a soft metal drift, you need to press the outer ring of the new outer bearing until it stops against the shoulder of the seat in the steering knuckle. It is necessary to fill the internal cavity with grease and apply it to the outer rings of the bearings.
Install all dismantled elements into the steering knuckle. When repairing the Niva suspension, the steering knuckle must be installed in the reverse order of disassembly. After this, adjust the clearance in the wheel bearings.
Walkie Talkie
Many extreme travel enthusiasts install a walkie-talkie in their car to always be in touch and quickly respond to requests for help.
To install a walkie-talkie in a Chevrolet Niva, you need to select a place in the cabin for the receiver. If the driver does not smoke, then the place under the cigarette lighter is just right for placing the receiver there.
Experienced people advise screwing the radio to the panel with furniture corners.
It is possible that mounting the antenna will cause difficulties, since you need to bring the wires to the roof and secure the antenna itself on top using clamps on the expedition trunk.
Here, in general, are all the main modifications of the Chevrolet Niva to a full-fledged SUV.
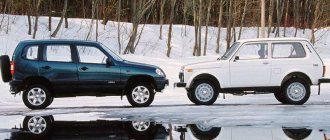
The Chevrolet Niva is a fairly popular car among Off-Road enthusiasts, since after simple modifications it copes with many seemingly insurmountable tasks.
Read news about the new Niva
- The modernized Lada Niva Legend (4x4) 2021 was shown on the Internet
- Lada 4×4 Bronto - sales stopped, new details » Lada.Online - all the most interesting and useful about LADA cars
- Description of the instrument panel Lada 4×4 (VAZ 2121, 2131) » Lada.Online - all the most interesting and useful about LADA cars
- Chevrolet Niva gasoline consumption per 100 km
- Buy LADA (VAZ) 2131 (4×4) 2021 in Rostov-on-Don, low price for Lada 2131 (4×4) 2021 on the Avto.ru website
- Fuses Niva 21214 injector «
- The new large Lada 4×4 Niva “Bigster” 2021-2022 based on the Dacia Bigster was shown for the first time. The SUV has changed beyond recognition
- New Niva Chevrolet Lux 2021 - review of GLC equipment
Replacing the upper ball joint
Repairing the front suspension of a Chevrolet Niva sometimes involves replacing the hinge. To dismantle and install it, you will need keys 13 and 22, a wheel wrench for removing wheels, a support in the form of a jack, a mounting blade, a metal brush and a hammer.
First you need to remove the wheel and place a support under the lower arm, and then lower the car. This way the suspension will be loaded and the position of the arms will correspond to their position under load. Clean the dirt from the ball joint, remove the brake hose clamp from the bracket
Loosen the hinge pin nut and unscrew it completely. If the pin rotates due to wear or a loose cone fit, the lever should be pressed down with a pry bar, resting against the last coil of the spring.
Remove the brake hose bracket and install a ball joint remover, and then press the pin out of the steering knuckle boss.
Unscrew the three nuts that secure the hinge to the lever and disconnect the hinge from it. Installation of the upper ball is carried out in the reverse order of disassembly.
Design and principle of operation of the front suspension
When creating a domestic SUV, engineers planned a car for a comfortable ride, which each owner could maintain independently. At the same time, I wanted to create something new so as not to be inferior to competitors.
In 2002, the first SUV equipped with an independent front spring suspension rolled off the assembly line. This design ensures a comfortable ride:
- The upper and lower suspension arms of the Niva Chevrolet are mounted on silent blocks and connected to the steering knuckle with ball joints. They ensure the movement of the right and left wheels in a vertical plane independently of each other. This design allows you to confidently drive the car on uneven roads.
- Shock absorbers and springs work together to smooth out bumps and prevent the vehicle from rocking. For less vertical runout, there is a rebound and compression stroke buffer.
- The anti-roll bar consists of a transverse beam and rubber seals. It provides tight traction at high speeds on sharp turns - when one side of the car leans, the other side also presses to the ground.
The front suspension is very ergonomic and well thought out - it allows you to confidently feel the road in any weather. During constant use, you must not forget to check the wheel alignment, which is adjusted by washers between the lever axis and the bracket, and also pay attention to the front hub bearing.
We are replacing the lower ball joint
Lower ball
If, when diagnosing the chassis of a Chevrolet Niva with your own hands, you determine the need to replace the ball joint, you will need a small set of tools:
- keys for 13, 22 and 27;
- wheel nut wrench;
- metal brush;
- mount;
- jack;
- hammer.
Remove the wheel and place a support under the lower arm, thereby loading the suspension and aligning the position of the arms. Remove the hub cap and unscrew the nut. It is always tightened very tightly, so use a head with a reliable knob.
Unscrew the nut that is screwed onto the ball joint pin, and then press the pin out of the steering knuckle boss. Unscrew the nuts of the bolts that hold the lever on the support and remove the bolts by moving the steering knuckle away. Remove the wheel hub from the splines of the outer wheel drive joint. Remove the ball joint and then install in the reverse order of assembly.
Is it worth doing the repairs yourself?
- Hammer.
- Balloon wrench (to unscrew the wheels).
- Set of keys.
- Screwdriver.
- Torque wrench.
- Empty container for washing elements.
- Litol-24.
- Beard.
- A mandrel used in pressing parts.
- Kerosene.
- Metal brush.
- Blade for installation. Jack.
- Mount.
- Puller for pressing out silent blocks.
Any repair requires not only experience, plumbing skills and a standard set of tools. Most operations are performed on an inspection pit or overpass.
To replace ball joints and silent blocks, pullers are required, and checking and adjusting the alignment angles of the front wheels is carried out only on special stands.
Repairing a car yourself is worth it only if you have the necessary equipment and tools. It is often cheaper to go to a service station than to buy pullers or keys for a one-time job.
Suspension repair is a serious process on which your safety on the road depends. If you are not confident in your abilities or do not have the necessary tools, it is better to turn to professionals.
Changing front shock absorbers
It is not so difficult to change shock absorbers on a Chevrolet Niva with your own hands. This has to be done when a leak occurs or vibration damping deteriorates when driving over uneven surfaces. Worn shock absorbers are always replaced in pairs or all four at once. To dismantle and install the shock absorber you will need 17 and 6 keys.
Using one 17mm wrench, secure the shock absorber rod from turning, and with another one, unscrew the nut and remove the thrust washer with the rubber cushion. Unscrew the bolt nut on the lower hinge and pull out the bolt, after which you can remove the shock absorber. Remove the lower cushion from the shock absorber rod and inspect the condition of the rubber cushions and shock absorber.
Remove the lower hinge, and if necessary, replace the cushion and bushing of the lower hinge. When repairing the suspension, Chevrolet Niva shock absorbers are installed in the reverse order. Before installation, the rod must be pulled out to its full stroke. When working on a lift, you need to lower the car before assembling the upper mount so that the suspension is loaded under the weight of the car.
Basic faults
Chevrolet Niva suspension parts are designed for different service life.
Also interesting: Transfer case synchronizer Niva and Chevrolet Niva (Val Racing)
The levers, beam and anti-roll bar do not need to be changed even after 100-200 thousand kilometers.
But rubber-metal hinges, boots and bushings gradually lose their properties even while parked.
VAZ-2123 owners have to deal with the following malfunctions:
- Wear of silent blocks, ball joints.
- Damage or cracking of anthers.
- Reduced performance of shock absorbers.
- Breakage of jet rods.
In addition to replacing faulty parts, it is necessary to regularly check and adjust the angles of the front wheels.
Otherwise, the car's handling deteriorates, and the tires begin to wear out rapidly. Wheel alignment is checked every 10-15 thousand kilometers and after very strong impacts when falling into road potholes.
Some problems can be identified by hearing while driving. Worn ball joints or silent blocks, faulty shock absorbers or broken rods knock, squeak or ring when driving on uneven roads.
In addition to extraneous sounds, suspension malfunctions manifest themselves as follows:
- Rocking or jumping of the body when driving over uneven surfaces.
- Pulling the car to the side.
- Increased braking distance.
- Deterioration in controllability.
- Accelerated or uneven tire wear.
How to replace front suspension springs?
Replacing Chevrolet Niva springs may be necessary in case of mechanical damage or severe sagging. Signs of precipitation include:
- violation of smoothness;
- suspension breakdowns on uneven surfaces;
- noticeable distortion of the front part of the car;
- difference in height of the front and rear parts of the car;
- traces of collision of spring coils.
Front springs
To dismantle and install the front springs, you need two 13, two 17 and one 24 wrenches, as well as a jack and a wrench for unscrewing the wheel nuts. First, remove the wheel and loosen the lower arm axle nut with a wrench.
Unscrew the nut of the bolt that secures the shock absorber from below and remove the bolt. Next, unscrew two more nuts of the stabilizer pad bracket and remove the bracket. Raise the front suspension with a jack to release the compression stop. Next, unscrew the three nuts on the ball joint mounting bolts and remove the bolts.
Slowly lowering the lever, you need to release the spring and remove it. Next, remove the lower and upper spring gaskets. If necessary, the compression stroke limiter must be removed. When repairing the Chevrolet Niva suspension, install the springs in the reverse order.
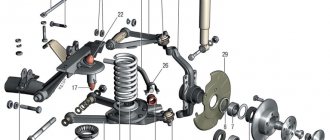
Purpose and design of the front and rear suspension
The Chevrolet Niva suspension device ensures free rotation of the front and rear wheels . The second purpose is to dampen vibrations while driving. The suspension acts as a connecting link between the body and the wheels of the vehicle.
The front suspension of the Niva Chevrolet consists of the following parts:
- protective casing;
- caps;
- fist;
- hinged fastening element.
- stabilizer cup;
- side supports;
- bearings;
- brake disk;
- hub;
- protective buffer;
- levers with brackets.
Replacing the lower front suspension arm
When repairing the Niva chassis, it is necessary to remove the lower arm if there is mechanical damage on it or in order to replace silent blocks. To work you will need:
- two keys for 13;
- two keys for 17;
- key to 22;
- two keys for 24;
- jack;
- hammer with a beard.
First you need to dismantle the spring and unscrew the lower arm axle nut. Knock out the axle with a punch, paying attention to the location of the adjusting washers. Pull out the axle, but hold the lever as you do so. If necessary, you will have to unscrew the nuts that hold the spring support cup.
Before installation, the axle and bushings must be lubricated in the front suspension cross member using grease. Next, the removed lower arm is put back in place in the reverse order.
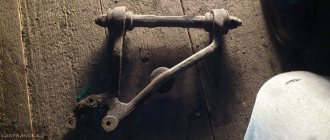
Replacing the upper arm
Removing the upper arm
If, when diagnosing the front suspension of a Chevrolet Niva, you find mechanical damage or decide to replace worn silent blocks, you will have to remove the upper arm. To work, you will need two 13mm wrenches, one 22mm wrench, a jack and a wheel wrench. Jack up the car and remove the wheel, then place a support under the lower control arm and load the suspension by lowering the car.
Remove the three nuts that hold the ball joint to the upper arm. Then unscrew a couple of nuts from the upper arm axle bolts. When turning the bolts, they must be held with a wrench.
Remove the upper arm, paying attention to the number and location of the adjustment washers that are installed on the axle mounting bolts. Installation of the upper arm into silent blocks is carried out in the reverse order.
Replacing the silent blocks of the upper arm
Upper arm silent blocks
The silent blocks in the upper lever are changed for the same reasons as in the lower one. To work you will need a 22mm wrench and a puller. First, remove the upper arm with all silent blocks and the machine axle. Unscrew the upper arm nuts and remove the washers and nuts from the axle.
Using a puller, you need to press the silent blocks out of the lugs and press new ones in here. After that, put everything back together and adjust the wheel alignment. You won’t be able to do this on your own, since you probably don’t have special equipment.