Checking and replacing injectors on a Lada Granta car
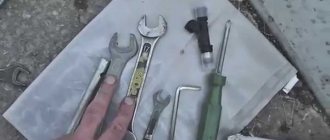
Tools (for 8 valve engines):
- Tester
- Medium Phillips screwdriver
- Medium flat screwdriver
- 5 mm hex key
- Open-end wrench 17 mm – 2 pcs.
Tools (for 16 valve engines):
- Tester
- Medium Phillips screwdriver
- Medium flat screwdriver
- Open-end wrench 10 mm
- Open-end wrench 17 mm – 2 pcs.
- Ratchet wrench
- Extension
- 13 mm head
- 5 mm hex key
Parts and consumables:
- Injectors
- Injector O-rings
- Carburetor Cleaner
- Engine oil
- Rags
Notes:
If the injectors on a car fail, the following signs of injector malfunction are possible: – difficulty starting the engine; – unstable engine operation; – the engine stalls at idle; – increased crankshaft rotation speed at idle; – the engine does not develop full power, insufficient engine response; – jerks and dips in engine operation when the vehicle is moving; – increased fuel consumption; – increased content of CO and CH in the exhaust gases; – glow ignition due to leaking injectors.
In points where there are two photos, the first shows the process on an 8-valve engine, and the second on a 16-valve engine.
1. Disconnect the injector and engine harness connectors as described here (for 8-valve engines) or here (for 16-valve engines.
2. Carry out an initial check of the injector windings. To do this, connect the tester to the connector contacts one by one.
Note:
The connector has five contacts: four for supplying a control signal to the injectors and one for common ground (a crimson wire with a black stripe is connected to it).
3. Connect each of the four control contacts in turn to the common contact and measure the resistance in each case.
Note:
It should be equal to 11-15 Ohms. If one or more measurements show resistance different from the specified value, some injectors are faulty.
4. To more accurately check the injectors, remove the fuel rail from the vehicle as described here (for 8-valve engines) or here (for 16-valve engines.
Flushing engine injectors
Almost everyone uses entire systems of tubes, syringes, bottles and much more to clean injectors. In fact, you can do without all this.
I do everything on a much lower budget and without any hassles. Where do we get extra money and time? Right?
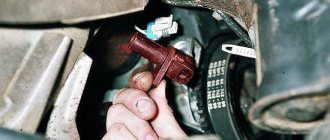
Remove the spray nozzle from the cleaner can
We see a fitting there, which in diameter fits most different injectors, including our Lacetti
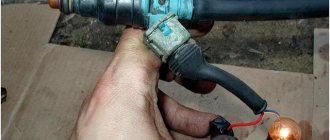
Now we connect our two wires to the injector. We connect one of the wires to the positive terminal of the battery, and place the second next to the negative terminal.
We put the nozzle on the fitting of the can and press
We intermittently connect the wire to the negative terminal of the battery. In this case, the nozzle will open and let detergent flow through it under pressure from the can. This way the channels and nozzles of the nozzle are washed.
Attention! Be careful not to get the rinse in your eyes!
We rinse until the spray becomes equally “fluffy” from all nozzles. I have two, you may have four.
I couldn’t photograph this process because for some reason the third arm hasn’t grown back yet
We carry out a similar operation with all nozzles.
Before installing the injectors in place, it makes sense to lightly lubricate the new O-rings with silicone spray and be sure to rinse and wipe the injector seats in the ramp and in the manifold.
Checking the electrical part of the injector
In addition to mechanical defects, electrical defects may also occur. For a more complete picture of the condition of the injectors, it is advisable to check the resistance of their windings. This can be done simply using an ohmmeter.
We connect the ohmmeter probes to the injector terminals. The resistance should be the same on all injectors and be 10-15 Ohms.
On these injectors the resistance is the same and is a happy 13 ohms
Conclusion. It’s clear that you can also measure the performance of the injectors on a special stand and all that. But I want to do everything myself and with minimal costs. Therefore, I believe that the methods of checking and washing given in the article may well identify problematic injectors and wash them without the help of any specialists from a service station (keyword - some)
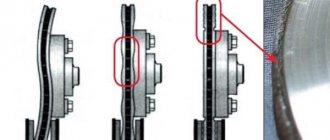
Checking for leaks and spray quality will give a lot of information about the condition of the nozzle.
I suggest you visually check the spray pattern of the injectors in a video filmed by a member of our community Vyacheslav
And of course, do not forget to check the tightness of the connections after assembling and starting the engine.
Removing the fuel rail and injectors
We remove the fuel rail to check the injectors and replace them, as well as when dismantling the intake pipe. Relieve the pressure in the engine power supply system (see “Replacing the fuel filter”). Remove the air supply hose to the throttle assembly (see “Removing the air supply hose to the throttle assembly”)
Using a slotted screwdriver, press out the clamp of the engine control system wiring harness block...
...and disconnect the block from the injector wiring harness block.
Using a 17 wrench, unscrew the fitting of the fuel rail tube, holding the tip of the fuel supply hose to the rail with a wrench of the same size.
Remove the tip of the fuel supply hose from the ramp tube.
The connection is sealed with a rubber ring. Remove the throttle assembly (see “Removing the throttle assembly”).
Washing Lada Granta injectors with removal
This method will not give us the opportunity to wash the intake valves, piston bottoms and rings from carbon deposits, but it will allow us to properly check the injectors and wash them very efficiently. At the same time, you don’t need to have any special skills or special equipment. The only thing that will cause some difficulties is dismantling the fuel rail.
Injectors on the removed ramp
And you can easily remove the ramp on Grant:
- We thoroughly blow and wash the engine.
- Unscrew the first ramp mounting screw...
- ...and the second one.
- We disconnect the fuel line from the ramp with the same key number 17.
- We disconnect either the common cable of the injector wires, or each one individually.
- Remove the connectors from the injectors.
- Mark the location of the injectors on the ramp and remove the spring clips.
- Remove the injectors from the ramp.
Relieve the pressure in the system as described above.
To clean injectors in this way, you can use a simple aerosol can of cleaner (carburetor, throttle valves), solvent, or any other product.
If you remove the atomizer from the can, the nozzle fits perfectly onto the nozzle of the can. All that remains is to apply voltage to the injector solenoid valve so that it opens. Actually, you can simply connect two wires from the battery, as most people do.
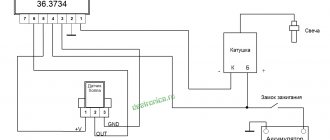
Or you can assemble a simple device and, like a civilized person, wash the injectors efficiently and conveniently. As you can see in the photo, the device consists of a 9 V salt battery, a button with two contacts without locking and a standard connector for the nozzle. All this costs a penny, but will last for many years.
Now we simply press the nozzle while simultaneously closing the button contacts for a few seconds. Just protect your eyes from liquid. We wash the injectors and at the same time check their tightness. The nozzle, when closed, should under no circumstances allow liquid to pass through, but when open, should create an even and neat spray.
After flushing, as a rule, fuel consumption is reduced by 5-7%, the intake manifold pressure drops by 3-5%, and problems with unstable engine operation and starting disappear. It was also noted that the operating frequency of the stepper motor of the idle speed controller is leveled, air consumption is reduced and mixture formation is improved.
Cleaning VAZ injectors (2109, 2110, Kalina, Granta)
Now we will talk about self-cleaning of injectors on VAZ cars (2109, 2110, 2115, Kalina, Granta with 8-valve engines). How often should this be done? There is no clear answer to this question. It all depends on the quality of the fuel. But on average, it is recommended to clean injectors every 20-25 thousand kilometers.
But mileage is not the main indicator on which you should rely. The main thing here is to notice in time the incorrect behavior of the engine - floating speed, increased fuel consumption, dips in dynamics, etc. All of these factors may indicate clogged injectors.
You can clean the injectors without removing them from the engine by pouring a special liquid into the gas tank. But this method is not always effective. And, besides, we will not be able to personally see the result. Therefore, the second method is predominantly used - washing the injectors with removal.
There are two methods here - ultrasonic cleaning and cleaning with special liquids. The latter does not require particularly complex additional equipment, so it is better to use it yourself.
Do-it-yourself injector cleaning VAZ
- Carburetor cleaning fluid
- 5 cc syringe
- 2 wires
- Set of tools
Read more: Scania brake system diagram
The first thing to do is remove the injectors from the engine. All 4 injectors are mounted on the fuel rail, which in turn is attached to the engine with two bolts.
To make work easier, you can remove the intake manifold and clean the throttle valve at the same time. The intake manifold is mounted on 5 studs.
Before removing the fuel rail, it is necessary to relieve the pressure. For this purpose, there is a special spool on the left side of the ramp.
Remove the chips from each injector, having first disconnected the terminal from the battery. Unscrew the fuel supply hose from the ramp (key 17). Unscrew the 2 bolts securing the ramp to the engine block (hexagon). Now you can remove the injectors from the engine and take the entire structure out.
Remove each injector from the rail. It is secured with one small clip. Now you can start cleaning.
To clean the injectors yourself, you need to assemble the following structure:
Remove the two o-rings from the removed injector. We connect the wires to the 2nd terminals (if +/- are not marked, then + should be on the left). From the side where the injector is attached to the fuel rail, we tighten the syringe (it fits quite tightly). To the syringe, instead of a needle, we attach a bottle of liquid for cleaning the carburetor. Now this entire structure is ready for use.
We put a little liquid into the syringe and briefly supply power to the injector terminals by connecting the wires to the battery terminals (try not to supply power for more than 1-2 seconds, this may damage the injector).
Follow the steps described in the previous paragraph until the nozzle begins to spray liquid normally (there should be no separate jets, dripping, etc.).
After you have cleaned all the injectors with your own hands, you can put everything back in place. When you start the engine, you will be pleasantly surprised, and the dirtier the injectors were, the greater the surprise.