Lada 4×4 3D Adventure time ⌚ › Logbook › Installation of a vibration damper and the third support of the vehicle
After installing the transfer case supports of the new model, incomprehensible knocking noises appeared, which seemed to have gotten rid of, but they came out again.
I assumed that due to the “softer” supports, the transfer case sways more and this causes shocks in the transmission. This did not happen with the old supports. Reading the next entry in the BZ on the drive, I saw that a person had installed a subframe and was giving away for a nominal fee (500 rubles) a traverse with a vibration damper and a third support of the RK. I bought it for an experiment, although delivery cost the same 500 rubles. But in general, it is several times cheaper than buying the same spare parts new in a store. =)
The vibration damper was slightly bent, or rather its mounting. I straightened everything out, assembled it, and installed the traverse. There were no problems.
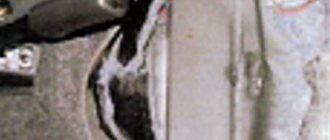
I also installed the third support. I had to tinker a little, of course. I didn’t remove the plastic cover of the tunnel, although I removed the driver’s seat for ease of work. I bent the casing up a little and installed the bolts, and to prevent them from turning, I made a fixing frame.
After installing the third support, I did not center the transfer case, I set it up quickly. The vibration that was previously at 1800 rpm has shifted to approximately 2200-2300 rpm. That's okay, we need to set the transfer case to normal.
Now the transfer case should no longer nod, but, nevertheless, the shocks when changing gears remain. And everything gives off somewhere in the area of the right foot, under the heel. I started to figure it out. It turned out that there was a large gap in the flange in the rear cover of the control valve. Those. If you move the cardan up and down with your hand, you hear a good knock. If this is the reason, then how is the knocking transmitted to the legs? I don't understand. There is some play in the flange of the front cover of the RC, but not much, there is no knocking. But at the same time, the cardan rotates relative to the axis at a large angle.
Did the transfer case “nod” more strongly on the softer cushion and the bearings were broken? Let me remind you that the cardans are CV joints and there seem to be no problems.
In any case, it will be necessary to change the bearings in the transfer case covers, or better yet, change the covers to new ones with double-row bearings. But there are no funds for this yet. In the garage there is a second transfer case, removed from the same car, which was very noisy. You can try to sort it out, replace the covers and bearings. I’ve never done this myself, but I think I can do anything.
I'm going like this for now. If you try to release the clutch more smoothly and choose the right moment, then there are no shocks.
I did not check the operation of the vibration damper. You need to center the transfer case, remove vibrations from it, and only then check the car on the track.
Source
Lada 4×4 3D 2004, 81 l. With. — tuning
Lada 4×4 2121 Niva, 1987
Comments 20
I'm definitely saving money! Third support of transfer case 0 r! I cooked everything myself
1) Bulgarian 2) Metal 3 mm is enough 3) Freewheel electrodes 4) 3 bolts for 10 5) Hands
Everything works and makes me and the car happy!
This kind of support scares me, to be honest. And a lot of time has passed since then. This support is attached to the subframe.
The thing is cool, the soul is already happy for the owner! I now recommend installing “quiet” RK levers or making them yourself, how to make them yourself here is the link www.niva-faq.msk.ru/tehni...ansmis/pazdatka/com_r.htm saving almost 1300 rubles than buying from hucksters from Niva-Comfort
Thank you) True, this support required reworking so that everything would fall into place. I think I’ll do this somehow, but first of all I have to improve the stove! and then maybe I’ll work on the levers!
Congratulations! There is, however, one drawback to this support :-(. With it, the rear gearbox bearing breaks faster.
Thank you! For this reason, it seems to me that the industrial shaft will live longer! especially when driving in a swing!
It will need to be remade a little! otherwise it was not possible to set the correct angle of inclination of the RC. The rear part of the RC had to be lowered to the bottom (by about 5-10mm) so that everything would fall into place. I think this is not a buzz, what do you think?
Yes, Dim, the shaft will undoubtedly live longer. About the angle of inclination of the Republic of Kazakhstan. That’s exactly why it breaks, because of misalignment :-(. So it needs to be corrected. That’s why I switched to a support from the entire shnivy.
Clear! I will rule! I haven’t quite figured out how to do this yet (I think if the holes for attaching the support to the RC are drilled out to 10 and the hole for attaching the support itself to the pillow is drilled to 12, this still won’t be enough. Then do I have to cut and cook?
I think drilling out is not the best option. It will probably be better and faster to digest it right away...
I’m thinking of welding some fish soup and then drilling them on site! oh how!
Yes, Dim, the shaft will undoubtedly live longer. About the angle of inclination of the Republic of Kazakhstan. That’s exactly why it breaks, because of misalignment :-(. So it needs to be corrected. That’s why I switched to a support from the entire shnivy.
Hello! Damn, I installed such a crap, began to rejoice at the effect and came across this post :(((it just happened that the third support lowered the flange of the shaft by 2-3 mm. Just with all this, I replaced the shaft from a cross to a CV joint and I stuck a donut from Shnivy on it instead of my own one. If it’s not difficult to enlighten me about the misalignment that the third support introduces, otherwise the brain begins to sparkle from the abundance of contradictory information from the Internet
Malfunctions of VAZ transfer cases
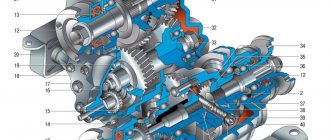
The transfer case is not present in all VAZ passenger cars, but only on cars with two drive axles. In the transmission, the transfer case (TC) is installed at the rear of the gearbox; a rear driveshaft is attached to its shank, which connects the transfer case to the rear axle. The front axle is also driven by the steering wheel; it is connected to the transfer case by a front driveshaft. The reduction gear in the Republic of Kazakhstan is designed to obtain high torque, it is used to overcome difficult sections of the road, and helps to cope with off-road conditions. The VAZ Niva transfer case contains the following main parts:
The transfer case on the Niva is a fairly reliable unit; problems with repairs in the mechanism itself arise mainly due to insufficient oil level in the valve - if for some reason the oil leaks out, intensive wear of all parts occurs. Among the frequently occurring malfunctions are:
Installation and Centering
Install and center the transfer case in the following order:
- make sure that the engine mount mounts are installed correctly in the brackets (the centering washers of the front engine mount mounts must fit into the corresponding holes in the side brackets);
- install the transfer case on the car without fully tightening nuts 4 and 5 (Fig. 3-41) securing the transfer case suspension brackets;
- moving the transfer case along and across the body, as well as in the vertical direction, find its position in which the flanges of the drive shaft of the transfer case and the intermediate shaft of the driveline are at the same level, parallel and the gap between them is minimal; The transfer case shafts must be located parallel to the bottom of the body;
- Having installed the previously removed adjusting shims under the suspension brackets (supports), fully tighten the nuts securing the transfer case suspension brackets;
- attach the front and rear propeller shafts to the transfer case shafts; Connect the flexible shaft to the speedometer drive and the wires to the differential lock warning lamp sensor.
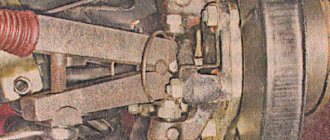
Rice. 3-41. Transfer case installation diagram:
1 — bolts securing the flanges of the intermediate propeller shaft and the drive shaft of the transfer case; 2 — transfer case; 3 — adjusting shims; 4 — nuts securing the transfer case to the body; 5 — nuts securing the transfer case suspension brackets to the axles
When replacing a transfer case or changing a four-speed gearbox to a five-speed one and vice versa, as well as when the rear engine mount settles, causing the transfer case to vibrate, it is necessary to select and install a new thickness of pad 5 (see Fig. 3-40).
What is the function of the Niva 2121 transfer case?
The procedure for selecting shims is as follows:
- make sure that the engine mounts are installed correctly in the mounts (see the chapter “Removing and installing the engine”);
- disconnect the flanges of the transfer case drive shaft and the intermediate driveshaft;
- loosen the nuts securing the transfer case supports to the body, remove the adjusting shims and, moving the transfer case along and across the body, as well as in the vertical direction, find its position in which the separated flanges are at the same level, parallel and the gap between them is minimal, and the transfer case shafts are located parallel to the bottom of the body;
- Fill the resulting gap between the body floor and the supports with the required number of gaskets,
- align the centering flanges without creating tension in the transfer case and engine supports and, holding the transfer case in this position, tighten the previously loosened nuts securing the transfer case supports;
- insert and secure the bolts securing the transfer case flanges and the intermediate shaft; if the bolts pass freely into the flange holes, then the alignment is carried out correctly, otherwise repeat the operations to align the flanges.
The Niva family of cars differs from VAZ passenger cars in permanent all-wheel drive - they have two drive axles. In total, the VAZ SUV has three differentials in its transmission - one for each axle and another center differential.
The Niva transfer case is designed to distribute traction forces between axles, and operates on the principle of a 2-speed gearbox.
Transfer case Niva 21213
Model VAZ-21213 is an all-terrain passenger car with permanent all-wheel drive and differential lock. Brand 21213 is a restyled version of the first VAZ SUV, VAZ-2121. RK Niva 21213 has three gears:
21213 is equipped with 4-speed and 5-speed gearboxes, and when the first speed of the transfer case is turned on, the car operates in standard mode, the gear ratios in the transmission are from 5-speed. The checkpoints are as follows:
It’s also interesting: Properly bleed the brakes of a Chevrolet Niva with abs. When you turn on the second position of the transfer case lever (rear position), the gear ratios change (lower):
On ordinary roads, the transfer case is always in first gear, the transfer case control lever (reduction gear) is pushed forward. The neutral gear of the RK disconnects the transmission, and in this position the car does not drive; there is also a neutral in the gearbox.
Motorists often ask the question: why is neutral gear needed in a transfer case? The neutral is used when connecting additional units to the transmission, for example, a mechanical winch; in this case, a power take-off must also be installed.
Quiet Niva - it's now possible
Believe it or not, but a quiet Niva is now possible.
For many years, the brainchild of the domestic automobile industry, the world's first crossover, is famous for its off-road characteristics. More than one generation of lovers of country trips, hunters, fishermen, or people who, by the will of fate, got acquainted with this car were able to appreciate it. Light weight, short wheelbase and transfer case allow the Niva to get through where even famous foreign SUVs like Nissan, Toyota and Mitsubishi lie on their bellies on the ground and spin their wheels helplessly.
Unpretentiousness in maintenance, availability of parts and components made the Niva an ideal budget SUV. And everything would be fine if not for a few shortcomings. Despite the above advantages, the car also has significant disadvantages, these are vibrations of the cardans and transfer case, poor quality of factory spare parts and the absence of any sound insulation. This is not just annoying, but also greatly complicates the use of modern devices - navigators, phones, tablets. But without such pleasant little things it is very difficult to imagine a comfortable trip. Today, the market offers a large number of options, by introducing which you can achieve positive results in refining the Niva.
To do this, we propose to make the following modifications in our workshop:
1. Subframe for the Republic of Kazakhstan
2. “Velvet transfer case” kit for the Republic of Kazakhstan, “Synchro-Sport” synchronizer and front axle disengagement clutch
3. Silent RK handles
4. Cardan shafts with CV joints
5. Brackets for untying the front axle gearbox
6. Steering knuckles with non-adjustable radial ball bearings
7. Clutch from Chevrolet Niva
8. Interior noise insulation
But it is not necessary to carry out the whole range of work, since it is not cheap. The car owner simply has to decide what he wants to achieve from the car and in what conditions it will be used. Any of the above improvements contributes to a significant increase in comfort in operation and maintenance of the Niva.
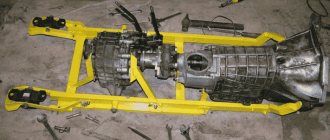
1. Install a subframe for the gearbox and transfer case of the VAZ 21213-214 Niva.
This device will help eliminate the problem of the VAZ SUV - vibration of the transfer case. A subframe for alternative mounting of the transfer case has a number of advantages. Monolithic frame. Reduces all kinds of vibrations and noise to a minimum, relieves the floor, and increases the possibility of adjustment along the axes. It is a natural protection for the transfer case.
During testing it proved to be the best. Allows you to accelerate the car without gear crusher and noise up to 140 km/h and higher (if the engine allows it). The set is factory-made from structural steel;
2. Install the “Velvet transfer case” kit.
Double-row imported bearings and oil seals are pressed into the rear transfer case cover and the front axle disengagement clutch, eliminating play (vibration) and oil leaks on the transfer case flanges and thereby increasing the comfort when operating the vehicle. The axle release clutch adds another position for the RK locking handle, thanks to which the Niva can become significantly more economical in fuel consumption when driving on asphalt roads, and it is also possible to turn the differential lock on and off on the move, and the Synchro-Sport synchronizer will allow us to switch low and high gears of the RK when driving;
3. Replace the transfer case shift handles with tuning ones (assembled according to the type of gearshift handle). This will remove the metallic itch when the transfer case is operating;
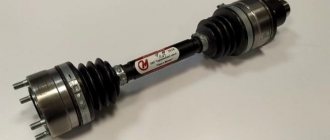
4. Install the cardan shafts on the CV joints.
The driveshaft on CV joints allows vibrations to be reduced to zero.
The principle is very simple, converting the cardan shaft crosspieces to constant velocity joints. Another plus: easy installation and dismantling. When subsequently replacing CV joints, unlike universal joints with a cross, the balancing is not disturbed;
5. Install the brackets for independent fastening of the front axle gearbox.
When the gearbox is mounted independently from the engine, noise and vibration are reduced, and cross-country ability is improved due to its more fixed mounting on the body. The Niva's front axle gearbox is attached to the body separately from the engine on special steel brackets through elastic bushings.
In the case of the Chevrolet Niva, we suggest replacing the silumin brackets of the front axle gearbox with reinforced steel ones. It is better to do this operation on a car in preparation for off-roading, since they are three times more reliable than standard ones;
6. Installation of a non-adjustable wheel bearing.
Some advantages of ball bearings over roller bearings used in standard designs:
a) reduction of resistance during rotation;
b) operates within a guaranteed thermal gap;
c) absence of play, and as a result, improved performance and extended service life of the brake mechanism;
d) improved handling, both on hard surfaces and on dirt roads,
e) noticeable reduction in fuel consumption.
Long-term operation, both under normal conditions and under conditions of increased load, including autocross, has proven the reliability of the proposed design;
7. Install the clutch from the VAZ 2123 Chevrolet Niva.
Large working surface area. The flywheel does not require additional balancing. The force of pressing the clutch pedal is reduced by half.
The RCS is self-regulating, for a backlash-free clutch drive type. The RCS rod is of a fixed length, the pressure is constant. No adjustment is needed, there is a power reserve in both directions;
8. Complete sound insulation of the cabin.
For sound insulation, high-quality automotive sound-absorbing materials and “STP” are used. This treatment of the car body allows you to reduce noise in the cabin by up to 3 dB.
Did you like the article? Subscribe to the channel to stay up to date with the most interesting materials
Vibration
Vibration in the body is the main “disease” of the Niva; it often occurs due to improper alignment of the transfer case. Most often, vibration occurs on VAZ 21213/21214 cars, since the transfer case is mounted only on two supports on the sides of the body; on the Chevrolet Niva, the transfer case is already installed on three supports.
Vibration when starting off on a Niva can also occur for the following reasons:
Installing the third support of the transfer case on VAZ 21213/21214 vehicles allows you to reduce the level of vibration of the transfer case; with this support it is easier to center the transfer case. The part can be purchased at auto stores or made yourself. The finished product comes with three long studs (for model 2121); to install the third support on this machine, you will need to unscrew the short studs from the transfer case housing and install new studs from the kit. We carry out repairs as follows:
Vibration is eliminated more effectively by installing a subframe under the transfer case. You can also make such a device yourself or buy a finished product at a car store.
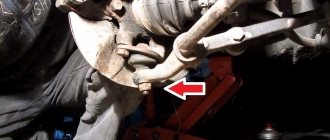
In order to install the subframe, the transfer case must be removed. It is more convenient to carry out such work in a pit; we carry out repairs as follows:
Also interesting: Niva transfer case: repair, installation
It should be noted that installing an additional support or subframe on the steering wheel does not always lead to the desired effect; in some cases, vibration only increases.
Removing the Niva transfer case
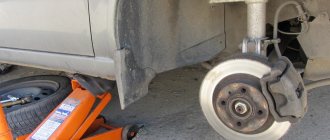
To repair the transfer case on a VAZ 21213 (21214), the unit must first be removed. We carry out removal in the following order:
- in the cabin we dismantle the plastic lining of the gearbox and gearbox levers;
- unscrew the knobs of the transfer case shift levers, remove the casing under them;
- disconnect the speedometer cable, for RK 21214 you will need to additionally disconnect the speed sensor;
- we unscrew the bolts with nuts securing the elastic coupling of the front and rear propeller shafts; in order to remove the bolts, the cardan shafts must be turned - they are removed one at a time in one specific position of the shaft;
- We install a jack (or other support) under the transfer case and mark the places where the side supports of the RC were attached. This is done in order to minimize the alignment of the transfer case during installation;
- unscrew the 4 nuts securing the gearbox to the gearbox;
- unscrew the 4 fastenings of the RC supports to the car body;
- Now all that remains is to dismantle the transfer case.
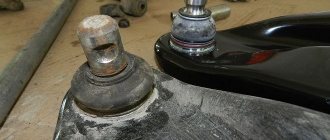
Third pillar of the Republic of Kazakhstan
Reg.: 04/13/2009 Messages: 187 From: Khabarovsk Age: 40 Car: VAZ-2121, 1991 (USSR) [sold], Nissan Presea 1996 SR18 Manual. (I drive and spit)
I got the idea from here: https://niva.tv/reduktor_NIVA.htm But I decided not to remove the original right airbag mounts, but to make new ones using them. In the corner we drill 3 holes on the same line through 110 mm with a diameter of 10 mm. In the bottom of the car we drill 2 holes in line with the original bolts with a diameter of 8mm, also at 110mm intervals. We remove the right pillow and install 2 pillows and a “rocker arm” made from a corner (there is no need to unhook the cardan shafts). My transfer case was already centered, so I didn't center it. But you can perform the operation of centering the transfer case. Now we screw the ears to the transfer case studs and weld them to the “rocker arm”. You can do without welding, drill holes and secure it all with 2 M8 bolts. It didn't take me much time. I arrived at the garage at 19:00 and went home at 21:00. The transfer case does not lose mobility, but it is greatly limited. It’s unusual to drive uphill in 2nd and the transfer levers are standing still, the speed is 30-60-80, the levers are standing. Unusual and very pleasant. Still, I didn’t completely get rid of the vibration. The reason is that my old model with a cross had a hole. And the rear crosspiece of the rear universal joint turned out to be dead. But the vibration amplitude has decreased significantly, and the cabin has become quieter. I changed the crosspiece a day later. The spline in the front universal joint is broken (although in theory the front universal joint should generally be eternal, it is the loose transfer case that kills it). so it needs to be changed.
Removing the Niva transfer case
To repair the transfer case on a VAZ 21213 (21214), the unit must first be removed. We carry out removal in the following order:
- in the cabin we dismantle the plastic lining of the gearbox and gearbox levers;
- unscrew the knobs of the transfer case shift levers, remove the casing under them;
- disconnect the speedometer cable, for RK 21214 you will need to additionally disconnect the speed sensor;
- we unscrew the bolts with nuts securing the elastic coupling of the front and rear propeller shafts; in order to remove the bolts, the cardan shafts must be turned - they are removed one at a time in one specific position of the shaft;
- We install a jack (or other support) under the transfer case and mark the places where the side supports of the RC were attached. This is done in order to minimize the alignment of the transfer case during installation;
- unscrew the 4 nuts securing the gearbox to the gearbox;
- unscrew the 4 fastenings of the RC supports to the car body;
- Now all that remains is to dismantle the transfer case.
additional transfer case support
additional transfer case support
Post by Dr. Dre » May 09, 2012, 10:06 pm
Re: additional transfer case support
Post by bambr » 09 May 2012, 22:34
Re: additional transfer case support
Post by Dr. Dre » May 09, 2012, 11:18 pm
Re: additional transfer case support
Post by Portada » 09 May 2012, 23:33
Re: additional transfer case support
Post by Santey » 09 May 2012, 23:44
Re: additional transfer case support
Post by Vovanych » May 10, 2012, 10:22 am
Re: additional transfer case support
Post by Santey » May 10, 2012, 11:26 am
Re: additional transfer case support
Post by Vovanych » May 10, 2012, 12:11
Re: additional transfer case support
Post by Santey » May 10, 2012, 01:06 pm
Re: additional transfer case support
Post by tarantass » May 10, 2012, 01:22 pm
Re: additional transfer case support
Post by Santey » May 10, 2012, 01:35 pm
Re: additional transfer case support
Post by Dr. Dre » May 10, 2012, 6:38 pm
Re: additional transfer case support
Post by tarantass » May 10, 2012, 07:04 pm
Re: additional transfer case support
Post by Dr. Dre » May 11, 2012, 07:45
Re: additional transfer case support
Post by schut4x4 » May 11, 2012, 07:52
Video - Aligning the transfer case Niva Chevrolet 2123
The transfer case of the VAZ 2123 car has fundamentally the same device as unit 21213/21214, but in the Chevy Niva:
- different control mechanism (with one lever);
- an additional support was installed (on a simple Niva the RK is mounted on two supports, on a VAZ 2123 car - on three supports).
2. Floor vibration, which occurs when driving at a speed of approximately 100 kilometers per hour. Occurs in the area of the front seats.
- There was a strong imbalance of the intermediate shaft. This happens as a result of incorrect assembly of the unit or severe wear of individual elements. In this case, it is necessary to replace the entire intermediate shaft.
- there has been a change in shape or fracture of the bolts securing the elastic coupling. As with the first malfunction, simply replace the damaged fasteners. If possible, it is recommended to replace the entire intermediate shaft assembly.
- CV joint wedging. This hinge must be disassembled and the amount of lubricant in it checked. The lost lubricant is restored, and if necessary, the CV joint must be completely replaced.
- wedging of the hinges on the front and rear shaft driveshafts. In this case, lubricate the unit; if this does not help, then the universal joint or the corresponding shaft must be completely replaced.
- there is a large imbalance of the driveshaft. Replace the faulty shaft assembly.
- severe violation of the alignment of the special center differential. Such a malfunction can only be eliminated by replacing the unit.
3. Noise from the unit when entering sharp turns or during free rotation of the wheels.
- The special teeth of the satellites or the gears located in the drive of the drive axles have undergone increased wear. Old parts need to be replaced.
- The satellites rotate too hard. Disassemble the mechanism and check for smoothness. If various burrs are found on the satellite teeth, remove them by grinding.
- the spherical or internal cavity of the differential has suffered severe wear. In this case, the differential housing or the entire assembly is replaced.
- The gears in the differential housing began to jam. Replace worn parts and create an axial clearance of 0.10 millimeters.
- The axial clearance between the gears is damaged. Restore the gap by selecting special support washers located in the drive part of the bridge. Be sure to monitor the resistance to rotation to avoid excessive friction between parts.
Disassembly of the Niva VAZ 21214 transfer case.
4. Difficulty shifting gears or setting differential operating modes.
- The sliding shift clutch located on the hub splines or differential housing moves too hard. Replace the parts that have wrinkled splines, and clean the rest with a file to remove burrs.
- The fork or gearshift rod has been severely deformed. The part can be straightened or simply replaced.
- The drive lever was damaged. In this case, it needs to be changed or simply straightened.
- There is a slight jamming of the special levers of the drive mechanism located on the axles. Disassemble the mechanism and check its internal condition. If necessary, carry out a complete cleaning or replace faulty or deformed elements.
- The oil that is poured into the unit is too thick. Fill in oil that matches the climatic conditions of the vehicle.
5. Spontaneous, without driver intervention, turning off or resetting gears, as well as the differential locking mechanism.
- mechanical damage or deformation of teeth. Sand or replace damaged transmission parts.
- The elasticity of the springs of the special handle position clamps is broken or the clamps are clogged with dirt. Clean the retaining devices or replace the springs.
6. There is an oil leak from the transfer case.
- wear of sealing seals of rotating parts. Replace worn rubber elements and add oil to the required level.
- The fastening parts of the oil pan have been weakened. Tighten them and, if possible, replace the gasket.